AirmailAirmail Soars to New Heights with iOS 17 CompatibilityThe contemporary era of digital communication witnesses yet another milestone with the latest Airmail updates, dovetailing impeccably with…Sep 13, 2023Sep 13, 2023
AirmailAirMail for Business: Streamlining Corporate CommunicationIn the age of rapid digital transformation, communication remains the cornerstone of successful business operations. With an overflowing…Aug 30, 20232Aug 30, 20232
AirmailAirMail for Mac: Now Compatible with Sonoma OS!Hello, esteemed AirMail users and tech enthusiasts!Aug 30, 20235Aug 30, 20235
AirmailAirmail for Mac Tip: Automate your email with powerful rulesWe’re big fans of helping you do more with your email faster, which is why we offer unique, powerful Custom Actions on iPad and iPhone…Feb 26, 20184Feb 26, 20184
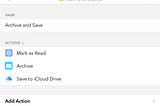
AirmailAutomate your email on iPad and iPhone with Custom ActionsWe designed Airmail to bring powerful email management tools to your fingertips. You can quickly save an email as a PDF to your favorite…Jan 31, 20182Jan 31, 20182
AirmailRead Receipts BetaIn Airmail you can use the plugin for Read Receipts.Jul 21, 201615Jul 21, 201615
AirmailUsing Quick Filter MenuAirmail has a great Quick Filter menu which is located just above the messages list.Nov 7, 20151Nov 7, 20151
AirmailSharing a file from Finder with the Airmail…To share files from Finder in Max OS X is now possible with Airmail’s ExtensionNov 7, 2015Nov 7, 2015
AirmailAdd an Office 365Email AccountAn Office 365 account is the same as an Microsoft Exchange Account. To add a O365 account, follow these steps:Nov 7, 20151Nov 7, 20151