How easy is it to hack my WiFi light bulb?
Or a companies whole line of light bulbs?
Being a frugal student, I bought myself a 20$ light bulb and a 8$ RGB led strip controller so I could turn my lights on using my phone. After the IoT DDoS that took a part of the internet down on October 2016 I decided to check ‘how unsafe’ IoT devices like these light bulbs actually are. Articles describe the “theories” behind hacking “simple” IoT devices and the damage they could do — but how simple is it for a student like me to hack a light bulb (or maybe even all light bulbs of a company)
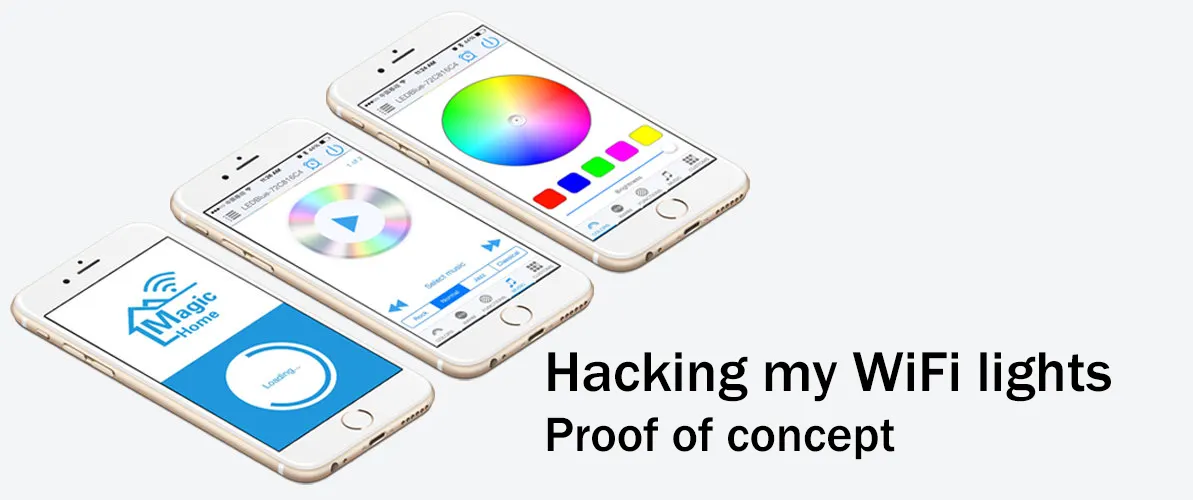
The light bulb and RGB controller I am using are from a company called “MagicHue” and their app is called “Magic Home”.
The following is a proof of concept to make users and manufacturers aware of the dangers in creating/using IoT devices. Controlling lights has been done using personal devices. Information such as sessions, id’s and email’s are masked.
Step 1) What can this light bulb/RGB controller actually do?
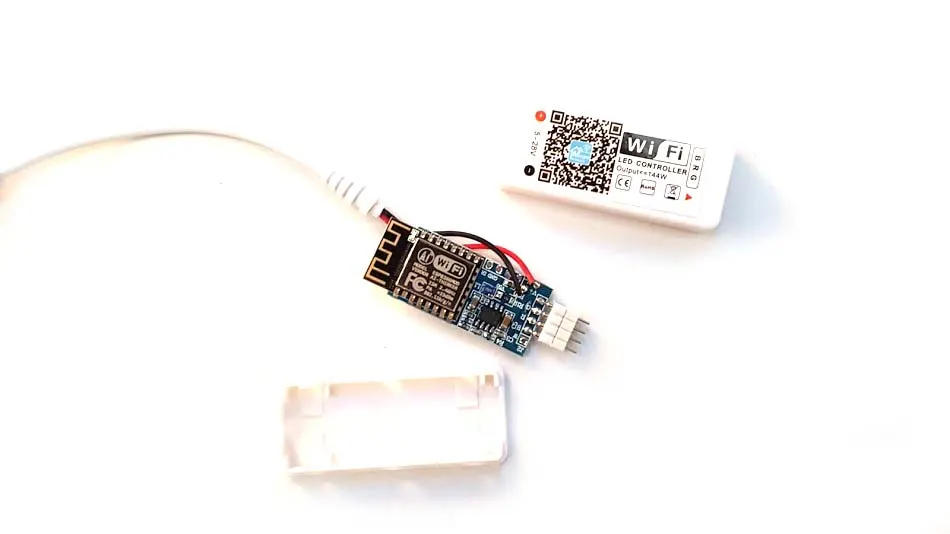
To start, I disassembled my RGB led controller to see what is actually in there. It turns out to be an ESP8266 providing both the WiFi connection and code that makes the actual thing work.
An ESP8266 is a cheap controller I actually used a lot in combination with an Arduino, so I did have some background information on it.
The controller is simple and just does what it is programmed to do. I can understand that a smart device running a Linux variant would’ve been way easier to hack. But that doesn’t mean this thing can’t be controlled/hacked.
Step 2) What can you do with it?
The next step a hacker would take is analyzing what actually can be done with the IoT device (in this case an RGB led controller).
- Turn the lights on and off
- Change the color and brightness
- Control using an iOS and Android app
- Bind a bulb to an account so it can be controlled from everywhere
Step 3) Reverse engineering the server connection
Now that we know that the light bulb controller itself doesn’t really have a lot of ‘easy to notice’ vulnerabilities, it is time to look for those vulnerabilities on the server the devices are connecting to.
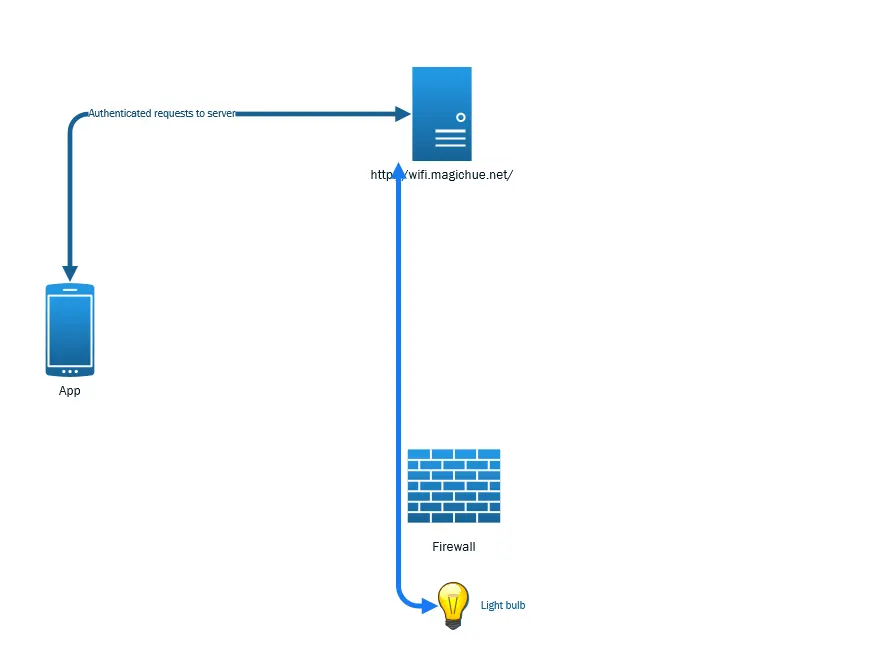
So like all remote IoT devices behind a firewall they connect to a server that gives your light bulb commands. When your phone makes an “authenticated” request to the server, it is able to use the server to relay actions to your light bulb.
The question you have to ask yourself as a developer:
“How will I know what light bulb is connected to a specific user?”
To do this the device needs to have “something unique” for that user/light bulb.
A good way would be to generate a random and secure key (or request a unique key from the server and store it somewhere on first start).
Requesting an unique key from a server allows you to keep the method you are using the generate the unique key private + it helps to give you server side control on how many keys are actually being generated.
But did the developers that created this ‘cheap’ hardware chose this approach? That is what we are going to find out …
Step 3.1) Analyzing the light bulb to server connection
This step is not always possible since some servers may communicate over SSL preventing you from reading the actual packets that the light bulb is sending to the server.
I prepared the light bulb for remote connection. So It should be doing something with the server at that point:
- It either polls the server for changes (sending a request to the server every interval)
- It initializes a keep-alive connection with the server (resource intensive for a server with many light bulbs)
I used Wireshark to sniff the traffic that was coming from my light bulb.
The things I found didn’t really help me further, so I went on analyzing the application traffic. On other IoT device it is probably recommended to continue analyzing the IoT<->server traffic.
Step 3.2) Analyzing the app traffic
Checking the connection between the Android app and the server is easy. I used an app called “Packet Sniffer” that launches a MITM on a non-rooted Android phone and even allows you to see SSL requests in plain text.
From earlier research I did to automatically turn on my lights when I enter my room I know that the connection between the App and light bulb is a normal socket TCP connection sending hex. The connection from the app to the server is done over plain HTTP and actions are send as hex in a HTTP JSON request.
The protocol for the hex commands is for this proof of concept not important, it consists of hex commands followed by their arguments and a checksum — but for testing purposes we will just copy paste commands send from the app.
Checking all the different requests
Most of the time I spend doing all sorts of different requests and saving them so I could analyse/redo them later.
Login:
The login is fairly easy to sniff. It sends the UserId (email) with a hashed (md5) password.
The result is an ASP.NET session cookie used for further actions.
Enabling remote on a device:
This is basically a request that is made when you “Check” a checkbox asking to allow remote control.

Apart from the MAC address there is nothing unique to identify the device. The request does ask for device information, but it is not certain yet if this information will be validated to the connection that the light bulb makes to the server. I do not think that the time zone will be checked, since this is something that can be changed locally without it causing to break the remote function.
Disabling remote on a device:
Same as enabling, but when unchecking the box.

Disabling only requires a GET request with the MAC address.
Checking to what accounts a device is bound:
Apparently the server supports binding a device to multiple accounts. This means we may be able to add someone else their light bulb if we know its MAC address (or brute force it?).

The request is made after enabling remote on a device to display the following information inside the app:

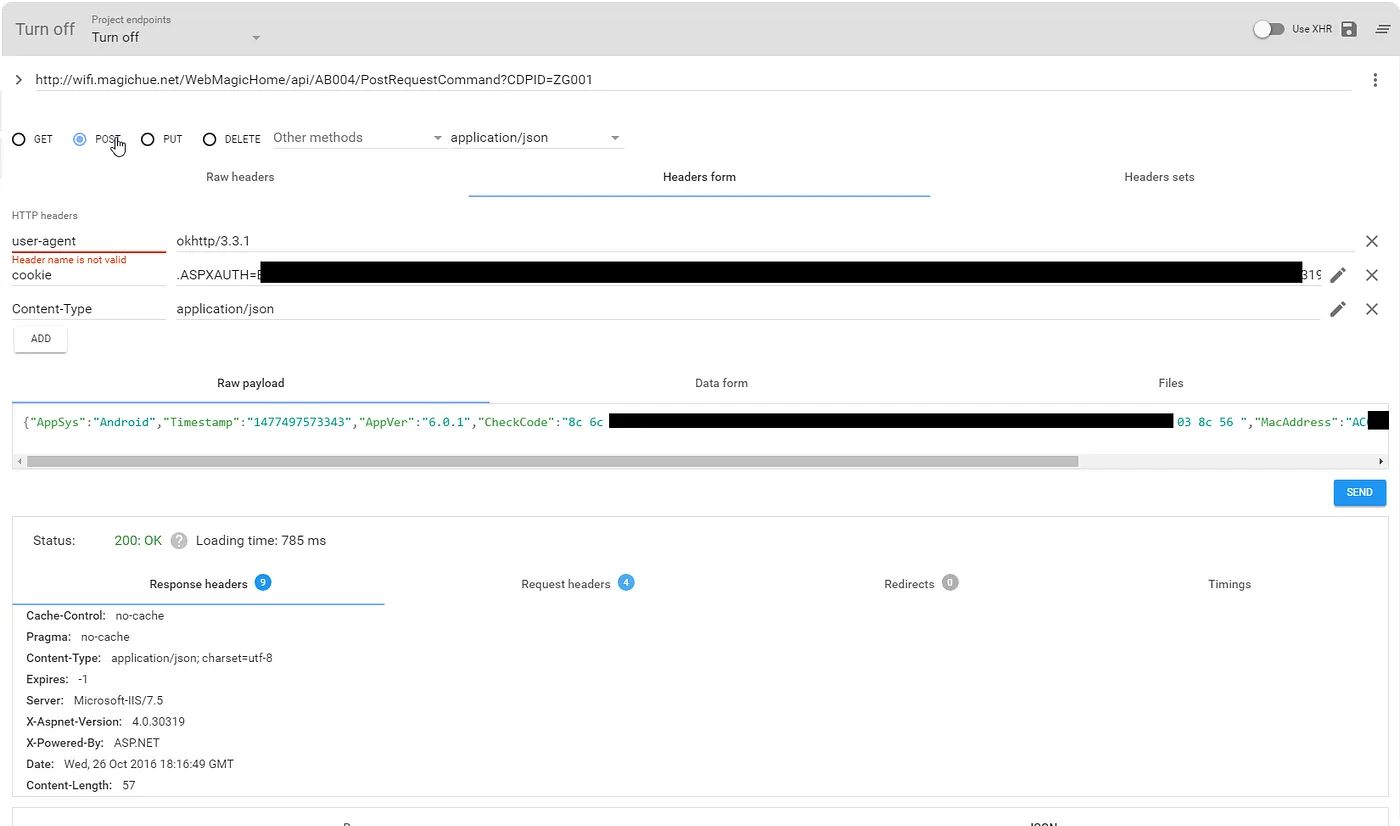
Turning on/off:
Once remote is enabled you can turn it on/off using a request
(note: the hex command is different for on/off/color/…)

Thinking as a developer — What would you do?
We know how a simple “on/off” requests is done:
- The user logs in with a request that takes:
a) The user email
b) The hashed password
c) Some version info
d) A check code (probably a checksum of the request) — UNKNOWN - The response is a cookie used for future requests
- The user enables “remote” on the device sending a request containing:
a) MAC Address (only identifier of a light bulb)
b) Device information and model
c) Some version info
d) A check code (probably a checksum of the request) — UNKNOWN - The request to turn on a light requires:
a) Some version information about the app (copy/paste)
b) MAC Address (only identifier of a light bulb)
c) The action in HEX (copy/paste)
d) A “check code” (probably a checksum of the request) — UNKNOWN
e) Timestamp (probably used in the check code)
You can clearly see that apart from the MAC address there is nothing ‘unique’ to identify a device. There is no unique key that you can’t guess… there is no password per device…. it’s just the MAC address.
Think as a developer. What would you do on each request: What will you check, what will you do but above all… “What will you forget to check”.
Step 4) What protections exists?
Now that we completely understand the working of the server connection we have a full overview of the existing protections and the gaping holes:
- We know that connecting to a bulb from inside the network doesn’t require any password or pin
- Logging in using the app is done over plain text with a hashed password
- Requests to login / performing an action have an unknown “CheckCode” argument
- Light bulbs are bound to an account by their MAC address only
Step 5) Manually creating requests
Once you know “What” requests are made, “How” they are made and “When” they are made — it is time to manually create them and change their purpose.
The first thing I did was executing the EXACT HTTP requests I captured before (without changing anything).
Step 5.1) Turning an already bound device on/off
Result: It worked!
This allows us to conclude a few things:
- The “Timestamp” can be used multiple times and does not need to be in the near future
- The “CheckCode” can be used multiple times
Changing the MAC to an already bound device
The next thing I tried was simply changing the device to an already bound device. This worked as well allowing me to conclude that:
- The “CheckCode” does not take the MAC address into account
Changing the cookie to another account
Feeling hopeful I tried to change the cookie to that of another account I just created. The CheckCode, Timestamp and MAC stayed the same.
The request failed with the following message:
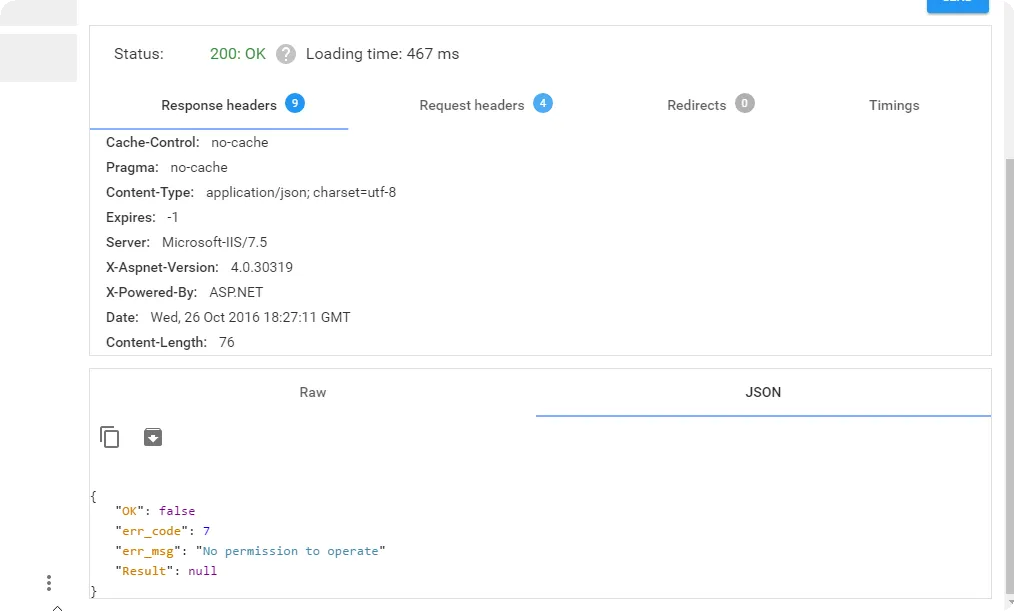
The request failed, but we now know that the problem is either:
- The checkcode depends on the user
- The device needs to be bound first
Step 5.2) Binding a device to an account
To test this, I first removed the device from my account. After that I just executed the same command again.

Result: The request worked, and when I looked in the app the device was in there!
Changing the MAC to another device
This is perhaps the most important test in this article. If this works — it means we can bind to any device by just knowing or guessing the MAC address.
I executed the command from another WAN address than the IP address of the device — so I was certain that wasn’t used as a check.
Result: It worked!
I managed to add a device bound to another account without changing the device specifications.
In the application the new device showed it being bound to two accounts — the icon/information about the device was incorrect since I didn’t change it. This allows us to conclude:
- The “CheckCode” does not take the MAC address into account
- The device can be added by only knowing the MAC address
- The device specifications/type does not matter when adding
Changing the cookie to another account
This test was the same as 5.1, where I just change the cookie to another account that does not have the device bound to it.
Result: It worked!
This lets us conclude a few more things:
- The “CheckCode” does not take the user into account (we now know that this is the same case as in 5.1 , so that means we just need to bind a device first before performing actions on it)
Step 5.3) Turning an unbound device on/off
What we know of step 5.1 and 5.2 is that we can perform an action from the moment we bind a device to an account.
Result: It worked!
After just binding the device I was able to perform the hex command on the newly bound device without any problem.
At this point, we have managed to control any light bulb of that company by just knowing their MAC address.
Step 6) Automating the whole thing
What we did from step 1–5 was research on how everything worked. We may now know how to control IoT lightbulbs of MagicHue by just knowing their MAC address — but what does this actually mean?
Brute forcing the possible MAC addresses
A first thing a hacker could do is just brute forcing the MAC addresses. This may seem impossible — but since we know the manufacturer of the WiFi adapter (ESP controller) we can just brute force within the boundaries of their assigned addresses.
A quick lookup on https://macvendors.com/ learns that the company is called “ESPRESSIF INC.”. Using that name we can lookup the assigned addresses: https://www.adminsub.net/mac-address-finder/espressif
Giving us the first 3 bytes (as of 10/2016 there are 6x ranges).
Lets calculate how much MAC addresses we have to test. Keep in mind that ESP is not just used by these light bulbs — so just a fraction is actually used by MagicHue.
A MAC address consists of 6 bytes. Since we have the first 3 bytes we still have
255*255*255 possibilities = 16581375
There are 6 different OUI (Organisational Unique Identifier) assigned to ESP. So that means the possibilities are 6 * 1651375 = 99 488 250
Trying to bind one MAC address takes about 450ms per request (ASP.NET — explains it all). The request will return if the device is online/offline so we do not need to check this.
This means it would take ~520 days to check all these MAC addresses.
For a hacker, this is fast enough to wait for. Especially when they already have a botnet that can speed up this ‘testing’ action.
Brute force proof of concept
A proof of concept Java application that will loop through possible MAC addresses. I chose a range of MAC addresses that I know are sold in Belgium.
After just a few minutes:

I outputted the list of user email addresses I found for each online device. This proves how “real life” this is.
You may not know the MAC address of the person you are hacking, but you can basically map each MAC address that you find to a living person. That is what makes this so scary.
The “admin@proofofconcept.fake” is an account I made for this proof of concept.
This is how the app now looks like after a 2 minute brute force search:

How will this be fixed?
They can try to prevent it a bit… but they can’t remotely update the existing devices to make them more secure.
This basically means that the current line of devices is vulnerable to hacking regardless of whatever the company tries to do — and a hunch tells me this won’t change in the near future.
Tips:
- Give the devices a unique identifier that is stored on first boot. This ensures that a hacker can’t just guess the MAC address
- Check the timestamps that are send to avoid double requests (slows them down)
- Perform checksums on the requests (slows them down)
- Use TLS — its 2016
- Only allow your IoT devices to be added inside the network they are in
- Possibility of using pin codes for a light can act as a private key (or both)
- Rate limiting the amount of requests
What can a hacker do?
- They can turn all the lights on and off or just change the colors. We are speaking of millions of sold units
- They can see all emails linked to those light bulbs/rgb controllers
- They can see when you timed your lights to go on or off. Maybe see when a specific user leaves his house or has his house in vacation mode?
- They can further exploit it …
Conclusion
Despite having all sorts of ‘security’ measures — I was able to control any light bulb of the company without breaching into the network. Some simple changes like giving each device an unique ID would solve this particular problem ASAP.
IoT devices come in all shapes and sizes. Some have screens, others are smart under the hood without you even really noticing it.
The problem however is that these IoT devices are made by hardware manufacturers that do not really care about cyber security. A light bulb like this may not be able to inflict a lot of damage apart from energy bills, probable fire hazards and stealth burglary — but from the moment these devices get smarter and smarter they have more possibilities to exploit them.
This proof of concept shows that it isn’t hard to hack all sold devices of an IoT company — what is kind of worrying.
Even if companies fix these “small” security issues it just means we have to search for the next vulnerability in a long list to come…
Signed,
Maxim Van de Wynckel