DIY — How to Make a Lightweight Concrete Table with Metal Table Legs
Creating a table or bench out of concrete isn’t as hard as it may seem. In this article, we will describe the entire process of creating a lightweight concrete table using glass fiber reinforced concrete (G.F.R.C.). While the steps we list are used with a G.F.R.C. mixture, this entire process can be used with leftover concrete from a job. Whether you are a hobbyist or a contractor, a good-looking concrete table is a task that anyone can achieve.
Here’s a full list of items we used to make this table (according to contigotool.com)
2 Pails of ProCast
4 Color Packs (2 per pail)
Proline EZ-Accent
Proline EZ-Tique
ProlineNatureShield 100
DuraClean
Buffing Pad
Acid Brush (For DuraClean)
Foam/Wrap (Optional but recommended)
A mold
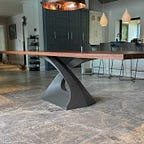
At the end of this article, you’ll be able to find some handmade metal table legs that can pair perfectly with your concrete table top from flowyline.com
Step 1:
If you don’t like the grey color of the concrete, you can add the integral color to make it more interesting. We find that it’s easiest to add the color straight to the water and mix it that way.
This allows the color to evenly distribute throughout the concrete. In this case, to make it woody-like, we add the yellow-brown color.
Step 2:
When we are confident that the color has mixed into the water completely, we start to mix in the concrete mixture. Leave out the bag of fiberglass that comes in the pail. Mix the slurry until there are no clumps and it has the consistency of a milkshake.

Step 3:
At this point, you would think we would just mix in the fibers and pour them into the mold. However, we have found that it’s important to take this slurry and rub it into all of the small crevices in the mold. We do this because it reduces the number of air bubbles you get on the surface of the concrete. Since this mixture is thinner, it is able to get into all of the nooks and crannies. Don’t forget to add form release to the mold.

Step 4:
Now is when you can go ahead and mix in all of the fibers into the slurry. These fibers are what is going to give our concrete its strength without adding much weight and they are the G.F. in G.F.R.C. You’ll also notice that the mixture will become thicker and more viscous after mixing them in.

Step 5:
Then you can pour the mixture into the mold. We used the rest of the bucket for this table before adding the foam insert. We used a portion of another bucket to fill in the edges (see below)
You have flexibility on how much concrete you would like to use. One bucket of ProCast can be enough, but the table will turn out to be thinner at 1–2 inches thick. If you want to get a full-thickness table, you will end up using around 1 1/2 or more, depending on the size of your insert.

Step 5':
This is an optional step, but we highly recommend it if you’re looking to make the lightest table possible.
We took two pieces of Styrofoam insulation and cut them to fit the mold, with roughly two inches of spacing around the edges. We also wrapped the insert with plastic wrap so that it can be more easily removed later.

Step 6:
Not its time to fill in the gap you left between the foam insert and the mold. We recommend starting by weighing down the insert to prevent it from moving and so you can get a thinner top (lighter table)
If you’re doing a thicker-edged table as we did, you’re probably going to have to mix another pail for this step. We ended using another half pail.
You don’t have to be extremely careful, just fill in the gap the best you can. You can chip or wipe away any concrete that gets over the edge of the foam.
Once you have the entire edge filled in, let it sit and harden.

Step 7:
Once the table has dried, carefully remove it from the mold. This is where mold release will make your life easier. Take your time when you’re peeling back the edges.
And washing is an important step because it is going to remove all of the residual mold releases that were left on the surface of the concrete.

Step 8:
Now’s the time to get in touch with your artistic side because we are going to be staining the table. We used two different colors for this.

Step 9:
Now for the legs, if you want a lasting, budget-friendly piece of furniture for your home, then there is no better choice than metal legs. Some can bear more than 500lbs
Flowyline Design (flowyline.com) offers a wide range of interesting and elegant table legs design at the best price you could ever find anywhere.
Here are some best-selling models that fit the most with your DIY Concrete table


Read the full article here: https://flowyline.com/blogs/for-diy-ers/how-to-build-an-outdoor-table-with-concrete-top
Address: https://www.google.com/maps?cid=16787952025643628509
More information: https://www.google.com/search?q=flowyline+design