Introduction to Drawing Systems

Hey guys👋👋👋. So this week’s lesson brings back some painful😪😪 (I’m crying on the inside)memories of technical drawing in secondary school and engineering drawing (the worst!!!) in university. Anybody that scaled through these subjects just know that I feel your pain.

Anyways, drawing systems are various types of ways a drawing can be carried to better represent the views of a 2-D or 3-D shape. There are various types which include: paraline, orthogonal, isometric, oblique, planometric and perspective. I’ll explain further below.
Paraline Drawing
This includes all drawings that use parallel lines. Unlike the other systems, this system is the only one that is represented by 2 dimensions.
Orthogonal Drawing

This system is made up of 2 conventions: 1st and 3rd angle. 3rd angle is the most commonly used. When making orthogonal drawings it is important to dimension and avoid circular objects.
Isometric Drawing

This is one of the most used drawing systems as it defines an object with little distortion and it includes the 3 faces of the object. When working with this drawing you must work from a corner view. The lines that project from this view are angled at 30° to the horizontal.
Oblique Drawing

In this style of drawing, the front face of the object is emphasized. The drawing begins with the front view being placed at 90° and the receding parallel lines being drawn at an angle of 45°. There are 2 forms of oblique: cavalier and cabinet.
Cavalier oblique is the drawing that is more suitable for measurement. This style is where all the measurements are exact. This results in a high degree of visual distortion even though the measurements are accurate.
Cabinet oblique is the drawing that is more suitable to display. It corrects the distortion by making the side measurement half of the actual dimension. So it corrects the distortion by altering the dimensions of the original plan.
Planometric Drawing

This is also based upon a corner view unlike the 30° isometric style, this has plane receding lines at 45° angle. This style is most commonly found when the top plane (often the roof of a house) or the interior face is the main focus of attention. It can also be represented using 30°/60°system, the system is more common when a longer view required.
Perspective Drawing
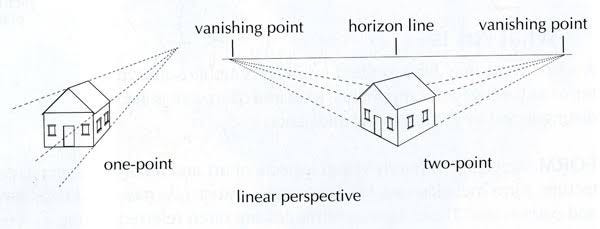
In this drawing, the receding lines are no longer parallel but share one or two vanishing points. There are 2 types of perspective drawing: one point perspective and two point perspective.
One point perspective drawing can be linked to oblique drawing, as it is places emphasis on the front plane of an object. This drawing has 2 vanishing points.
Two point perspective drawing can be linked to isometric and planometric drawing as it can equally represent 3 planes depending on where the vanishing point is placed. This drawing has 2 vanishing points.
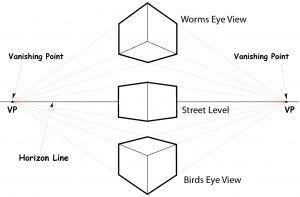
When the vanishing points in both styles are placed above the horizon line, the top of the object will be clearly visible. When placed on or at the horizon, neither the top nor the bottom will be visible. If you place your vanishing point below the horizon line, the base of the object will come into view.
So that’s it for this week’s lesson, can’t wait for what next week brings. Have a great week guys 😘😘😘.

