One Simple Trick for Recording Vocals in Logic Pro X!

I am overjoyed to report that I have found a solution to one of my biggest complaints when switching from Pro Tools to Logic Pro X!
(I compared the two in a previous post) The efficient workflow I relied on for recording vocals in Pro Tools became ungainly in LPX, but after multiple deep dives into user groups and forums I stumbled on one little feature that changed the game. Yes, like internet clickbait headlines I’ve discovered “one simple trick” to make your vocal workflow better.
To save you time the trick is the “Pack Take Folder” feature, and if you want to skip ahead to my explanation of how to use it, jump to the “Pack Take Folder” section below. First I’ll explain why I was looking for something like this in the first place and why it was so crucial to me for recording vocals.
The Problem
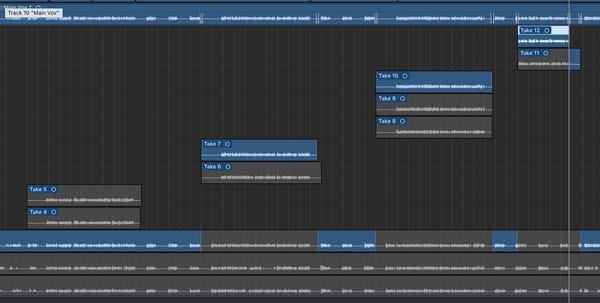
As I mentioned in my PT to LPX comparison essay, the way LPX automatically creates take folders makes the workflow for recording vocals an absolute mess. Each time you punch into the vocal track, even if it’s just for a couple of words or one verse, it creates a new take, adding to the vertical stack of takes and filling up screen real estate. The more takes filling up the screen, the more difficult it becomes to comp together the final vocal track because you’re constantly scrolling up and down to audition sections of audio. Even if you have “Replace Record” enabled, which is supposed to record new audio into the current track, it only works the first time through the song. Once you create a take folder and start on the second full vocal performance, each punch in, even with Replace Record enabled, creates a new take. And those takes add up quickly.

None of the tutorials I saw about comping vocals in LPX, addressed this issue. They all had singers happily singing an entire song three or four times through, resulting in only three or four takes to work with in the take folder. Who records like that? There’s no way you’re going to get the best performance singing the whole song a few times through. You’re going to need to punch in to get a word or line just right. The lead vocal is like a close up shot in a movie, every detail and nuance is magnified and you need to get the best and most compelling performance for each and every line.
In Pro Tools you could manually create a new take (their term is “playlist”) and punch into it as needed. You could take the time to get a good, full version of the song — line by line if you like — before you created the next full performance. This process gives you four or five (or however many you want) performances of the whole song, and when it comes time to comp the vocal track you only have to navigate four or five vertically stacked tracks.
It was incredibly frustrating and almost a deal breaker not to be able to use this Pro Tools vocal recording workflow in Logic Pro X.
Except, you can.
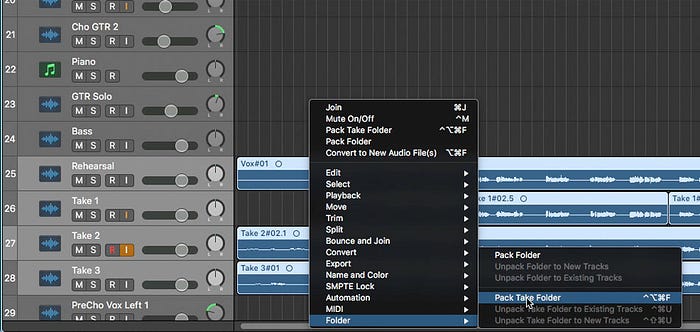
Using this one simple trick! The “Pack Take Folder” function that’s buried in a pop-up menu you can only get by clicking on multiple audio regions!

Pack Take Folder
To use this feature to make Logic Pro X vocal recording more like Pro Tools, you’ll need to record each vocal performance on a new track. When you have all of your full-length performances where you want them — punching in over mistakes, going verse by verse, whatever — you use the “Pack Take Folder” to combine the tracks into a take folder. From there you can use Quick Swipe Comping to comp together a final vocal track. I’ll elaborate:
The first step to this workflow is to set LPX into “replace record” so you can punch in to your vocal track without creating new takes. You can record one verse at a time, punch in to fix a blown note or bad diction, all without creating a new take folder. Take folders are your enemy (for now)!
When you’re happy with your first full performance of the song and want to start the second, instead of creating a new take, duplicate the entire vocal track. I do this by option clicking the track header of the vocal track and dragging it down until you see a transparent copy of the track floating under your mouse. Release the mouse button and a new track is created with the same plugins and bus sends. I rename the tracks “vox take 1” “vox take 2” etc., delete the copied audio regions in the new track, mute the previous track, and then start recording.
You can punch into each track as needed, getting useable, full performances on each. Repeat this process until you’re confident you have enough good performances of the whole song to make a final comp, or until you’re singer gives up and says “make it work!”
Now it’s time to Pack Take Folder, a feature so buried I didn’t know it was there for a full gall-darn year. Shift click the track headers of all of your vocal tracks, which will select all of the audio regions in all of the tracks (they should be highlighted). Next, right-click (or option-click) on one of the highlighted audio regions to get a pop-up menu. Select the word “Folder” at the bottom of the pop-up menu for the submenu, then select “Pack Take Folder.” You can also press Command-Option-Control-F if you have enough fingers and can remember that.
Now all of your separate vocal tracks are moved into a take folder on the top track. The new take folder behaves like any other, allowing you to Quick Swipe Comp, create alternate comps, etc.
Cleaning Up The Vocal Workflow
Once you have your vocal comp together (there are plenty of tutorials on comping) there’s one more step to mirror the Pro Tools workflow: exporting the comped vocal to a new track. You do that by clicking the letter at the top of the take folder to get the drop down menu, then selecting “Export Active Comp to a New Track.” This creates a new track with the comped vocal as audio regions rather than a take folder. You need to do this to strip silence, add fades to the beginning and end of each audio region, and do the other vocal cleanup stuff you need to do before mixing. I prefer to export the comp rather than flattening it because once you flatten a comp you can’t go back! I save the original comped vocal track containing the take folder (and mute it, of course) in case I want to go back and pick a different take for a word or line, which, if you’re recording for clients, is something they’ll always want to do.
So there you have it: One Simple Trick that has helped me immensely by streamlining my vocal workflow and making it more efficient and Pro Tools-like. I still prefer the way Pro Tools handles playlists over Logic Pro X’s take folders, but with this workaround the difference is much more manageable and most importantly, the dread of an unwieldy take folder won’t discourage me from punching in to get a line just right.
Let me know if this process works for your or if you have any thoughts, questions or suggestions!
