Transfer Your Image to Cartoon Style in Stable Diffusion
Introduction
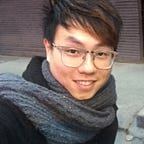
We will use image to image generation to transfer a photo to cartoon style and explain basic ideas on how to tune parameters in stable diffusion WebUI.

If you don’t know how to install stable diffusion, download checkpoints and VAE, please check out my last blog.
Step 1: Install Checkpoints
We will use a checkpoint called Mo Di Diffusion. It is a fine-tuned Stable Diffusion 1.5 model trained on screenshots from a popular animation studio.
Download the model:
cd ~/stable-diffusion-webui/models/Stable-diffusion
wget [<https://huggingface.co/nitrosocke/mo-di-diffusion/blob/main/moDi-v1-pruned.ckpt>](<https://huggingface.co/nitrosocke/mo-di-diffusion/blob/main/moDi-v1-pruned.ckpt>)
Step 2: Quick Test Img2Img
- Reload the model, and select the moDi-v1-xxx model
- Select the img2img tab
- Prompt: modern disney style
- Negative prompt: woman
- Hit generate button

You will see the generated image is not similar to original image. We will start tuning the parameters.
Step 3: Understand Parameters
Lets have a basic understanding about these parameters.
Sampling Steps
The number of sampling steps in Stable Diffusion represents the iterations required to transition from random noise to an image that corresponds to a given text prompt. Generally speaking, increasing the sampling steps results in more detailed images, but it also leads to extended processing times.

You can see the more step, the image is more details.
Approximately 25 sampling steps typically enough to generate high-quality images. While adding more steps might not guarantee improved quality. Moreover, using a higher number of steps inevitably increases the wait time for image production.
Further Reading:
- https://onceuponanalgorithm.org/guide-what-are-sampling-steps-and-how-to-reduce-them-in-stable-diffusion/
- https://getimg.ai/guides/interactive-guide-to-stable-diffusion-steps-parameter
CFG Scale
Like Seed, the CFG Scale is another setting in the Stable Diffusion model. This setting changes how close the picture looks to the prompt or input image. If the CFG Scale is higher, the output will match the input more, but it might be distorted. If the CFG Scale is smaller, the output may not look like the input, but the quality will be better.
Further Reading

Left is CFG = 4, Right is CFG = 29. you will need to test and find a balance.
Denoising Strength
Denoising strength controls how much change it will make compared with the original image. Nothing will change when you set it to 0.

You will get an unrelated inpainting when you set it to 1.
Further Reading
You can see too small would change nothing, too large would get unrelated image.
Step 4: Parameters Tuning
Adjust Image Ratio
Remeber to edit the width and height to fit your image ratio.

XYZ Plot
Different combinations of steps, denoising strength, and cfn values will yield varying results and quality. To efficiently determine the best combination, we can use an x/y/z plot script to generate an image based on different combinations.
- Select X/Y/Z plot in Script
- X type use CFG Scale, value input
5-8 (+0.5) - Y type use Denosing, value input
0.2-0.8 (+0.2) - Hit Generate button

The CFG Scale 5-8 (+0.5) means that it will generate images using CFG scales 5, 5.5, 6, 6.5, and so on, increasing by 0.5 until it reaches 8.
You will able to obtain a matrix image like this

Once you have a range you like, you may further adjust the X/Y/Z plot’s value for a more detailed tuning, for example make the step smaller.
- X type use CFG Scale, value input
7-8 (+0.2) - Y type use Denosing, value input
0.25-0.4 (+0.05)
Step 5: Generate Final Result
Pick the Parameter you like and Generate Again! For example I like CFG scale 7.9 and Denoising Strength 0.4.

You will able to obtain your final cartoon image!


Conclusion
We have discussed the basic ideas of tuning Steps, Denoising Strength, and CFN values. Then, we used an XYZ plot to generate images using different combinations.
Finally, we converted an image to a cartoon style.
Currently, we build the entire stack on a single machine, which is not scalable. I am considering writing more about the server architecture to address this issue. Please let me know if you are interested!
If you enjoyed this blog, please consider following me on LinkedIn for more content like this!