3D Print Overhangs and How To Deal With Them
You know why you want to 3D print, how to 3D print, and even how to deal with scaling & slicing issues, but you’ve come across one more thing. Your print has an overhang. When there aren’t any surfaces to pipe the material onto, the model will droop and curl instead of shaping into the form you made.

Given this unfortunate side effect, there are three main ways to deal with overhangs, each with their own positives and negatives:
Support Structures
A common way to deal with overhangs is by generating support structures. These are towers that rise up from the ground to hold the sections that can’t hold themselves up. They can come in a variety of patterns and forms, depending on what software was used to generate them.
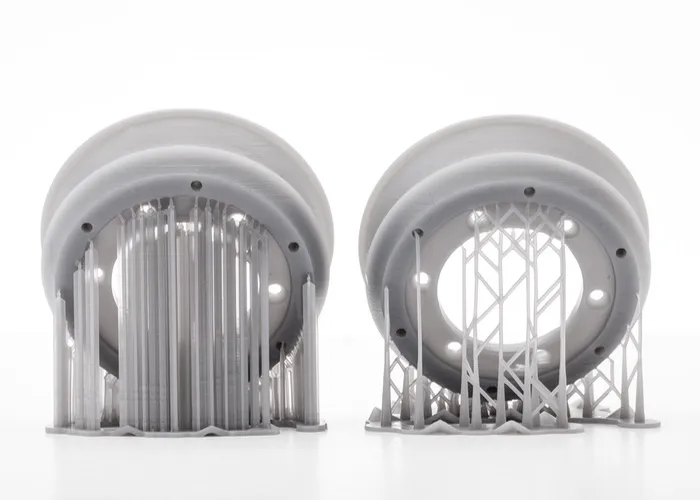
After the print is finished, they can be ripped out to leave the model as intended. As ideal as it sounds, this is also the downside to this method — the places where the model had support structures attached will have a rougher, less clean finish.
One situation where you may want to use support structures is when printing a structure with steep overhangs that aren’t flat, while also requiring high accuracy. The support structures will leave the shape exactly as intended, and as long as the finish doesn’t matter too much it will print out fairly well. For example, if a 3D printed tree’s branches were at too steep an angle, support structures would keep the form as close to the digital form as possible.

Note: Some printers have two nozzles and are able to print two separate materials in the same print! Special foundation materials can be used in these prints to make support structures that come cleanly off the rest of the print without hassle.
Slicing
Another technique for dealing with overhangs is slicing the model up, and then gluing it back together again. When overhangs are flat, slicing at that point creates two objects that can both be printed flat on the ground.

Some of the downsides to this method are that it doesn’t work when the overhangs aren’t flat, and that the split is often visible (depending on your craftsmanship!).
These limitations mean that slicing is the appropriate method only when printing a large uninterrupted flat overhang. For example, a print of a suspension bridge should be sliced so that excessive amounts of support underneath are avoided, leaving the surface smooth and reducing printing material waste.

Angle Deforming
Cura includes an experimental technique for dealing with overhangs, going by the name “Make Overhang Printable”. To deal with overhangs, this method finds the overhangs it can’t print and angles them down so that they can be printed.

This method takes away the hassle of having to do anything after the print is finished (no structural supports to remove or gluing to finish!), making it very easy to implement. It does however leave the model deformed, and is still an experimental feature — it hasn’t been fully tested so it may not work as expected.
It’s a good idea to use angle deforming when printing something that has a lot of overhangs on top of each other. It’s difficult to see the angling if you haven’t been told about it previously (especially when the overhangs aren’t too deep), and the surfaces look much cleaner than their structural support counterparts. For example, a print of an apartment block with lots of balconies would print well with this technique, keeping the surfaces of the balconies’ finishes clean, and would take much less time to prepare since there aren’t any structural supports to remove or pieces to glue.

Model Rotation
Depending on your model, sometimes it’s possible to avoid any deformations, slices or support at all — if you rotate your model correctly. If there’s one side of your model that is entirely flat, and there aren’t any overhangs when rotates that direction, printing with that side as the floor is the best way of dealing with overhangs in your print.

Having said that, this is fairly rare. Only a very small portion of prints will be able to be rotated to avoid overhangs — but this technique can be applied with others (usually the slicing technique) for good results for a lot more forms. For example, a sphere can be sliced in half and printed with the flat side down for both halves to avoid needing any supports or deformations.

In the end, I recommend you try them all at least once. After some practice, you’ll come to know which methods you prefer. Personally, I don’t like slicing as I don’t like the aesthetic of prints that have been glued back together — I’d rather rotate or angle deform ideally, and if necessary use support structures, sanding any bad surfaces down. Plenty of people disagree with me. Let me know what you prefer!
Have you enjoyed this series on 3D printing so far? Found anything useful? Here are all the previous articles if you haven’t already read them:
- Why You Should 3D Print Your Architectural Model
- How to 3D Print Your Site Model Using SketchUp
- How to Scale Your Architectural 3D Print
- How to Split Your 3D Printed Site Model
There’ll be more to come in the future, but we’re not quite sure what topics yet. Let us know what you want to hear more about.