What I learned about WebSockets by building a real-time chat application using Socket.IO.
In this article, I take a deep-dive into the world of WebsSockets, looking at the history of HTTP and the web and the use of WebSockets on the modern Web. I also list 16 steps to building your own real-time chat application, allowing you to gain hands-on experience with this powerful technology. I highly encourage that those with a basic grasp of web development take 20 minutes to follow along. The project uses Node.js, some vanilla JavaScript and a pre-built front-end.
As users, we are used to our apps sending and receiving mass amounts of data right there on screen without us knowing about it. Think about it, when was the last time you had to hit refresh in your favourite app or website?
Whether it’s gaming, waiting for an email to come through, looking at a twitter feed or using an instant messaging app, we simply expect the data to be sent from the server and render itself to our device screen with the ability to further filter and refine it according to our needs, as if by magic.
And if that wasn’t enough, we, the ever-demanding user, expect to send data back to the server and see it appear on the screen, without ever refreshing the page.
If this doesn’t sound all that impressive to you, that’s because it’s not. Not because it’s not difficult or complicated, but because the real-time experience has become so integral to our interactions with technology, and so commonplace in our everyday use of it.
Applications that respond instantaneously (or so quickly as to appear instantaneous) create a seamless user experience. They reward users instantly and repeatedly with fresh content, be it the live price of their cryptocurrencies, an instant messaging conversation with a friend or a game of online blackjack.
Nowadays, we take this type of instantaneous behaviour for granted in our apps, but there was a time in the not-so-distant-past when a web user would have to refresh the browser to get access to fresh content. Not only does this feel clunky to our modern sensibilities, it’s also a monumental waste of time.
Imagine today’s 4.5 billion web users had to refresh the page each time they wanted to see new content, and imagine this resulted in an efficiency loss of, say, ten seconds per person per day. If we add together all those wasted ten second blocks together, that would result in a total of 45 billion seconds of wasted time each day, or 1,427 YEARS!
Impressed yet?
So which miracle technology enabled this miraculous, instantaneous, bidirectional communication behaviour on the web, and who do we have to thank for bringing it to us? To understand that, we have to take a brief detour.
HTTP 1.0 and the early web
Hypertext Transfer Protocol (HTTP) is the set of rules and information systems that first enabled data transfer across the web. In short, HTTP 1.0 involved a request response cycle between client and server. There are a few important things to note about HTTP 1.0 and the request-response cycle.
First, the request is always initiated by the client.
Second, one (successful) request from the client always gets one and one only response from the server. After that, the connection between client and server is closed.
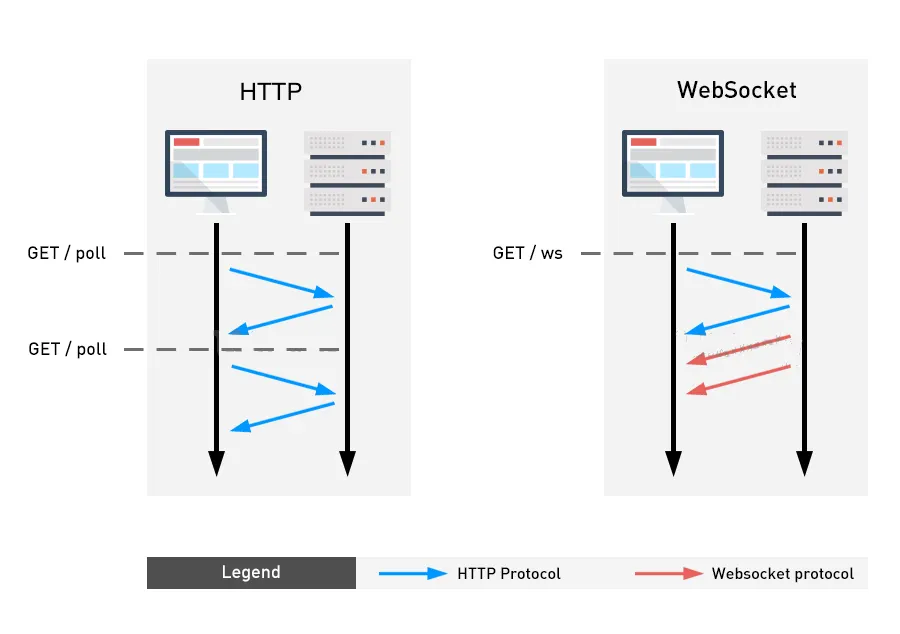
If a user wanted to send 100 messages to the same person on a chat app, if they were using HTTP 1.0, that would mean 100 separate request — response cycles. As for the lucky person on the receiving end of your hundred-message tirade, well, they would have to refresh the page to check to see if your stream of consciousness was still ongoing.
Herein the problem lies. Because the connection between server and client is lost at the end of every request-response cycle, the server does not typically maintain information about previous requests or the state of what the client sees, HTTP is therefore known as a stateless protocol.
This type of stateless behaviour is fine, and even useful, where we simply want to see static content on a page, for example reading a wikipedia article or checking the news. In these cases the statelessness of HTTP minimizes the amount of data that needs to be transferred, rendering all of the necessary content once, and doing nothing until a separate request from the client is received.
And of course, there are other ways to store state about a user and their browsing session. Cookies, anyone?
However, as we discussed, there are many cases where we need the server to keep information about the state of the application, and we want the server and client to be able to make requests for and receive data, independently of one another and without any turn-taking or order of precedence.
The introduction of AJAX allowed users to make a request to the server and receive a response, without reloading the page. This went a long way towards solving the problem of the seamless user experience, but did not solve the problem of allowing the server to send data without being requested to do so, or to persist any long term connection between multiple clients and a server.
This is where WebSockets enter the picture.
The real-time web: HTTP 1.1 and WebSockets
Developers Michael Carter and Ian Hickson started working on WebSockets in 2008 in response to the problems outlined above. WebSockets are two things: a set of rules for client and server on how to establish communication and transmit data to each other; and a transport layer for data exchange. WebSockets support exchange of a variety of data formats including JSON and XML.
In a normal HTTP 1.0 request, a client initiates a request to a server. The client informs the server that it wants to do something with a particular resource. The client also sends information about the url at which the resource can be found. This information is contained inside a request header, along with an explicit statement of the HTTP protocol to be used (in this case 1.0).
The server then sends a response with a status code that gives information about the success of the request, about the content being sent, in addition to the content itself.
All of this takes place over a TCP/IP socket. WebSockets are built on top of the TCP layer (a data-transport protocol that depends on two hosts having a connection before any data can be sent), and modify the TCP/IP socket so that client and server can agree for the socket to stay open.
Keeping this socket open is the crucial step in enabling bidirectional communication. Without this, there would be no WebSockets, and using the web would still revolve around a request — response cycle, wherein a user would always have initiate the request to the server to do something with some data.
With the connection persisted, all that remains is for an agreement to be reached about how the data being exchanged should be interpreted by both parties. This is known as a WebSocket handshake.
A WebSocket handshake is much like simple HTTP GET request, but this request contains an ‘upgrade header’, which requests that the server switches to a binary protocol using a WebSocket and gives some information about the WebSocket connection. The server responds with a 101 header to confirm that it is switching protocols, and the WebSocket is open. Real-time data exchange between multiple clients and a server can now take place.
The image below shows a normal everyday HTTP GET request header. We see that the connection uses HTTP 1.1, and as a result, the ‘Connection’ is set to ‘keep-alive’. Readers will recall that this functionality was introduced in HTTP 1.1 and allowed a persistent connection between client and server to be kept open. This formed the foundation of WebSockets.

Next, we can see an example of an ‘upgrade header’. One of the first things that we notice is that the request URL is prepended with ‘ws://’ as opposed to ‘HTTP://’. This tells us that a request is being made to use the WebSockets protocol as opposed to HTTP. We can also see a ‘Connection’ header and an ‘Upgrade’ header. The former attempts to upgrade the connection to a binary protocol, while the latter allows the client to specify which protocol they would like to upgrade to, in this case, WebSocket.

Providing the request is successful, a WebSocket connection has been made. The server can now emit, via a WebSocket, real-time updates on football scores, chat messages from the client’s friends and more. Not only that, it can do so unprompted by an initiating request from the client, and it can do it over, and over, and over again.
Likewise, the client can send whatever it chooses, whenever it chooses, providing the connection is kept open and the request being sent is in accordance with the agreement reached by both parties during the WebSocket handshake and upgrade process.
The significance of this technological innovation is not to be underestimated. It has transformed the way we use the web, and spawned untold amounts of innovation in the way technology entertains and serves us.
And it all boils down to the WebSocket handshake process, complete with a request from client to server containing an upgrade header, sent across a persisted connection enabled by both parties agreeing to keep a TCIP/IP socket open.
So what does implementing this fantastic technology involve? I took a look at a popular WebSocket library to get a feel for how difficult WebSockets are to implement.
WebSockets in modern web development using Socket.IO
One of the most popular libraries enabling users to use WebSockets in their projects is Socket.IO. But what exactly is Socket.IO?
Well, according to their website,
“Socket.IO is a library that enables real-time, bidirectional and event-based communication between the browser and the server. It consists of:
- a Node.js server: Source
- a Javascript client library for the browser (which can be also run from Node.js)”
At its most simple, then, Socket.IO simply adds a syntactic ‘wrapper’ around the standard WebSockets API found in node, making it slightly easier to read and work with.
I was interested to read in Socket.IO’s documentation, under a section titled ‘What Socket.IO is not’, that Socket.IO is NOT a WebSocket implementation.
So what is it then?
Socket.IO’s purpose is to enable “real-time, bidirectional and event-based communication between the browser and the server”. Most of the time, this means giving us a slightly more usable interface than the WebSocket API that comes with Node.
Sometimes, however, WebSockets can be difficult to establish, for example in the presence of proxies or load balancers. In these cases, Socket.IO will use Engine.IO to establish a long-polling connection between server and client, while trying to upgrade to better transports like WebSocket.
In brief, long-polling is a method of maintaining a close-to-persistent connection between client and server. In long-polling, the client sends a request to the server, and the connection is not closed until the server responds. Immediately following the response and the closing of the connection, the browser resends the request, thereby reopening the connection. While this does create the impression of a persistent connection between client and server, it does not truly enable bidirectional communication, and is a far less versatile than WebSockets.
A quick look at at Socket.IO’s ‘Emit cheat sheet’ gives an idea of the simplicity and versatility of WebSockets with Socket.IO.

Reflections on using Socket.IO
My first reflection on Socket.IO was how simple it was to use. Just a few simple steps can open up a world of possibilities.
On the server side, simply:
1. Require the web server and pass in the port on which you want to listen
2. Listen for connections
3. Within the body of the connection, send or emit events, listen for specific events, and broadcast to all clients except the sender, and much more.
While over on the client side, all I had to do was:
- Create a WebSocket and listen on the port where my app is being hosted
- Set up event listeners to listen for specific events
- Create event emitters for when the client wants to send data back to the server.
Indeed, there doesn’t seem to be much to using WebSockets at all. In short, we can create a server-side Socket object by simply importing the Socket.IO library and setting the port we want to listen on. Logging the Socket object to the console gives us a good idea of what it looks like.


As we can see from the images above, the Socket object contains a wealth of information about the connection between client and server, as well as exposing methods for event handling, error handling, and much more. In the images above, for example, we can see that there is a count of how many clients are connected to the server, and that each socket has a unique ID.
Putting it into practice: using Socket.IO to build a real-time chat application
To learn even more about Socket.IO, I followed this excellent tutorial by Web Dev Simplified, that uses Socket.IO to build a real-time chat app.
I condensed the process down into 16 steps, which I walk you through below.
Because this activity focuses specifically on the implementation of WebSockets, we are not too concerned with the front end logic, but it should be noted that there are more ideal solutions to building out a front end for an app like this. We use a pre-built index.html front end available here.
To run the front end code, I used the amazing Live Server extension for Visual Studio code.
1. First things first, you need to make a project folder. Grab the index.html from the link above, and put it in your project folder. Use Live Server to launch your front end server and see your html in the browser.
2. We will need a few dependencies for this project to work. Set up your project as a node project by running npm init in the command line. Install Socket.IO, and Nodemon as a development dependency, by running npm i socket.io followed by npm i --save-dev nodemon. Nodemon will restart the server every time we make a change in the backend.
3. In the package.json file, replace the entire "scripts" section with the code block below. This will allow us to start our server by running npm run devStart in the command line.
"scripts": { "devStart": "nodemon server.js"},
4. Create a server.js file which will hold our server code.
5. Now for the fun part. Go into your server.js file and bring in the Socket.IO using require syntax. Socket.IO allows us to pass in the port that we want our server to run on as part of the require statement, which is neat and intuitive.
const io = require('socket.io')(3000);6. Now we have created a server, we can listen for connections. Using Socket.IO’s simple .on method, we can listen for a connection event and open a WebSocket for each individual user who makes a connection. The server can emit a response to each user through this socket using the socket.emit method, where the first parameter is the name of the event and the second is the data. In Socket.IO, there are some reserved event names that should not be used to name your events. Outside of this list, you are free to name events whatever you want, giving us the ability to write server code that is easy to understand. In the example below, on each connection to our WebSocket from a client, we send back a string called ‘chat-message’ with the text ‘Hello world’
io.on('connection', socket => { socket.emit('chat-message', 'Hello World')});
7. We can listen for connections on the server side. Now we need to handle the client side. Create a script.js file which will store the client-side javascript. In this file, simply create a socket connection by passing in the url where we are hosting our application to Socket.IO’s special io() function, which is available in global scope for use.
const socket = io('http://localhost:3000')8. Now we have a client side socket connection set up, we can listen for the event that we named ‘chat-message’ above using the .on method, passing in a callback function which takes the data we passed down from the server side (the string ‘hello world’) as a parameter. Add this code in to your scripts.js file
socket.on('chat-message', data => { console.log(data)});
9. To allow users to send messages to each other, we need to capture the data in the input field when the user presses send or submit. We handle this on the client side by grabbing the input field, grabbing the submit button, and adding an event listener. It is important to prevent the default submit behaviour (a page refresh) to stop the page from reloading and the messages being wiped. We do this inside the event listener callback.
const messageForm = document.getElementById('send-container')messageForm.addEventListener('submit', e => { e.preventDefault()})
10. Also inside the event listener callback, we grab the value from the input field, before repeating the socket.emit behaviour from step 6, which sends the message data back from the client side to the server side, again in the form of an event. We will name the event ‘send-chat-message’. Finally we reset the value of the input field to an empty string, thereby clearing it.
const messageForm = document.getElementById('send-container')const messageInput = document.getElementById('message-input')messageForm.addEventListener('submit', e => { e.preventDefault(); const message = messageInput.value socket.emit('send-chat-message', message) messageInput.value = ''; })
11. We have emitted an event from the client to the server.js containing a message string. Now we need to listen for the event on the server side using the familiar .on method. We can then take this event and use the .broadcast.emit to send the event to all clients except the sender.
io.on('connection', socket => { socket.on('send-chat-message', message => { socket.broadcast.emit('chat-message', message) })});
12. Back on the client side in script.js, add a function that appends a message to the DOM each time a message is sent. We also need to prompt the user to give their name in order to be able to identify who sent each message. We then emit this event from the client side to announce that a new user has joined the chat. We name the event ‘new-user’ and emit it with the user’s name that we capture from a javascript prompt.
Underneath our call to io(‘http://localhost:3000') add the following:
const name = prompt('What is your name?');appendMessage('You joined');socket.emit('new-user', name)
13. To handle the ‘new-user’ event on the server side, we again need to listen for the event using the .on method. Because each WebSocket has its own unique ID, we can use this as the unique reference for each user, and store these on a users object. Now we can get the user’s name by looking at the users object to see what name is stored next to the socket ID. We then broadcast this users connection to all other users using another .broadcast.emit on our socket, emitting an event with the name ‘user-connected’ and the name. We will also update our ‘chat-message’ event to pass down an object containing both the message and the user’s name.
const io = require('socket.io')(3000);const users = {}
io.on('connection', socket => {  socket.on('new-user', name => {    users[socket.id] = name;    socket.broadcast.emit('user-connected', name)  })  socket.on('send-chat-message', message => {    socket.broadcast.emit('chat-message',
    {message, name:  users[socket.id]})  })});
14. Now we can use these changes on the client side. Modify the socket.on event to append both the message and the user’s name on receiving a ‘chat-message’ broadcast. We also want to update the event listener on our message form so that the DOM shows the user their own messages too.
socket.on('chat-message', data => {  appendMessage(`${data.name}: ${data.message}`)})
messageForm.addEventListener('submit', e => {  e.preventDefault();  const message = messageInput.value  appendMessage(`You: ${message}`)  socket.emit('send-chat-message', message)  messageInput.value = '';})
15. Finally, we handle what happens when a user disconnects. Inside our server.js, we use the trusty .on method, but this time we listen for an inbuilt event named ‘disconnect’, passing an anonymous function in which we emit an event which we name ‘user-disconnected’, and pass the user’s name, referring to the appropriate socket.id property on our users object. Then we use the delete keyword to delete the user from our users object.
The final version of our server.js should now look like this:
const io = require('socket.io')(3000);const users = {}io.on('connection', socket => {  socket.on('new-user', name => {    users[socket.id] = name;    socket.broadcast.emit('user-connected', name)  })  socket.on('send-chat-message', message => {    socket.broadcast.emit('chat-message',
    {message, name:     users[socket.id] } )  })
  socket.on('disconnect', () => {    socket.broadcast.emit('user-disconnected', users[socket.id])    delete users[socket.id]  })});
16. The corresponding client side change should be predictable by now. We use .on to listen for the ‘user-disconnected’ event, and append to the DOM a message announcing that the user left. Your script.js should now look like the code block below. Congratulations, you just built a real-time chat app in 16 steps.
Your script.js file should now look like this:
script.jsconst messageForm = document.getElementById('send-container')const messageInput = document.getElementById('message-input')const messageContainer = document.getElementById('message-container')const socket = io('http://localhost:3000')const name = prompt('What is your name?');appendMessage('You joined');socket.emit('new-user', name)
socket.on('chat-message', data => {  appendMessage(`${data.name}: ${data.message}`)})socket.on('user-connected', name => {  appendMessage(`${name} connected`)})socket.on('user-disconnected', name => {  appendMessage(`${name} disconnected`)})messageForm.addEventListener('submit', e => {  e.preventDefault();  const message = messageInput.value  appendMessage(`You: ${message}`)  socket.emit('send-chat-message', message)  messageInput.value = '';})function appendMessage(message) {  const messageElement = document.createElement('div');  messageElement.innerText = message;  messageContainer.append(messageElement);}
Reflections on my experience using Socket.IO
As someone who is relatively new to web development, the idea of learning about another new technology and its implementations can seem like a daunting task.
The beauty of WebSocket APIs like WebSocket or libraries that perform similar functions such as Socket.IO, is that they abstract away all of the complexity that it takes to create a persistent connection between client and server.
Take the example of our chat app. Despite its flaws, we created an app in just 16 steps that can allow many individual clients to join and exchange messages, and we only used three of the methods exposed by the WebSocket: .on, .emit, and .broadcast.
It is clear, then that WebSockets are not only extremely useful in supporting the modern web experience, but they’re also not too difficult to use. Libraries like Socket.IO make the experience even easier, and their easy-to-use documentation makes troubleshooting any problems a breeze.
I’m glad I finally got to take a look at WebSockets, and I’m glad I did so through Socket.IO’s intuitive and user-friendly library. I look forward to exploring the Socket.IO library even further in future projects.