Build your first XCFramework -How to create an iOS framework Pt 1
In the previous post (Pt 0), we kicked off this series by breaking the ice, now that we can skip formalities, we will move to the real deal. In today's post, we will create a framework called SimpleMath, which will contain some basic functions for some basic mathematical algorithms, so fire up your Xcode and let’s start by creating a new project!

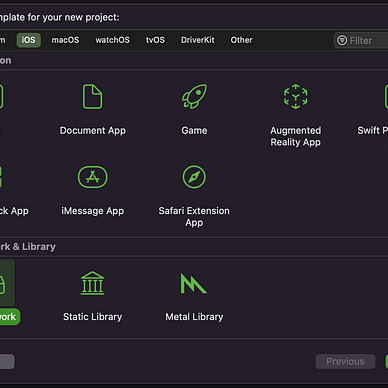
Instead of the usual choice of selecting “App” as the template of your project, this time, we will select the Framework option from the Framework & Library Section.

Name your project, choose your preferred iOS programming language, make sure to include documentation ( we will need it for a future post ), then, choose a location for your project and press “create”.
Let’s take a look at the project's structure, by default, a framework only contains an objective-c header file (despite picking swift as the programming language) and since I checked the “include documentation” option, Xcode automatically generated a DocC catalog too.

Let’s create a new swift file, title it SimpleAlgorithms, the following class will contain some mathematical functions.
Access control is something every programmer should know about, especially when developing a framework/ library. In this example, I’m purposefully using the public access control keyword to declare my class and my functions.
In Swift, there are 5 access control specifiers: open, public, internal, private, and fileprivate. If left unspecified, “internal” will be used by default.
Internal classes and members can be accessed anywhere within the same module(target) they are defined
Since our framework is separate from the apps where it will be used, not specifying the public access control keyword means that our class or function or even our variable won’t be accessible to the developers, so keep this in mind. To test this, you can create a similar class, name it PrivateSimpleAlgorithms instead ( don’t use any keyword), and once we build our framework in the next steps, you will notice that we will have access to the SimpleAlgorithms class, on the other hand, the PrivateSimpleAlgorithms class won’t be visible.
If you’d like to know more about access control in swift here’s a great Medium post that explains it well
So what’s next?
The next step is to archive our framework, we will create two different archives, one for iOS devices and another one for simulators, then, we will combine these two archives into one XCFramework.

Archiving the framework :
Although it is possible to archive directly using Xcode, using Terminal is recommended.
First things first, navigate to your project’s folder either by using the cd command or by right-clicking on the folder -> Services ->New terminal at the folder
Then paste this commend into your terminal, I’ll explain it in a second :
I have to clarify something to avoid confusion, this is just one long commend, to make it more human-readable you can break it into multiple lines by using the backslash character ( \ )
- The destination option defines the target OS ( and whether a simulator )
- The archivePath option means where the archive will be stored
- Setting skip install to No will install the framework to archive
- Build_Library_For_Distribution will make the framework inside the archive distributable
To build our XCFramework, the four options are needed, so don’t skip any one of them.
Generating an archive should take only a few seconds, this duration will increase as your project gets bigger ( especially when you include other third-party frameworks inside your framework )
To achieve the same result for the simulator version of the archive, repeat the same commend, but this time, change the destination to “generic/platform=iOS Simulator” and the archivePath to ../output/SimpleMath-Sim ( name it whatever you want, as long as it is a significative name and is different from the other archive’s name).
In case the output folder doesn’t exist, these commands will automatically create it for us.
Building the XCFramework :
And finally, navigate to the “output” folder ( located next to your project folder ) the following command will allow you to merge your archives and create an XCFramework :
xcodebuild allows us to include many frameworks with different architectures/platforms, in this case, we only included two frameworks ( iOS and iOS simulator ) but we could also include other variants of the framework like a MacOS version as another parameter.
Unlike the XCArchive files, an XCFramework cannot be overwritten. Before using the xcodebuild command for a second time, you have to delete the previous XCFramework and then run the command … It’s just a slight inconvenience, not a big deal!
Importing the XCFramework to a project :
The last step is to import the framework to an iOS app, it should be a piece of cake, to demonstrate this, let’s quickly create a new iOS app project.

After creating the demo app project click on the plus (+) button in the Frameworks section of your app target, select the “add another” option in the bottom left corner, then click on “add files…” and finally select your framework … You can also ignore what I just said and simply drag and drop it, what matters is that you can see the blue XCFramework icon.

Now go to your View Controller, and let’s import our framework, once we have done that we will have access to our Simple Math functions
Now, run your app and you should see this result in your output once the app loads. Congratulations, you have just imported your first ever framework into an app!

And as I said earlier, if you try to access the class PrivateSimpleAlgorithms, it won’t be visible/accessible.
Conclusion :
In today’s post, we created a framework, built it, and then successfully added it to a demonstration app. While it seems like we achieved the series’ goal of creating a framework, in reality, we barely scratched the surface and there’s still a lot to learn which we will cover in future posts.
This marks the end of this post so make sure to click on the clap button 👏👏 if you liked it.
In the next post, we will move to compilable documentation using DocC, so follow me to stay up to date with this series, and of course, feedback is always appreciated.
Happy coding!