Set Up Your Portfolio Website in Less Than 10 Minutes with Github Pages
In this tutorial, I will guide you though the process of quickly creating your data science / developer portfolio using Github Pages. No HTML or Jekyll knowledge is required here. This is a good start if you are at the point where you have some projects to show (on Github or somewhere else) but you don’t have a personal portfolio website to show them on.
Step 1. / Log in to your GitHub (if you don’t have a GitHub user profile, create one at https://github.com/join) and open this link in your browser: https://github.com/evanca/quick-portfolio
Step 2. / Click on the little “Fork” button at the top right corner. Wait until the repo is forked.


Step 3. / Now you have your own template copy to use! Go to repository Settings and scroll down to the “GitHub Pages” section. Select “master branch” under the “Source”:


Step 4. Next, scroll back to the “Repository name” and change it to a username.github.io (use your actual username here), click “Rename”:

Step 5. Magic time! If you open your username.github.io right now, you should be able to see a working website. How fast was this?!

Step 6. Upload a website logo (could be your photo or avatar) image into the /images folder. To do that in browser, just open the folder in your (forked) Github repository and click on “Upload files” button (don’t forget to click on “Commit changes” after upload). Do the same for all your project thumbnail images if you plan to use those.

Step 7. Open the (forked) repository in Github and click on the _config.yml, then on a little pencil icon. Here, you can configure the sidebar: change website title (e.g. Name Surname), change website logo url, add description, LinkedIn link and even Google Analytics tracking ID (get one here for free: https://marketingplatform.google.com/about/analytics/). Edit the file and click on “Commit changes” when you’re done.

Step 8. Make sure your website is still alive on username.github.io!
Step 9. Open the repository in Github and click on the index.md, then on a pencil icon. This your main page template. It has some examples of project links with and without the thumbnails. You can easily edit page title (“Portfolio”), categories, example links, project names and thumbnail urls. You can also add or delete stuff, as well as build your own layout using Markdown syntax. If you are a complete beginner, it might be a good idea to Commit changes after adding each project link one by one, so you could make sure website is running as expected.

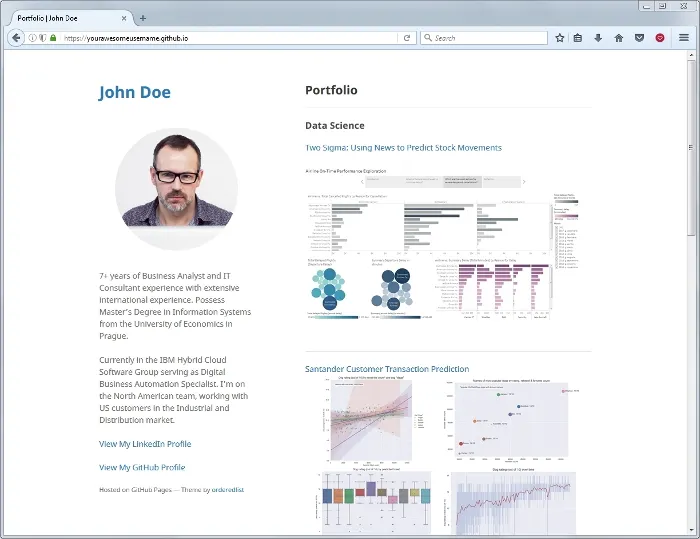
DONE! After editing and saving (committing) the index.md, your finished website should look somewhat like this:

How do you link a project?
🔗 If your project is stored externally (on Tableau Public, Google Slides, Medium etc.), you can always put a direct link to it in your portfolio.
🔗 If your project is stored on a Github repository, you have several options on how to link it to the portfolio:
1. Direct link to the Github project. When clicking on the link, you will see the project page on Github.
2. Convert your project README.md to a Github Pages and use a fancier url. After setting this up, your link will open a page like this (cool, this is your README.md converted to a webpage automatically):

To do this, go your project repository Settings and scroll down to the “GitHub Pages” section. Select “master branch” under the “Source” and you will see a new link to your project, e.g. username.github.io/some-repository/.
3. If you want to keep the sidebar visible while viewing the project in your portfolio, you can set up a custom page. There is an example page called “sample_page.md” for a quick start. You can quickly copy and paste all the code from your project README.md in your new page or create it from scratch. Note! When linking to a page like this, omit the “.md” ir your link! Final page url should look like username.github.io/sample_page

🔗 If your project has not been published anywhere yet, you can always upload it to Github or other appropriate service. Let’s say you have a Power Point presentation on your computer and you’d like to include it in your portfolio. One quick way to do that would be saving it to .pdf and then uploading to Github, in your website’s “pdf” folder. You can link directly to this .pdf file and after clicking on the link you will see something like this:

Don’t forget that you can always build a custom project page using the “sample_page.md” example! Add as many different project pages as you’d like.
Update (requested):
If you’d like to change the theme’s HTML layout, use the instructions provided by GitHub Pages:
1. Copy the original template /_layouts/default.html from the theme’s repository
(Pro-tip: click “raw” to make copying easier)2. Create a file called
/_layouts/default.htmlin your site3. Paste the default layout content copied in the first step
4. Customize the layout as you’d like
Did you know you can easily use a custom domain with GitHub Pages? No kidding! You can read more about this here: https://help.github.com/en/articles/using-a-custom-domain-with-github-pages
OPTIONAL: After everything is done, you can modify or remove the following files in your website repository:
/LICENSE - remove or modify your website license here (more info on licensing: https://choosealicense.com/ & https://help.github.com/en/articles/adding-a-license-to-a-repository)
/README.md - set up the description of your website repository here (more info: https://help.github.com/en/articles/about-readmes)
/sample_page.md & /pdf/sample_presentation.pdf - feel free to remove these sample files if you don’t use them (the same for dummy images)
BONUS nr. 1! Need some help with your project thumbnails?
- A nice article with examples of UX portfolio thumbnails: https://blog.uxfol.io/project-thumbnails/

- Free mockup templates for web development: https://cssauthor.com/20-free-web-browser-frame-psd-templates/

- Free Android Phone Mockup for a commercial use: https://www.behance.net/gallery/101993297/Android-Phone-Mockup-Galaxy-S10-Free-Download
Some ideas on what to use for the data science project thumbnails:
- Brand or company logo (the one you are doing project for)
- An interesting plot from your analysis
- Multiple plots from your analysis combined into one image
- A photo or clip art representing the theme of analysis (I use https://pixabay.com/ for free photos and https://www.flaticon.com/ for icons)
BONUS nr. 2! How to make a circle photo avatar?
I used GIMP (https://www.gimp.org/) to make a circle image. GIMP tutorial: https://www.gimp.org/tutorials/CircleImage/
Photoshop tutorial: https://www.photoshopessentials.com/basics/crop-image-circle-photoshop/
Make circle photo online: http://www.oooo.plus/en/
None of the links in this post are sponsored or affiliate.
⭐️⭐️⭐️ That’s all folks! ⭐️⭐️⭐️

📝 Read this story later in Journal.
🗞 Wake up every Sunday morning to the week’s most noteworthy Tech stories, opinions, and news waiting in your inbox: Get the noteworthy newsletter >
