7.1) User feedback and Testing
The final and the most important task as a part of our Hasura Internship is User feedback and Testing. If you have not already checked out our development for screen 3 here you go: Screen 3
Testing and fixing bugs is an important part of building a successful application. It is very essential since you might wonder what wrong could I’ve done. Everything works flawlessly! But as it turns out, as a developer we try to test the application in the same way every time. Hence the chances are that we might miss some bugs or we might forget to analyse some aspects of the app. Thus testing apps in the real world scenario helps getting valuable feedback from users.
You can also be a part of the beta testing phase by downloading our app and providing feedback in the comment section below.
App link : ExTra Expense Tracker APK
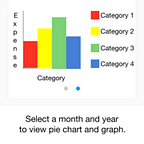
1. Screenshots of app in various states
First lets have a look at different states of the app:


2. Feedback and improvement
In our case, we were grateful to the Slack Community for Hasura Internship and our friends who tested our app and provided valuable feedback which helped in making our app better.
Note: As we were running short of time we first took the feedback and then deployed our final app and wrote blogposts accordingly. All the changes that have been mentioned here have already been incorporated. Thus we won’t be needing to change our blogposts and hence we do not provide any links to any changes in this blog and not even in the task tracking sheet under task 7.2 .
Errors and bugs fixed are as follows:
- Initially when the user entered the view expense screen for the first time all that the user could see was a floating action bar which caused confusion to the user as to what should be done next and hence we added a message which suggested the user to click the floating action button to get started.
- This issue which is going to be mentioned is a bit complicated. When our app was being beta tested, many users pointed out this error which looked as follows:

Here, when the user registered, the user_id in auth table was randomly generated and we had another table user_info, which maintained other user related information, that assigned a different user_id than the one assigned while registering which caused issues while adding expenses. So we fixed this issue by allotting the user_id of auth table to the respective user in the user_info table. Now we are successfully able to add expenses.
3. One of the issues encountered was when the expense was added, the user could not see the expense as the screen did not refresh. This issue was resolved by having the screen refreshed after adding each expense.
4. This is a minor one. Some fields in add expense screen had a Lowercase font which was not apt and hence we changed it to Sentence Case.
This completes the feedback section of this blogpost. As and when we receive new feedbacks from users, we would try to update our app and this blog. So stay tuned!
-Akash Dabhi and Vinit Neogi