Designing characters for animation
The process for creating Kat & Doug

Character design is, for me, one of the most important stages of pre-production. It can be compared with the casting process of a live-action film, where you’ll have to choose the perfect actor who will work with you before, during and after the premiere of the film (Diffusion and promotion). Even more important, it’s who we’ll follow during the story and whatever the duration of the short/film/series is. If we make a bad choice, this can compromise the success of the piece, because if the audience doesn’t identify with the characters, they won’t be able to establish an emotional bond with the story. This is why it’s important to take enough time to explore the possibilities and trust the decision that feels right.
Ok, ok, that’s very interesting, but, how do you translate that live-action casting logic to animation? Casting is just to pick the voice actors! Right?
The truth is, I used to think that too, but after reflecting and studying about the process of casting in cinema and comparing them to animation, I realized that they were essentially alike but with an interesting difference: In live-action, your characters come almost pre-designed. You see a lot of people to choose from, with different features, who you could slightly alter by changing their clothes, hairstyle or even ask them to change their physique by training/gaining weight etc. If we see it coldly, it’s a catalog of templates, where you end up choosing the best possible mix of acting skills, physical characteristics and unique features that the actor/actress has to offer.
But in animation we have the particularity that we have the control of creating from scratch absolutely EVERYTHING about a character. We can pick and mix different characteristics of various sources until we find the perfect character. The problem about this is we don’t get the chance to see a vast array of pre-determined possibilities unfold before us. We have to create them ourselves.
And this is why when we design characters, the process of exploring, sketching and experimenting is crucial.
Now, I have to be honest. Like I mentioned previously, usually my personal projects start with the characters. Every once in a while, a character I draw appears between my sketches and seems interesting enough for me to write a story about him/her and spend years of my life developing a project to tell that story.


So, in Here’s the plan’s case, when people ask me why I choose a cat and a dog, I don’t have an answer. After that first sketch appeared, I never thought if it was better to make them a rabbit and a dog or a mouse and a cat or a dog and a raccoon, or fish or dinosaurs or humans etc.
But since I’m a character design teacher, I can’t stop walking you through all the stages that usually conform my design process. Also, it’s something I apply in some extent to all the client work I get.
The stages of my characters design process are:
Exploration (Blue Sky stage)
This stage is known in the big studios as “Blue Sky” because sky is the limit. Usually you’ll be provided a physical or psychological description of the character, but it’s not necessary yet to stick a 100% to them in all your sketches, since the important thing is to explore the widest range of possibilities for a character and hopefully very contrasting between them. How does this character look? Tall/short, fat/thin, muscular/weak, white/black/asian/latino? Even in some cases, you could try drawing the opposite of the gender that was assigned.
Since I skipped this stage while making Here’s the Plan, I did a couple of new sketches to illustrate my point ;)

References & Research:
This stage can run parallel to the previous one, but I think at some point it becomes very necessary to integrate the use of references, whether they be for style or research. On one hand, it’s good to compare the sketches you did in the previous stage with your style references and measure how far/close they are from them, and make them more similar or different depending on what you want. It’s important to study what makes those designs work and grab your attention, so you can try to include it into your work.

On the other hand, it’s possible that in the exploration stage, you’re not concerned in drawing correctly, since you tend to do it from imagination and preconceived notions of what we’re drawing. If we look at reference we can adjust or even exaggerate aspects of our firsts designs so we can improve them and make them more interesting.
For example, when I sketched the firsts drafts of Kat & Doug, I had no idea how a cat/dog snout looked like from a profile view and that was something I had to improve. Also how their ears connected to their heads was a mystery for me, and it was something that was necessary to make them more solid and improve the design.
Anyway, it’s important to emphasize that my objective wasn’t to make something hyper-realistic, so I only took some aspects that I was interested in and threw out the rest. For example, the size of the eyes, the real form of a cat mouth, the length of the snout, etc.

Polish
Once we decide on a design, it’s time to explore ways to polish them. We already have most of the main elements in place and now we have to try to make them as visually appealing as possible.

This means trying to understand and craft the rhythms in the design, simplify forms so the design flows better and maybe go back and try to include aspects of our references that could improve the quality of our designs.
In this case, i didn’t polish the designs too much, but with this sketch I decided the proportions of the characters, with more stylized forms and bigger heads. Later on, this design would be modified when translating it to CG during production, including the decision of scaling down the heads so they would look slightly more realistic and a bit less cartoony/chibi.
Model / Production sheets
The last stage of character design would be the most technical one: Structure the designs so that the modelers can use them as reference to translate them to 3d later or animators can animate them in 2D. Also, here’s were you design and decide on an expression, pose and lip sync sheet.


In Here’s the Plan’s case, I have to admit that the model sheets were traced from the first 3D model I made, since I knew we would go back and polish the design and they were only necesary because the financing application required them. In hindsight I should have made a new model sheet before making the new 3D models, but I’ll talk about the challenges of translating the 2D design to 3D in a future post.
Extras
As an extra stage, I’d like to talk a little about the clothing design for the characters. In the early stages I only drew them in their default clothes, but during the story they had to change their outfits several times. I would loved to design an entire wardrobe for each of them but once you get deep into the process, you start to realize the limitations and start to ground the designs according to the reality of the production.
And the reality was that the more outfit changes we had, more time and money we were going to spend modeling and implementing them. So I limited myself to only 4 outfits per character.


I don’t know a lot about fashion, so looking for references was key. I limited myself to shops that I loved, like Modcloth and Asos, for Kat’s clothes. Sadly I didn’t search a lot of references for Doug, since I limited myself to the stigma that there’s not a lot of clothing options for men, but I’d like to seek advice in that area in the future, to break that mold.
This is were the work of Meli Yensen (our additional concept artist) came in, who presented a lot of possibilities for one of Kat’s work outfits. Having so many options was useful to understand what made sense or not with the character. Sadly sometimes the design was perfect, but it presented characteristics that would be challenging to do in CG and had to be discarded.

General thoughts
During the process, it’s important to ask yourself what do you want to communicate with the characters, and what internal traits you’d like to reflect externally.
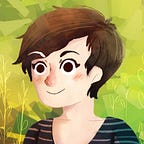
In Kat’s case, she should communicate dynamism, order, passion and I had the personal goal to not make her follow the overly feminine cliche (pink ribbons? Long lashes?) and also don’t make her proportions sexualized, like the recurrent and over-utilized hourglass shape, were the waist is microscopic. It’s funny/sad, because since I didn’t conform to this trend, a lot of people commented that Kat looked too fat (like, really?) but that’s also another topic for a future post.
In Doug’s case, I wanted to communicate stability, protection and tenderness. He had to have a rough/big body-type to justify his clumsiness in the story and give the sense of a “gentle giant”. The fact that corgis have almost no neck really helped this sensation.
Also, some people have asked, why both of them have the same orange pattern in their heads, since it sometimes causes confusion as in what type of animals they are and it contradicts with a general rule that your main characters should contrast with each other.

The reason is because I wanted to show through the designs, how connected and united they were as a couple, despite being completely different races (and with the loaded implication they’re usually enemies). The fact that they’re so different but share a common physical trait, communicates that deep down, they’re alike. Also, I based it on some articles I read, about couples that have been a long time together usually start looking like each other, specially if they got along. I don’t know the veracity of this but I liked reading it and I wanted to add it.
I think all these intentions aren’t included in an obvious way in the designs, but definitely there was a feedback process between the visual designs and the psychological design in the writing of the characters, which would eventually result in tridimensional character who would you enjoy watch acting for 18 minutes.
Conclusion
It’s very important in this pre-production stage, to not settle with the first sketch or initial idea. Even if I didn’t follow that advice too much, they were indeed multiple revision stages to polish and improve the first sketches until they achieved a certain quality standard and match the aesthetics with my intentions.
Also, always look for references if you don’t have the skill to draw something, or you don’t know how to do it! They’re very useful in every step of the process and helps you grow as an artist.
Finally, in hindsight, the technical aspects of character design are also very important.
In this project, I never defined correctly the different mouth shapes for the character expressions, the eye/brow/eyelid poses and system, the teeth and how the cheeks would work. This caused that when the time came to translate everything to 3D, the modeler had all these questions that I had to improvise the answer to, losing time and flow in the process.
Next time, now I know that this is a step I cannot skip. Even though it’s impossible to try to predict every problem, it’s necessary to be prepared in case these type of questions arise during the project.