In this series I will provide step-by-step instructions to port a fully functional application (that’s already in use BTW) to a containerized version, albeit with limited functionality. I am just sharing, since sharing is caring.
Caution: importing a data repository, mongoDB or mySQL, in a containerized environment requires some work. And I mean it’s not quick, so be forewarned. So if you want to create a containerized repository that your application containers can use, you got some work to do, I would say about 1–2 hrs. See instruction below.
What You Need To Follow This Series
In order to follow this series you need to have a good understanding of
- NPM (Node Package Manager)
- NVM (optional)
- NodeJS/JS (obviously)
- VMBox (a general-purpose virtualizer)
- Mocha/Jasmine/should/supertest (TDD)
- Docker (containerization)
- MongoDB (data storage — could be anything really)
- Mongoose (object modeling for node.js)
I use a macBook High Sierra as my development environment.
Why NodeJS
TBH, I don’t think this really needs too much discussion since there are plenty of resources touting the benefits of this platform so I am not going to get into it. Except to say I like NodeJS, and JS for that matter. I have been coding and building applications in this environment for a while and I am pretty comfortable with NodeJS.
Why Containerization
Monolithic applications are difficult to maintain, stack dependent, hard to update, slow to deploy, and often much more difficult to QA. Containerization, on the other hand, is a wonderful new way to write robust applications that could grow overtime without becoming monolithic. Instead of creating a large application that has all the API in a single point of entry, containers allow for multitude of services that constitute your application.
Straight From The Horse’s Mouth
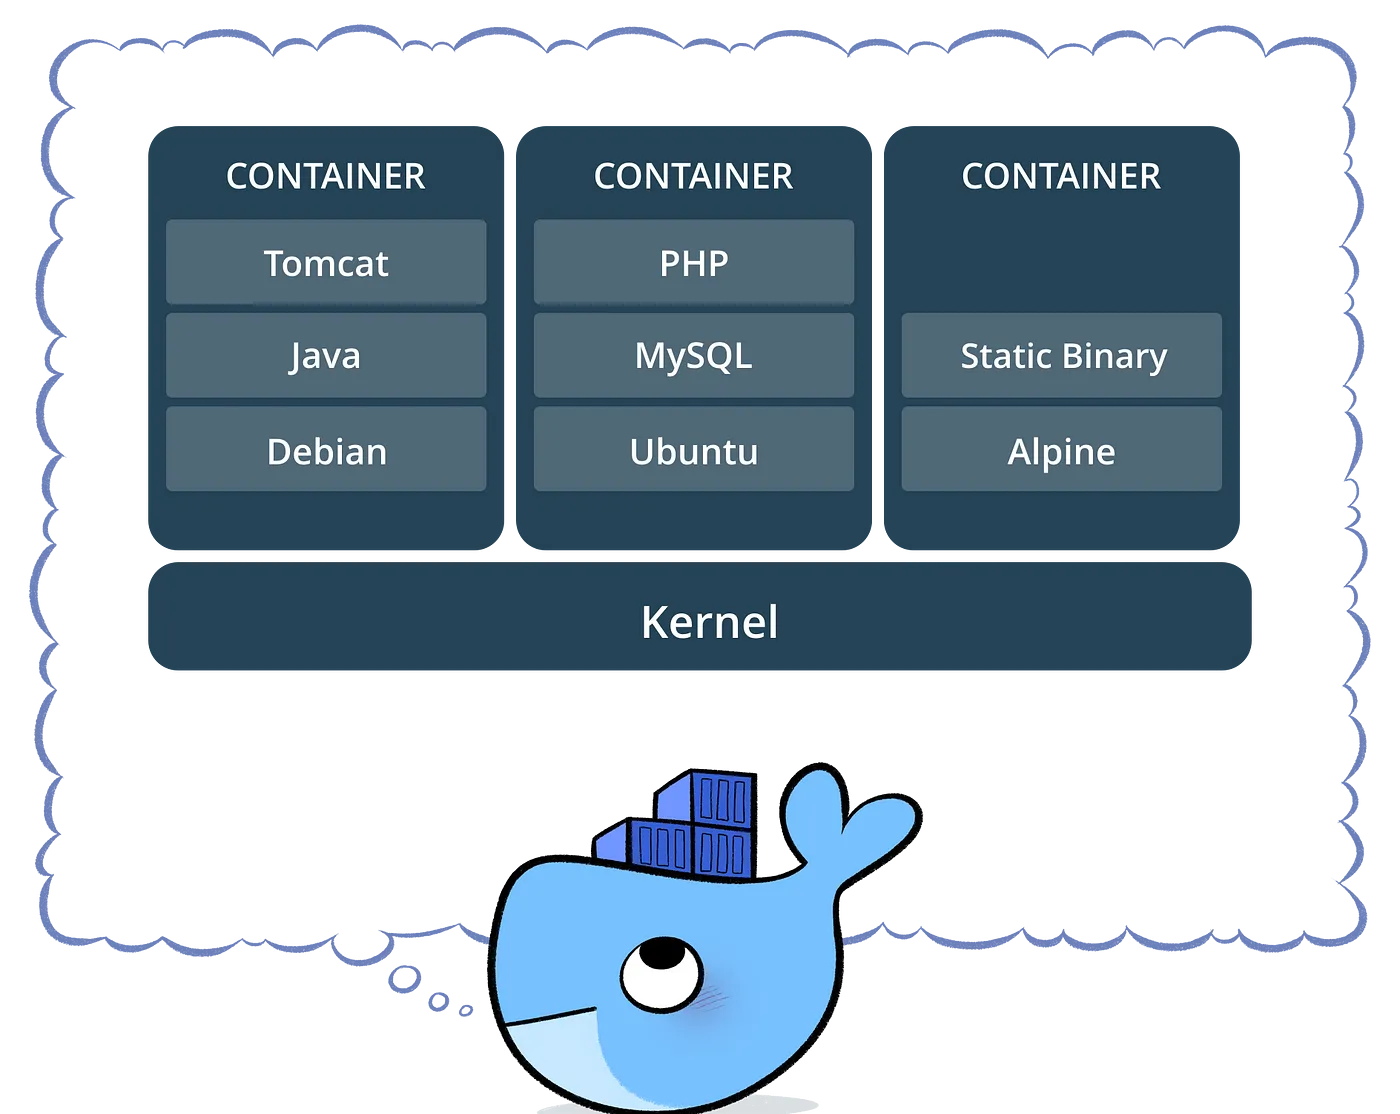
Containerization is a lightweight alternative to full machine virtualization that involves encapsulating an application in a container with its own operating environment.
To understand software containers, it would be helpful to consider a similar example from the real world — shipping containers.
Shipping containers are ubiquitous, standardized, and available anywhere in the world, and they’re extremely simple to use — just open them up, load in your cargo, and lock the doors shut.
Software containers fulfill a similar role for an application. Packing the container involves defining what needs to be there for an application to work — operating system, libraries, configuration files, application itself, and other parts of your technology stack. Once a container has been defined (imaged), that image is used to create containers that run in any environment, from the developer’s laptop to test/QA servers, to the production data center, on-premises or in the cloud, without any changes.
Get To The Point Already
Now that we are done with the niceties, let’s discuss the overall structure of our service. The services that I will design and develop will all have similar structure. This is how my service structure, first of many, looks like.
/home/{user}/github/{name of service}-services (top level)
|__ src/ (all your code)
|__ package.json (installed packages, description, entry point, etc)
|__ start-script.sh (start the service)
|__ stop-script.sh (stop the service)
|__ Dockerfile (all the commands a user could call on the command line to assemble an image)
|__ npm-shrinkwrap.json (locks you in to your dependency versions)
|__ integration-test/
|__ node_modules/ (all the installed packages when you execute npm instal <package_name>)
|__ create-image.sh (script to create a Docker image)
But First…
Before we start diving into code there are a few preliminary tasks that we need to perform. Paramount would be to ensure you have a data repository to test your containerized application with. Let’s start by creating 3 virtual machines. These virtual machines will host the mongoDB replication set, as well as the application containers.
- Download and install VMBox from here
- Create your virtual machines using the following commands (assuming you have already installed docker):
docker-machine create -d virtualbox manager1
docker-machine create -d virtualbox worker1
docker-machine create -d virtualbox worker2
To see the creations run the command:
docker-machine ls
manager1   *        virtualbox   Running   tcp://192.168.99.100:2376           v18.03.1-ceworker1   -        virtualbox   Running   tcp://192.168.99.101:2376           v18.03.1-ceworker2   -        virtualbox   Running   tcp://192.168.99.102:2376           v18.03.1-ce
Output is a table of the virtual boxes. And to see the containers in each of these virtual boxes we need to run the below commands (the first command effectively logs you into a virtual machine -vbManager, vbWorker1, vbWorker2- to inspect the container is up and running):
eval `docker-machine env manager1`
docker pseval `docker-machine env worker1`
docker pseval `docker-machine env worker2`
docker ps
vbManager is the primary (active) mongodb virtual server that handles the routing of requests to other servers, mainly vbWorker1 and vbWorker2.
If you need to stop the virtual boxes you can type:
docker-machine stop {name of virtual box: manager1||worker1..2}- Generate a key file that will be shared between the replica set
openssl rand -base64 741 > mongo-keyfile
$ chmod 600 mongo-keyfile
So this key file is a shred password between the replica set.
- Create the replication set
This is a big task and requires multiple steps that best can be done by creating a shell script createReplicas.sh, which I have done, courtesy of Crizstian (many many thanks for your great work). resetDocker.sh will basically remove the containers mongoNode1..3, allowing you to recreate the containers by running createReplicas.sh in case something goes wrong.
chmod ugo+x createReplicas.sh
chmod ugo+x resetDocker.sh
The 2 above commands make the files executable so that you can call them by typing:
./createReplicas.sh
# or
./resetDocker.sh
If you don’t want to make the files executable then you can type:
bash < createReplicas.sh
# or
bash < resetDocker.sh- Add data to main mongodb node container, which in my case in mongoNode1. And since I already have an existing mongoDB dev database I can export it to a zip file and load it into mongoNode1.
Get a dump of your data repository
./mongodump --archive=mydataRepo.20180510.archive — db {name of your data repo}Will produce a .gz file that you now must move to the volume that was created for your mongoNode containers. But you must make sure you are in the vbManager virtual box.
#this command -> "'docker volume create --name '$1" created the #volume. See createReplicas.sh fileeval `docker-machine env manager1`docker cp /Users/xxxxx/Downloads/mongodb-osx-x86_64-3.4.13/bin/mydataRepo.20180510.archive mongoNode1:/tmp
You now need to update thed CRUD permission for raykahn, the user with access to the database.
docker exec -it mongoNode1 bash -c ‘mongo -u $MONGO_USER_ADMIN -p $MONGO_PASS_ADMIN — authenticationDatabase “admin”’You should see the following on the command line:
MongoDB shell version v3.6.4connecting to: mongodb://127.0.0.1:27017MongoDB server version: 3.6.4rs1:PRIMARY> use admin
switched to db adminrs1:PRIMARY> db.updateUser("raykahn",{roles ["readWriteAnyDatabase"]})
rs1:PRIMARY> exit
And now import the mongodb database. But before that you need to change Login to the mongoDB server
docker exec mongoNode1 bash -c 'mongorestore --archive=/tmp/medmart.20180510.archive --db medmart_db -u $MONGO_USER_ADMIN -p $MONGO_PASS_ADMIN --authenticationDatabase "admin"'# You should see something like this
2018-05-08T22:51:18.919+0000 the --db and --collection args should only be used when restoring from a BSON file. Other uses are deprecated and will not exist in the future; use --nsInclude instead2018-05-08T22:51:18.939+0000 preparing collections to restore from2018-05-08T22:51:18.959+0000 reading metadata for medmart_db.promotioncodes from archive '/tmp/medmart.20180510.archive'2018-05-08T22:51:18.975+0000 restoring medmart_db.promotioncodes from archive '/tmp/medmart.20180510.archive'2018-05-08T22:51:19.006+0000 reading metadata for medmart_db.offers from archive '/tmp/medmart.20180510.archive'2018-05-08T22:51:19.031+0000 restoring medmart_db.offers from archive '/tmp/medmart.20180510.archive'2018-05-08T22:51:19.079+0000 reading metadata for medmart_db.providercredentialrequests from archive '/tmp/medmart.20180510.archive'2018-05-08T22:51:19.084+0000 no indexes to restore
.
.
.
Now login to your imported db to see that data was successfully imported
docker exec -it mongoNode1 bash -c ‘mongo -u $MONGO_USER_ADMIN -p $MONGO_PASS_ADMIN — authenticationDatabase “admin”’
MongoDB shell version v3.6.4connecting to: mongodb://127.0.0.1:27017MongoDB server version: 3.6.4rs1:PRIMARY> use medmart_db
switched to db medmart_dbrs1:PRIMARY> db.{collection name}.find().pretty()
# you should see data printed
rs1:PRIMARY> exit
You are done with your mongodb database import.
So whats next?
Next blog will be about creating a service, a single service for now that connects to a mongodb using mongoose and returns some value.
Stay Tuned…