1-Click WebServer Provisioning on AWS using Terraform,Ansible,Docker & Jenkins

Terraform
Terraform is a multi-cloud (IaC) Infrastructure as Code software by HashiCorp written in Go Language using (HCL) HashiCorp Config Language. An open source command line tool that can be used to provide an infrastructure on many different platforms and services such as IBM, AWS, GCP, Azure, OpenStack, VMware and more.
Ansible
Ansible is an open-source software provisioning, (CM) Configuration Management, and application deployment, provisioning, and deployment tool.It provides the ability through declarative language to describe system configuration; it uses YAML (YAML Ain’t Markup Language) a human-readable data serialization language syntax for expressing Ansible Playbooks. Ansible Playbooks are the building blocks for all the use cases of Ansible.
Docker
Docker is a set of platform as a service products that uses OS-level virtualization to deliver software in packages called containers. Containers are isolated from one another and bundle their own software, libraries and configuration files; they can communicate with each other through well-defined channels.
Jenkins
Jenkins is a free and open source automation server. It helps automate the parts of software development related to building, testing, and deploying, facilitating continuous integration and continuous delivery.
Prerequisites:
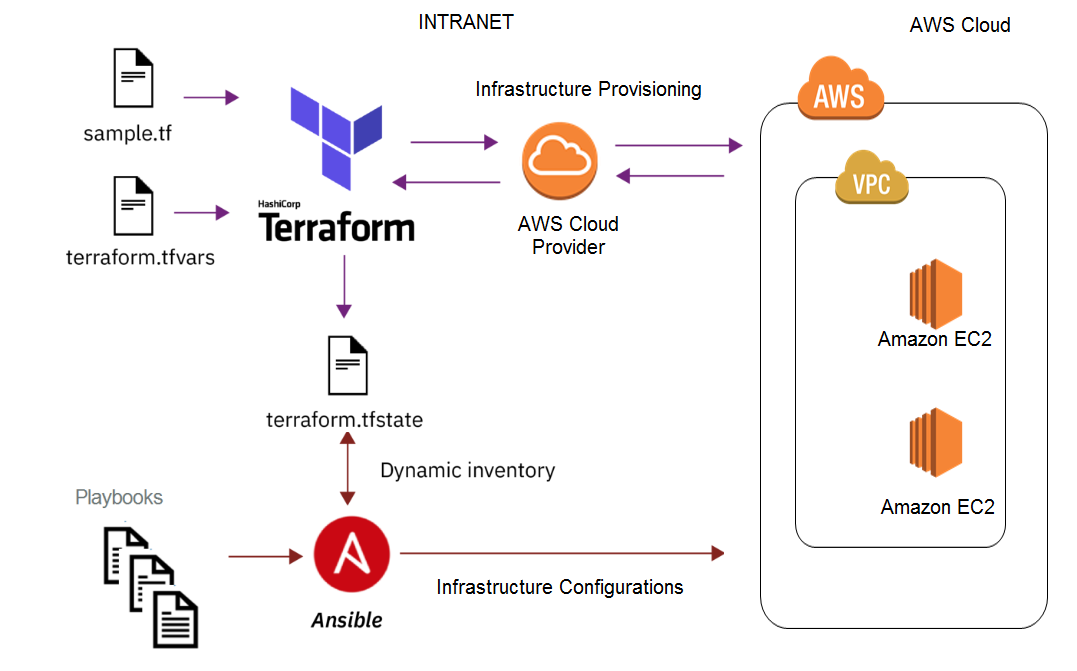
In this article i will show you how to provision,1-click fully automated webserver infrastructure on aws using Terraform,configuring webserver using Ansible,using Docker Container to isolate services, and creating a Continous Integration(CI), Continous Deployment(CD) pipeline,when a new commit is pushed on github using Jenkins.
Terraform part :
create a private key
create a key-pair on amazon
create security group
create ec2 instance
create a ebs volume for persistant storage and attach it to ec2 instance
create a s3 bucket for website static files
create a cloudFront distribution with origin s3 for fast delivery of static files
Ansible part :
create a directory /data where we can mount our ebs voulme
create partition of voulme
format partition with ext4
mount it at /data
install docker and git
start docker service and enable it
pull jenkins image from dockerhub
launch a new container with jenkins image
pull httpd image from dockerhub
launch a new cointainer with httpd image
Docker part :
with ansible we will pull httpd and jenkins image from docker hub
lauch container with jenkins image with -p 8080:8080 and -v /data/:/var/jenkins_home
launch containers with httpd image with -p 80:80 and -v /data/workspace/website/:/usr/local/apache2/htdocs/
Jenkins part :
we will use Jenkins for CI/CD
with ansible we will pull jenkins/jenkins image from docker hub
create a new job with name website which will pull git repo when a new commit is pushed
will create a new webhook on git repo so on every push Jenkins will get triggred
File Structure of Project:

main.tf is file where all terraform code is written.
playbook.yml is ansible-playbook where all play and task are written.
terraform.tfstate is terraform state file which maintain the state of infracture.(note:- never share this file with anyone this file contain critical data)
.terraform directory contain all your terraform plugin.
assets directory contain all assets which we want to upload to S3 bucket ,we can keep assets anywhere.
what infractructure we will create with terraform?
- key pair.
- ec2 instance.
- ebs volume which will be attached to instance for persistant storage.
- s3 bucket to store website assets.
- cloudFront distribution with origin as s3 bucket.
Let see all this in detail…
$ aws configure --profile yourProfilename
First we have to create a new profile using aws configure command we have to pass our access key and secret key to make profile,this profile will be used in terrform provider for authentication.
Provider and profile
In fig 1.2 we are using terraform provider and passing provider as aws so terraform will contact aws api,we are also passing profile name which we created in previous step using aws configure cli command and we are setting default region as ap-south-1
Default VPC
In fig 1.3 we are creating a new resource aws_default_vpc with variable name default_vpc, but aws_default_vpc does not create a new vpc when we execute terraform apply and it neither get destroyed when we execute terraform destroy ,this resource is just used for refering attributed of default vpc i.e vpc id.
Variables
In fig 1.4 we are creating a variable for key name ,we can keep default blank if we want to pass key name from shell after terraform apply,we are also creating one more variable with name base_path this will be very helpful later.
Private Key and Key pair
In fig 1.5 we are creating a private key with RSA algorithm with bit length 4096 ,with this private key we will create a key_pair in aws using aws_key_pair resource,and at the endwe will save this private key in our local machine at specified path using local_file resource.
Security Group
In fig 1.6 we are creating a new security group ,in which we are specifing ingress and egress rule ,in line number 5 we are referencing id of default vpc which we created earlier,in ingress rule we are allowing tcp port —
- 80 for http
- 8080 for jenkins
- 443 for https
- 22 for ssh
and for egress we are allowing all ports and all protocal.
EC2 Instance
In above figure we are using aws_instance resource to launch a ec2 instance with amazon linux ami and instance type as t2.micro (this is included in free tier for 750 hr per month limit).
EBS Volume
In above Figure aws_ebs_voulme resource will create a 1GB voulme in same availbility zone where our instance is created, we can’t attach ebs volume to our instance if it is not present in same availbility zone,then we are attaching the volume to ec2 instance which we created refering instance id and volume id ,attaching at device = /dev/sdf ,in this example we kept the value of force_ detach= true,so terraform destroy does not throw any error ,but this may result in data loss and in this example we are also not preventing this voulme from destroying, but voulme should be always preserved from destroying in production else you might loose data.
Null Resource and Provisioner
Provisoner in Terraform help to execute command in local or remote machine,we can only create Provisioner inside some resource we dont want to use some resource to be created so we are using null resource,in fig 1.9 we are changing the permission of key file,which we created in fig 1.5 ,then we are executing the command to connect to instance and playing ansible playbook in instance,Here we are using ANSIBLE_HOST_KEY_CHECKING=False what it do is,it does not give a warning for host authenticity ,else we have to manually pass an yes to terminal and if we do not pass it will fail our playbook to run.
What is written inside ansible playbook we will get to that part later in this article.
S3 bucket
In above code we are creating a s3 bucket for storing all static files of our website which is running on aws ec2 instance, then we are blocking all public access to bucket because we dont want anyone to access objects which are inside bucket directly,we want to give access it via cloudFront distribution,then we also created s3 origin id this will be used when we create distribution and set s3 bucket as origin.
CloudFront Distribution
Amazon CloudFront is a web service that speeds up distribution of your static and dynamic web content, such as .html, .css, .js, and image files, to your users. CloudFront delivers your content through a worldwide network of data centers called edge locations. When a user requests content that you’re serving with CloudFront, the user is routed to the edge location that provides the lowest latency (time delay), so that content is delivered with the best possible performance.
- If the content is already in the edge location with the lowest latency, CloudFront delivers it immediately.
- If the content is not in that edge location, CloudFront retrieves it from an origin that you’ve defined — such as an Amazon S3 bucket, a MediaPackage channel, or an HTTP server (for example, a web server) that you have identified as the source for the definitive version of your content.
Now we know why we are using distibution….so let see how to create one…
In above fig we are creating a distribution with origin set as s3_bucket which we previously created,and with none geographical restriction,we can blacklist or whitelist certain geographical region if we want.
Updating S3 bucket policy
Remember we have blocked all pubic access to s3 bucket when we created bucket, so even cloudfront also cant access bucket Objects,In order to allow distribution to access Object we have update bucket policy.
Here we are creating the policy with resource aws_iam_policy_document,to allow distribution to read objects from bucket.
Then with resource aws_s3_bucket_policy we are updating the bucket policy.
Output
In Terraform we can print attributes of resources,variable values to terminal for our refrence here we are printing instance ip and distribution domain name.
Ansible Playbook
Let see what is inside playbook.yml…..
This is the Ansible Playbook which will be used to configure our instance…
So Let break it down line by line ….
Remember in fig 1.9 we are running this playbook on ec2 instance with the help of Provisioners.
Here we are defined only one play with become = true so the default user as root will be used.
Tasks :
First we created a /data directory,
Created a Primary partion of whole ebs volume that we attached to instance earlier.
Formated the Created Partition with ext4 format.
Mounted the volume at /data directory which is created in task 1.
Installed docker using yum module with state latest
Installed git using yum module with state latest.
Starting docker Service
Enabling docker Service
Here we are pulling jenkins/jenkins image from docker hub
Then we are launching a new Container with “jenkins/jenkins” image with container name as jenkins and maping port 8080 of container to port 8080 of docker host and binding docker host directory “/data/” to container directory “/var/jenkins_home” so all the container file in “/var/jenkins_home” will be stored at “/data/” on docker host.
Then we are creating 1 directory “workspace” inside “/data” , and inside “workspace” we are creating a directory “/website” remember this is a very important step i will let you know why we are creating directory.For now just remember this.
Here we are pulling httpd official image from docker hub
Then we are launching a new container with httpd image with container name as webserver ,also maping container port 80 to dockerhost port 80 and binding docker host directory “/data/workspace/website/” to container directory “/usr/local/apache2/htdocs/”
Remember in fig 2.5 we created 2 directories “workspace” and “website”,we created them because in jenkins workspce and job directory is only created when we create a new job in jenkins,and we want to create a job which will automatically do git pull when a new commit is pushed, pulled data is kept in “/workspace/{jobname}/” directory,so we are pre-creating this directory so we can bind this job directory to webserver(httpd) container htdocs directory when launching container.
But Remember when we create our job in Jenkins we have to name it as website so our pre-created directory can be used to store git repository files.
Then in the last task of play we are just printing the initialAdminPassword for Jenkins which is at “/data/secrets/initialAdminPassword”
see binding jenkins home directory to “/data” makes our life so easy and since ebs volume is mounted at /data so all our jenkins data is stored on on our ebs volume…..
Now with just one command terraform apply we can build all our infrastructure,configure instances,launch container,create CI/CD pipeline etc…
$ terraform applyAfter this once our infrastructure is sucessfully created we can see instance public ip and distribution domain name on our terminal which we printed using output

Since now we have our distribution domain name we can upload all our website assets to s3 bucket by using below commad in asset folder and update assets link in our website code as distribution_domain_name/asset_name.
$ aws s3 cp {path_to_asset_directory}/ s3://{s3_bucket_id} --recursiveJenkins
Now we have to create a new job in Jenkins with name website..
we can go to “{instance_public_ip}:8080” and login to Jenkins.

Here we have to enter initialAdminPassword which you can find in terminal where we executed terraform apply.
Copy paste the password and click on Continue.

Now Click on Manage Jenkins on left tab

Click on Manage Plugin

Click on Available and and search for github in search bar
Then select GitHub Plugin and click on Install without restart
Jenkins will install Github Plugin Once Plugin are Installed Go to Home page.

Click on New Item
And type Item Name as website only(this is important give name as website only else it will save our gitrepo in some other folder) and website can’t be up on httpd server
select Freestyle Project and click OK

select checkbox for Github project and enter your github repo url(this repo is for website which we want to host on webserver)
scroll down go to source code management section

select git and enter Repository Url with .git at end
scroll down and go to Build Triggers section

Select Github hook trigger for GITScm polling checkbox and hit save
Now we have to go to our github repository and navigate to setting>webhooks and click on add webhook

Enter your Jenkins server url with /github-webhook/
Select Content Type as json and hit Add webhook
NOW we are all set and whenever we push a new commit to this repo jenkins will automatically pull the repo

when you push new commit Jenkins start building this job and automatically pull latest head from github and our latest changes are automatically deployed.

Now we can create this whole infrastructure with just one command :
$ terraform applyAlso can destroy the whole infracture with just one command :
$ terraform destroywe have sucessfully created aur whole infrastructure with just one command…
That’s it for this article…Hope you learned some thing new…..
If you want to do this same setup with EFS (Elastic File System) so it can be easily scalabe,I have written an article for that…here is the link for article
Here you can find source code related to this project :
Here is the link for the source code for website which is hosted on webserver:
If you liked this article, please drop a clap. You can follow me on Twitter at @callbyrefrence or find me on LinkedIn or github
