Azure End-To-End Data Engineering Project: Harnessing the GitHub Student Pack for Students and Beginners
Bring your Hot Chocolate and Enjoy Reading 🍵
🚀 Hey, future data wizards and Azure enthusiasts! Ready to dive into the captivating world of Azure data engineering but not sure where to begin? I come bearing fantastic news! Thanks to the GitHub Student Pack, you can open the door to a full year of thrilling Azure adventures, no strings attached.
This guide is tailored specifically for students and Azure beginners. I’ll take you on an exhilarating journey through an entire end-to-end Azure data engineering project. Even better, I’ll reveal the secrets to securing your very own Azure account for a full year by leveraging the incredible benefits of the GitHub Student Pack. Just imagine — a whole year dedicated to hands-on learning and experimenting with Azure’s potent data tools, all right at your fingertips!
What you will learn:
- Access Azure via GitHub Student Pack for One Year.
- Data Ingestion with Azure Data Factory (ADF).
- Exploring Azure Data Lake Storage (ADLS) and Its Capabilities.
- Performing Data Transformation and Advanced Analytics with Databricks.
- Using Azure Synapse Analytics for Data Warehousing and Analytics Capabilities.
- Harnessing Power BI for Data Visualization and Business Intelligence.
Unlocking Azure with the GitHub Student Pack:
- Go to the GitHub Education page (GitHub Student Developer Pack — GitHub Education) and sign in or create an account if you haven’t already.
- Confirm your student status by providing necessary identification.
- Once verified, go to the “GitHub Student Developer Pack” section and browse the available offers.
- Search for the Azure benefit within the pack.
- You will likely be directed to the Azure portal. Follow the instructions provided to activate your Azure subscription using the GitHub Student Pack offer.
- Once your Azure subscription is activated, log in to the Azure portal using your newly acquired credentials and start exploring the wide range of services and tools available.

General overview of the project:
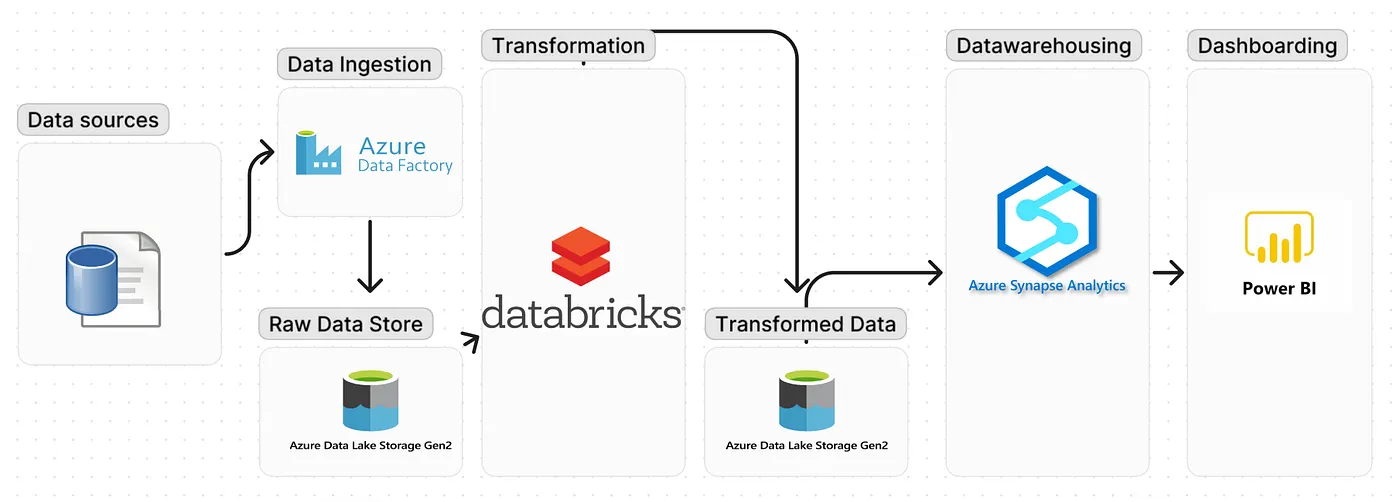
Beginning with the 2021 Olympics data stored in GitHub’s CSV files (accessible here: kaoutharElbakouri/2021-Olympics-in-Tokyo-Data (github.com)), this project employs Azure Data Factory (ADF) to smoothly bring this information into the raw layer of Azure Data Lake Storage (ADLS). Moving forward, Azure Databricks takes the lead, refining the dataset and storing the processed data in ADLS’s transformed layer. Azure Synapse Analytics steps in, primarily for robust data warehousing and detailed analysis, allowing deeper exploration and insights. Finally, Power BI visualizes these insights, marking the completion of a step-by-step process and providing a rich and comprehensive view of the 2021 Olympics dataset.
Here’s the diagram which shows the workflow of the project we’re going to build:
We are going to split this project into following sections:
1️⃣. 🇨🇷🇪🇦🇹🇪 🇦 🇷🇪🇸🇴🇺🇷🇨🇪 🇬🇷🇴🇺🇵⦂
The initial step under the Azure for Students subscription is to create a resource group, specifying its name and region.

This is our created resource group that will acts as a container to hold related Azure resources for efficient management and organization:

2️⃣. 🇨🇷🇪🇦🇹🇪 🇦 🇸🇹🇴🇷🇦🇬🇪 🇦🇨🇨🇴🇺🇳🇹⦂
Building upon the resource group, the next step is to create an Azure Data Lake Storage ADLS (a storage account with namespace hierarchy enabled).
- Select the created resource group.
- Click on the “Create a resource” button within the resource group.
- In the search bar, type “Storage account” and select the option for creating a new storage account.
- Enter the necessary details for the storage account, such as:
☑️ Subscription: Choose your Azure for Students subscription.
☑️ Resource group: Select created resource group
☑️ Storage account name: Enter “tokyoolympicdatastorage.”
☑️ Region: Choose the appropriate region (e.g., West Europe).
☑️ Performance, Replication, and Access tier: Select as per your requirements.
☑️ Hierarchical namespace: Enable this option to create Azure Data Lake Storage (ADLS).

The next step is to create a container. Inside the ADLS account, locate and select the “Containers” section, Click on “New Container” and enter the desired name for the container, for example, “tokyoolympicdata”, then click create.

The next step is to create two directories within this container. Navigate to the specific container, click on the “Add Directory”. Enter the directory name as “raw-data” and confirm the creation. Click on “Add Directory” again and enter the directory name as “transformed-data” and confirm the creation. This is a common way to organize data.

3️⃣. 🇮🇳🇮🇹🇮🇦🇹🇮🇳🇬 🇩🇦🇹🇦 🇮🇳🇬🇪🇸🇹🇮🇴🇳⦂ 🇹🇷🇦🇳🇸🇫🇪🇷🇷🇮🇳🇬 🇨🇸🇻 🇫🇮🇱🇪🇸 🇫🇷🇴🇲 🇬🇮🇹🇭🇺🇧 🇹🇴 🇦🇩🇱🇸 ❜🇷🇦🇼-🇩🇦🇹🇦❜ 🇩🇮🇷🇪🇨🇹🇴🇷🇾 🇺🇸🇮🇳🇬 🇦🇩🇫:
Now that we’ve established the “raw-data” directory, we’re set to initiate the ingestion process using Azure Data Factory ADF. This involves transferring data from CSV files stored in GitHub to the Azure Data Lake Storage (ADLS).
To do so, we need to create an ADF resource:
☑️ From the Azure portal, in the search bar, type “Data Factory” and select “Data Factory” from the search results.
☑️ Click “Create” to begin the setup of a new Azure Data Factory resource.
☑️ Enter the necessary information:
- Name: Provide a unique name for your ADF resource.
- Subscription: Choose your subscription (Azure for Students).
- Resource Group: Select the already created resource group.
- Version: Choose the ADF version you want to use.
☑️ Once everything is validated, click “Create” to initiate the provisioning of your new Azure Data Factory resource.
Here is our created ADF resource:

Once your Azure Data Factory (ADF) resource is created, you can begin working on it by launching ADF Studio.
Our data source in GitHub comprises five CSV files.

Let’s concentrate on ingesting the “Athletes” CSV file from our GitHub data source into Azure Data Lake Storage (ADLS) using Azure Data Factory (ADF). The same steps will be replicated for the ingestion of the other files as well.
⚒️ Create the necessary Linked services:
To effectively handle each CSV file, it’s essential to create two critical connections: a source linked service and a destination linked service. Our journey begins by crafting a linked service that establishes the crucial connection between Azure Data Factory (ADF) and the diverse data sources involved.
Under the ADF (Azure Data Factory) Manage hub, you can find the option for “Linked Services.” By clicking “New” and choosing “HTTP” as the connection type (our data is on GitHub) you’ll initiate the process of creating a new linked service:

Once you’ve selected the “HTTP” connection type, proceed by naming the linked service, providing the base URL, selecting “Anonymous” for authentication, and opting for “AutoResolveIntegrationRuntime” for the integration runtime setting.

For the Base URL, select Athletes csv file in github then click raw data and copy the link.

Let’s create the Azure Data Lake storage linked service by following the same steps as for the previous linked service but instead of HTTP for connection type, choose Azure Data Lake Storage Gen2 and provide the necessary details:

Here are our created linked services:

⚒️ Create the Datasets:
Now that our source and destination linked services have been created, we can create the Datasets that will be referenced by the ADF activities. For that, under the ADF Author Hub, locate the Datasets section and create new Dataset.
For the source Dataset, we need to choose HTTP for data store type.

Then choose CSV for the format type:

Then name your Dataset and specify the already created Linked service (do not forget to publish the Dataset):

Now let’s create the destination Dataset with the same steps but with ADLS as data store type instead of HTTP and set the required properties for our Dataset.

Now that our two Datasets have been created, we can proceed with creating the ADF activity to do the ingestion from source to destination.

⚒️ ADF Ingestion Activity:
Under the Author Hub, locate the pipelines section and create new pipeline, then select the copy activity from the Activities section.

The next step is to configure the source and sink for our activity:

Now we can start debugging our pipeline by clicking on Debug.

our pipeline succeeded and we can see Athletes data loaded to ADLS container (raw-data).

After following the same steps for the remaining CSV files, we need to have these CSV files located in raw-data folder within our ADLS container:

4️⃣. 🇩🇦🇹🇦 🇵🇷🇴🇨🇪🇸🇸🇮🇳🇬 🇦🇳🇩 🇹🇷🇦🇳🇸🇫🇴🇷🇲🇦🇹🇮🇴🇳 🇼🇮🇹🇭 🇩🇦🇹🇦🇧🇷🇮🇨🇰🇸⦂ 🇪🇳🇷🇮🇨🇭🇮🇳🇬 🇦🇩🇱🇸 🇹🇷🇦🇳🇸🇫🇴🇷🇲🇪🇩 🇱🇦🇾🇪🇷
Once data has been ingested into the raw layer of Azure Data Lake Storage (ADLS), the next stage involves processing this data using Databricks and then storing it in the transformed layer within ADLS.
For that we need first to create a Databricks resource. To do it, from Azure portal Search for “Databricks” and select “Azure Databricks” from the available services. Click “Create” and fill in the required information, such as resource group, workspace name, region, and pricing tier.

Once created, click on Launch Workspace and you will be directed to the Databricks workspace. And once Databrick workspace is launched, locate the compute section (This is where you manage clusters) and click on Create to set up a cluster based your configurations.
For me, a cluster is already created and ready to execute Spark code:

Now, we can write simple code to get data from ADLS raw-data layer, transform it and put it into ADLS transformed-data layer. To do so, we need to create a notebook by clicking ‘New Notebook’ and make sure the created Spark cluster is selected:

We have to create the connection between Databricks and ADLS so we can easily access the data. For that, from the Azure portal search for the App Registrations and click on ‘New Registration’ to register a new application by providing the name of the app:

This is our registered app. From that we need the Client ID and Tenant ID:

Within this application locate the ‘Certificates & secrets’ section and create a secret that we will need for the connection between Databricks and ADLS:

keep the value of the created secret key for further usage:

Now, we can use the three credentials (client ID, Tenant ID and value of secret key) to connect Databricks to ADLS.
configs = {"fs.azure.account.auth.type": "OAuth",
"fs.azure.account.oauth.provider.type": "org.apache.hadoop.fs.azurebfs.oauth2.ClientCredsTokenProvider",
"fs.azure.account.oauth2.client.id": "34f9f5d3-593c-4389-a3af-78adfecc736b", #Client ID
"fs.azure.account.oauth2.client.secret": 'yaf8Q~FEMX87TQw5a03cSNm6CrOL2vGxQ-qh8dfM', #Value of secret key
"fs.azure.account.oauth2.client.endpoint": "https://login.microsoftonline.com/eb12f8ec-35f2-415d-97bf-0e34301876a7/oauth2/token"} #Tenant ID


dbutils.fs.mount(
source = "abfss://tokyoolympicdata@tokyouolympicdatastorage.dfs.core.windows.net", # contrainer@storageacc
mount_point = "/mnt/tokyoolymic",
extra_configs = configs)
And to have the permission to access the files stored in ADLS, we need to explicitly giving this access using the credentials of the registered application. So, we need to give permission to this app to access the Data Lake. Under our ADLS container, Click on Access Control (IAM) then click add role assignement:

Select the ‘Storage Blob Data contributor’ role, click next and Click on Select members and select the registered app (app1):

To check that we were able to successfully create the connection to ADLS, we can check with this code within our notebook:
%fs
ls "/mnt/tokyoolymic"
Now, we can read our CSV files:
athletes = spark.read.format("csv").option("header","true").option("inferSchema","true").load("/mnt/tokyoolymic/raw-data/athletes.csv")
coaches = spark.read.format("csv").option("header","true").option("inferSchema","true").load("/mnt/tokyoolymic/raw-data/Coaches.csv")
entriesgender = spark.read.format("csv").option("header","true").option("inferSchema","true").load("/mnt/tokyoolymic/raw-data/EntriesGender.csv")
medals = spark.read.format("csv").option("header","true").option("inferSchema","true").load("/mnt/tokyoolymic/raw-data/Medals.csv")
teams = spark.read.format("csv").option("header","true").option("inferSchema","true").load("/mnt/tokyoolymic/raw-data/Teams.csv")
we can print the athletes Data:

We can go over the Apache Spark functions and do whatever transformations we need on our data. (the goal here is not to do the transformations 😇but just to show how we can use Databricks, build the connection…).
The next step is to write the (transformed 🌟) data to the transformed-data layer of ADLS:
athletes.repartition(1).write.mode("overwrite").option("header",'true').csv("/mnt/tokyoolymic/transformed-data/athletes")
coaches.repartition(1).write.mode("overwrite").option("header","true").csv("/mnt/tokyoolymic/transformed-data/coaches")
entriesgender.repartition(1).write.mode("overwrite").option("header","true").csv("/mnt/tokyoolymic/transformed-data/entriesgender")
medals.repartition(1).write.mode("overwrite").option("header","true").csv("/mnt/tokyoolymic/transformed-data/medals")
teams.repartition(1).write.mode("overwrite").option("header","true").csv("/mnt/tokyoolymic/transformed-data/teams")
Here is the folders that contain the written data to the storage within the metadata as well:

For example, within athletes folder we have (the first three files contain metadata and the last one is for data):

Now that our data is transformed 😜 and stored into the transformed-data layer of ADLS, the next step is to load it into Azure Synapse Analytics where we can use SQL to do our analysis to get insights from the data or build a dashboard on top of it 🌟
5️⃣. 🇱🇴🇦🇩🇮🇳🇬 🇩🇦🇹🇦 🇫🇷🇴🇲 🇦🇿🇺🇷🇪 🇩🇦🇹🇦 🇱🇦🇰🇪 🇸🇹🇴🇷🇦🇬🇪 (🇦🇩🇱🇸) 🇹🇴 🇦🇿🇺🇷🇪 🇸🇾🇳🇦🇵🇸🇪 🇦🇳🇦🇱🇾🇹-🇮🇨🇸 🇫🇴🇷 🇦🇩🇻🇦🇳🇨🇪🇩 🇩🇦🇹🇦 🇦🇳🇦🇱🇾🇹🇮🇨🇸:
From Azure portal, search for Azure Synapse Analytics and click on ‘Create’ and provide the required details:

Once it is complete, we can move forward to load our data into Synapse Analytics. To do so, open Synapse Studio and click on the Data hub then click the + button and choose Lake database:

Create the Database and name it:

Once the database is created, we can create the table and load the data (choose create table from data lake):

And provide the table details: name, linked service (choose the default one) and for input file just navigate to the file that contains athletes data inside the transformed-data layer of ADLS (make sure to choose that contains the data and not the metadata).

Upon following the identical procedure for additional data files, our Synapse database now contains the following tables as expected:

These tables provide the foundation for running SQL queries to perform analysis and derive insights:

6️⃣. 🇨🇴🇳🇳🇪🇨🇹🇮🇳🇬 🇵🇴🇼🇪🇷 🇧🇮 🇹🇴 🇦🇿🇺🇷🇪 🇸🇾🇳🇦🇵🇸🇪 🇫🇴🇷 🇩🇦🇹🇦 🇻🇮🇸🇺🇦🇱🇮🇿🇦🇹🇮🇴🇳 🇦🇳🇩 🇦🇳🇦🇱🇾🇸🇮🇸
The final step involves establishing a connection between Power BI and Synapse, enabling the use of Power BI for comprehensive data analysis and visualization based on the Synapse database tables.
Open Microsoft Power BI Desktop, click on ‘Get Data’ and search for Azure Synapse Analytics SQL as a data source then connect:

Go to Synapse Analytics Workspace overview and copy the ‘Serverless SQL endpoint’:

In Power BI, insert the copied string for the server name and Connect:

Finally, we can select the tables we want, load into Power BI then start our Analysis and Dashboarding works 🌟

𝓂𝒶𝒹𝑒 𝓌𝒾𝓉𝒽 𝐿𝑜𝓋𝑒 𝐵𝓎 𝒦𝒶𝑜𝓊𝓉𝒽𝒶𝓇 𝐸𝐿 𝐵𝒜𝒦𝒪𝒰𝑅𝐼 👩💻