
Overcoming The Hot Dog Dilemma
The re-creation of the Silicon Valley’s “See Food” app with the VGG16 convolutional neural network
Dear Humanity, you’re welcome!
Never again in your life, you will suffer from the Hot Dog Dilemma.
You will never think “Hmmm … Is this a hot dog I’m eating?” while chowing down on a bagel dog. You will never get scammed into buying an Italian sausage sandwich although what you are craving for is a hot dog. I promise you that!
The Inspiration
Who here is a fan of the famous HBO show “Silicon Valley”? If you are, great! If you are not, take a look at the short video below 👇.
See the See Food App? Imagine the things you could accomplish if you have this app in your hand. The sky is the limit.
Not to be worried. With the help of the VGG16 model, we can re-create this “Shazam of Food” app!
Note: VGG16 is a convolutional neural network designed by K. Simonyan and A. Zisserman from the University of Oxford. It was used to win the ILSVR(Imagenet) competition in 2014. It is considered as one of today’s best computer vision model architectures.
The Data
To train our VGG16 model, we will use the “hot dog-not hot dog” dataset from Kaggle. This dataset contains two subsets -
- A training dataset with 249 images of hot dogs and 249 images of various foods other than the hot dogs
- A testing dataset with 250 images of hot dogs and 250 images of various foods other than the hot dogs

Rescaling and Resizing the Images
Before we do anything else, we will assign two variables — one for training and one for testing subsets of our data.
test_path = "../input/hot-dog-not-hot-dog/test"
train_path = "../input/hot-dog-not-hot-dog/train"
Next, we will import the Keras’ ImageDataGenerator package to rescale and resize our images.
from keras.preprocessing.image import ImageDataGeneratorHere, we are using the “.flow_from_directory()” method to bring in the images from the training dataset. We will then rescale the images by dividing the pixel intensity values with 255 to keep the values between 0 and 1. We will also resize the images as 227 x 277. Both processes are required for the VGG16 model.
train_generator = ImageDataGenerator(rescale=1./255). flow_from_directory(train_path, target_size=(227, 227), batch_size=500)Let’s do the same for the images in the testing dataset.
test_generator = ImageDataGenerator(rescale=1./255). flow_from_directory(test_path, target_size=(227, 227),
batch_size = 500)
Splitting the Datasets
Next, we will use Python’s “.next()” function to assign variables for the image data and labels of our datasets.
train_images, train_labels = next(train_generator)
test_images, test_labels = next(test_generator)
Currently, we have two datasets — training and testing. We will create one more, the validation dataset, to use it for fine-tuning the model hyperparameters throughout the model training.
To create this dataset, we will split the current training dataset into two — 75% will be kept for training and 25% will be used for validation.
We will use Scikit-Learn’s “.train_test_split()” function to accomplish this. The parameter “test_size” is set as 0.25 to capture the 25%.
from sklearn.model_selection import train_test_splittrain_images, val_images, train_labels, val_labels = train_test_split(train_images, train_labels, test_size=0.25, random_state=42)
Note: Ideally, our training data should compromise 70% of the entire dataset. But our data was split as 50–50 for training and testing subsets, our final training dataset is less than the testing.
Image Data Augmentation
Before we use our training image data to train our model, we should augment it to improve our model’s performance. Although there are different augmentation techniques, we will only use three -
- Rotating the images randomly by 30°
- Flipping the images horizontally
- Fill the points outside of the image boundaries with the values calculated from the nearest points
By using these augmentation techniques, we expand the size of our training dataset by creating modified versions of images. Let’s set up these augmentations by using the “.ImageDataGenerator()” method.
datagen = ImageDataGenerator(
        rotation_range=30,
        horizontal_flip=True,
        fill_mode='nearest')
Now, we will apply our training image data to the augmentations.
datagen.fit(train_images, augment=True)Creating the Model
Now that we have our data ready, we will prepare the VGG16 model. First things first, we will import the necessary packages -
from keras.applications.vgg16 import VGG16, preprocess_input
from tensorflow.keras.models import Sequential
from tensorflow.keras.layers import GlobalAveragePooling2D
from tensorflow.keras.layers import Dropout
from tensorflow.keras.layers import Dense
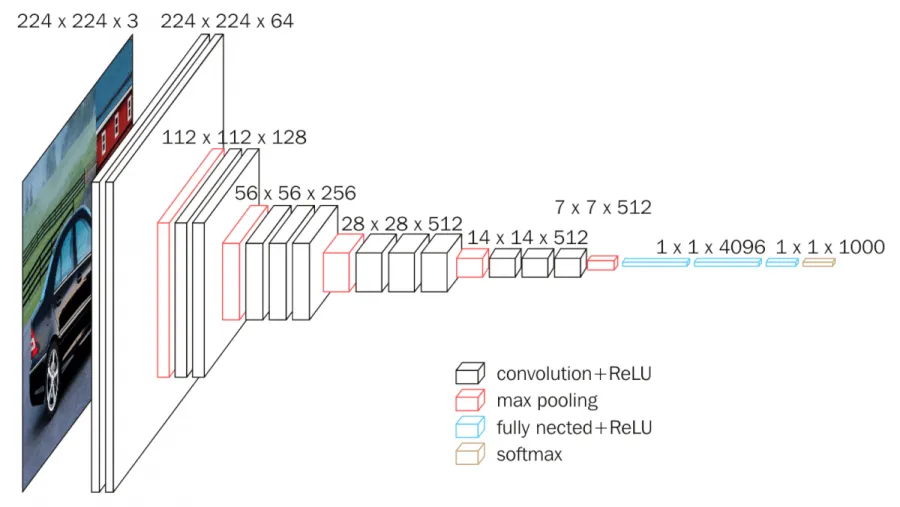
from keras import backend as KNote that we are importing the pre-built VGG16 model from Keras instead of constructing it from scratch. If you are interested, you can see the actual architecture of the model in the picture below -
To the VGG16 pre-built model, we will add a GlobalAveragePooling2D layer, a dropout layer, and an output layer with ‘sigmoid’ activation. We will also print out the summary of our model.
base_model = VGG16(include_top=False, input_shape = (227, 227, 3), weights = 'imagenet')model = Sequential()
model.add(base_model)
model.add(GlobalAveragePooling2D())
model.add(Dropout(0.5))
model.add(Dense(2,activation='sigmoid'))
model.summary()

Next stop, we will compile our model by setting the optimizer, loss, and metrics parameters. We will be using the Stochastic Gradient Descent (SGD) as our optimizer. The loss parameter will be “binary_crossentropy” since our target is binary data (i.e. hot dog or not hot dog). As for the performance metrics, we will use the accuracy score.
model.compile(optimizer="sgd", loss="binary_crossentropy", metrics=["accuracy"])Also, we will use 0.0015 as our optimizer’s learning rate to control how much to change our model according to the estimated error every time the model weights are updated.
K.set_value(model.optimizer.learning_rate, 0.0015)Training the Model
Finally, we can train our model! We will train it for 100 epochs, i.e. 100 rounds the model’s learning algorithm will work through the entire training dataset.
Also, note that we are setting the “validation_data” parameter to the validation dataset that we created earlier.
results = model.fit(datagen.flow(train_images, train_labels, batch_size=32), epochs = 100, validation_data =(val_images, val_labels), steps_per_epoch=len(train_images) / 32)
Evaluating The Model
Our model is trained! And it looks quite good based on the validation accuracy score from the last epochs (77% at 100th epoch).
But to get the gold standard scores, we will check the testing dataset’s loss and accuracy. We will also check training scores for comparison.
results_train = model.evaluate(train_images, train_labels)
results_test = model.evaluate(test_images, test_labels)
93.57% accuracy for training and 82.6% for testing. That’s quite decent since just randomly selecting out of two categories (hot dog or not hot dog) will only give you 50% accuracy.
Testing the Model
Here’s the fun part. Let’s test our model by putting hot dog and other food pictures into it and see how it will predict.
To accomplish this, we need to write a function that will take the image’s URL as the input of our model and tell us if the image is a hot dog or not a hot dog.
But first, let’s import the packages that are needed for this function.
import os
import numpy as np
from PIL import Image
from skimage.io import imread
import matplotlib.pyplot as plt
We can now write the function. In this function, we will also resize the input images as 227 x 227 to make them compatible with the VGG16 model.
def download_and_predict(url, filename):

    # download the image from the url and save
    os.system("curl -s {} -o {}".format(url, filename))

    # open the image
    img = Image.open(filename)

    # save the image
    img.save(filename)

    # convert it to RGB
    img = img.convert('RGB')

    # show image
    plt.imshow(img)
    plt.axis('off')

    # resize the image for VGG16 model
    img = img.resize((227, 227))

    # calculate probabilities of breeds
    img = imread(filename)
    img = preprocess_input(img)
    probs = model.predict(np.expand_dims(img, axis=0))
    pred = probs.argsort()[0][::-1][0]

    if pred == 1.:
        print("It's a Hot Dog!")
    else:
        print("It's not a hot dog :(")
Done! Let’s test a picture of a hot dog first. Here we go!

Eureka! Let’s do another one.

So far so good. What if we use a picture of a pizza?

Perfect! What about a hamburger?

Like I said … you are welcome guys. Now, you may roam around the streets at night half-drunk and stop at any food stand to get a genuine hot dog with 100% certainty!
Let’s do one more test!

Damnit … 😭