Snowflake Container Mastery: Step-by-Step Deployment of Your Multi-Container App with Snowpark Container Services
The buzz around town is all about Snowflake’s latest product feature, “Snowpark Container Services” and the excitement is real. Now, with the feature hitting public preview in various AWS regions, this blog dives into the nitty-gritty of what container services bring to the table. Join me as we explore what makes this feature tick and unravel the steps to deploy a multi-container app within Snowflake. Let’s break it down!
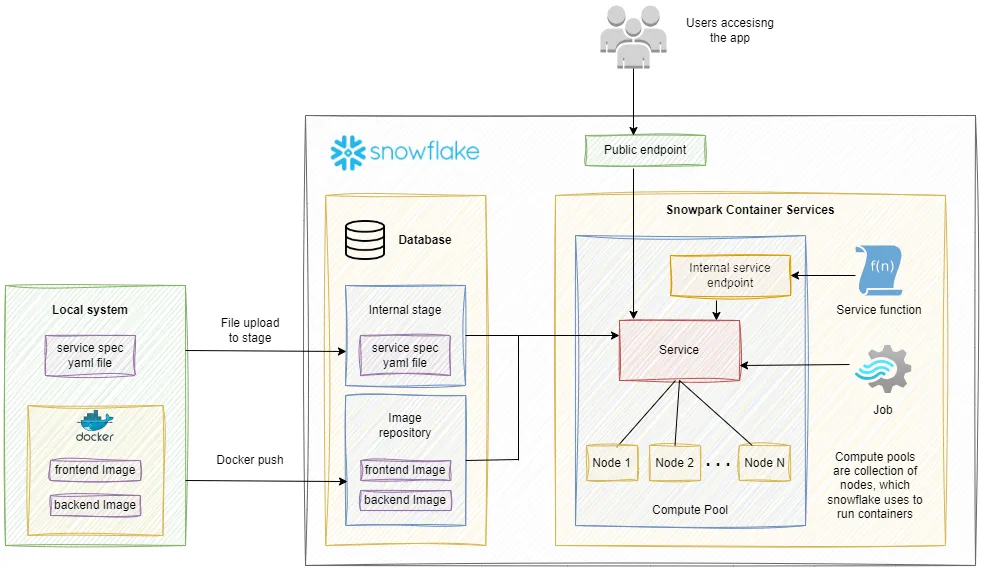
What is Snowpark Container Service ?
Snowpark Container Service is a fully managed container solution designed to simplify the deployment, management, and scaling of containerized applications — all without the need to transfer data outside of Snowflake. As a fully managed service, it encompasses the robust security, configuration, and operational best practices inherent to Snowflake.
In contrast to conventional container orchestration platforms such as Docker or Kubernetes, Snowpark Container Services provides a specialized OCI runtime execution environment finely tuned for Snowflake. This integration ensures the smooth execution of OCI images, making the most of Snowflake’s powerful data platform.
Snowpark Container Services opens up a host of exciting possibilities, introducing features such as:
- Establishment of enduring services.
- Utilization of GPUs to enhance system speed and processing capabilities.
- Freedom to code applications in any language, like C++.
- Compatibility with any libraries for your application.
All these functionalities are complemented by the inherent advantages of the Snowflake platform, offering ease of use, robust security, and governance features. The added perk? A scalable, flexible compute layer right alongside the formidable Snowflake data layer, all without the hassle of moving data off the platform.
Steps to Smoothly Sail Your Containerized App into Snowflake Waters 🚢❄️
Having delved into the essence and thrilling features of container services, it’s time to roll up our sleeves and deploy a straightforward multi-container app using SCS. As you venture into the world of containerized applications within Snowpark Container Services, you’ll navigate through key Snowflake entities such as databases and warehouses, while also interacting with specialized objects like image repository, compute pool, service, and job.
Step -1 : Building & running the images locally
In this blog, we’re gearing up to launch a basic application that leverages React for the frontend and Python for the backend. The React app will communicate with the Flask API, triggering a simple hello message. Picture this: the frontend, powered by React, gets its own container, and likewise, Python claims its dedicated container space for the backend. Here are sample Dockerfiles for both the frontend and backend of our application.
###########################
### Frontend Dockerfile ###
###########################

# Use an official Node runtime as a parent image
FROM node:14

# Set the working directory to /app
WORKDIR /app

# Copy package.json and package-lock.json to the working directory
COPY package*.json ./

# Install any needed packages specified in package.json
RUN npm install

# Copy all the app files to the working directory
COPY . .

# Make port 3000 available to the world outside this container
EXPOSE 3000

# Define environment variable
ENV REACT_APP_BACKEND_URL http://backend:5000

# Run npm start when the container launches
CMD ["npm", "start"]
###########################
### Backend Dockerfile ###
###########################
# Use the official Python image
FROM python:3.9
# Set the working directory to /app
WORKDIR /app
# Copy the current directory contents into the container at /app
COPY . /app
# Install any needed packages specified in requirements.txt
RUN pip install --no-cache-dir -r requirements.txt
# Make port 5000 available to the world outside this container
EXPOSE 5000
# Run app.py when the container launches
CMD ["python", "app.py"]Let’s utilize the below Docker Compose file to start up both containers.
version: '3'

services:
  frontend:
    build:
      context: ./frontend
    ports:
      - "3000:3000"
    depends_on:
      - backend

  backend:
    build:
      context: ./backend
    ports:
      - "5000:5000"
To execute the docker-compose file, utilize the following command:
docker-compose upExecuting above command will launch both containers as illustrated.

Opening the sample React app from the active container, the welcome message presented by the app will resemble the following:

Step -2 : Pushing the images to snowflake
Now that we’ve effectively built and executed images locally, it’s time to push these images to Snowflake. Snowpark Container Services furnishes an OCIv2-compliant image registry service and a storage unit known as a image repository for image storage. To create a new image repository, utilize the below command
CREATE OR REPLACE IMAGE REPOSITORY <name_of_the_repository>;

SHOW IMAGE REPOSITORIES;
Upon establishing an image repository, retrieve the repository URL from the output of the “show” command above. The repository URL should resemble something akin to the following:
# Sample image repository URL. The URL includes fully qualified name of image repository at the end

snowflake_org_name-snowflake_account_name-apps.registry.snowflakecomputing.com/scs_db/scs_schema/scs_repo
Now, in your local system, open a command window and tag both images with the repository URL from above using the following command:
# Sample command to tag docker images with repository URL
# docker tag <image_name:tag> <repository_url/image_name:tag>

docker tag multiple_container_poc-frontend:latest snowflake_org_name-snowflake_account_name-apps.registry.snowflakecomputing.com/scs_db/scs_schema/scs_repo/frontend:scs

docker tag multiple_container_poc-backend:latest snowflake_org_name-snowflake_account_name-apps.registry.snowflakecomputing.com/scs_db/scs_schema/scs_repo/backend:scs
Following the tagging process, log in to Snowflake using the provided command and enter the password when prompted:
# Note - Enter the image repo URL only upto snowflakecomputing.com

docker login <Image_repository_URL_upto_snowflakecomputing.com> -u <snowflake_user_id>
Upon successful login, push the images to the Snowflake image repository using the provided commands:
# replace <image_repository_full_URL> with the full URL of image repo

docker push <image_repository_full_URL>/frontend:scs

docker push <image_repository_full_URL>/backend:scs
As snowpark containerized services provide a specialized container runtime environment, we will need to create a service specification file which is similar to a docker-compose file. Here’s the service spec file for your reference. Make sure to replace the fully qualified name of your image repository as indicated in the following reference file. Upload this file to a Snowflake stage.
spec:
  container:
  - name: frontend-container
    image: /scs_db/scs_schema/scs_repo/frontend:scs
  - name: backend-container
    image: /scs_db/scs_schema/scs_repo/backend:scs
  endpoint:
  - name: pocfrontend-endpoint
    port: 3000
    public: true
Step -3 : Running the containerized app on snowflake
Snowflake leverages compute pools to run containers. A compute pool comprises one or more virtual machine (VM) nodes where Snowflake executes your Snowpark Container Services jobs and services. The creation of a compute pool is accomplished through the following command
CREATE COMPUTE POOL <name_of_the_compute_pool>
  MIN_NODES = 1 -- This number is adjustable
  MAX_NODES = 1 -- This number is adjustable
  INSTANCE_FAMILY = standard_1; -- This value is adjustable
The application containers can be run as a service or job. A service is designed to be persistent, akin to a web service, and doesn’t terminate automatically. Once a service is established, Snowflake oversees the ongoing operation of the service. For instance, if a service container halts, regardless of the cause, Snowflake automatically restarts the container to ensure uninterrupted service. In cases where your service demands additional resources, such as increased compute power, Snowflake provisions additional nodes within the compute pool. To create a service, leverage the below command
CREATE SERVICE <name_of_the_service>
  IN COMPUTE POOL <name_of_compute_pool>>
  FROM @<name_of_stage_that_contains_spec_file>
  SPECIFICATION_FILE='<spec_file_name'
  MIN_INSTANCES=1
  MAX_INSTANCES=1;
The service utilizes the specification file and executes the containers within the compute pool’s nodes. To access the deployed application, describe the service using the below command and retrieve the public endpoint from the output.
DESCRIBE SERVICE <name_of_the_service>;The public endpoint appears in the following format:
{
  "pocfrontend-endpoint":
        "ypj36-<org_name>-<account_name>.snowflakecomputing.app"
}
Copy the value section from the mentioned key-value pair and paste it into a browser tab to access the deployed application.

Voila! Give yourself a pat on the back. As evident from the above image, the deployed app is up and running seamlessly inside Snowflake, right alongside our data.
Conclusion
In summary, deploying applications using Snowpark Containerized Services offers significant advantages. One notable benefit is the proximity of the app to data within the Snowflake environment, eliminating the need for data movement and mitigating network latency. This proximity enhances efficiency and overall performance, providing a streamlined and optimized environment for application deployment.
Feel free to explore the code on my Git repository. Be sure to hit that clap and follow button for more captivating blogs in future. Stay connected by following me on LinkedIn.
