How to have your Memoji as your profile picture — anywhere
Everything you need to know about creating your Memoji, from creating the profile image to how to get it to use anywhere you want.
Part I — Creating your iMessage profile picture
Create a custom display name by following the steps below:
1) Open Settings on your iPhone or iPad with iOS/iPadOS 13 or later.
2) Tap Messages in the menu.
3) Choose the option called Share Name and Photo.
You can also achieve this inside the Messages app, tap the three-dotted menu near the top-left corner and select the option called Edit Name and Photo.
4) Feel free to type whatever you want in the First Name and Last Name fields.
5) Tap Add Photo below the image circle to bring up the photo booth.
If your profile photo is already set, tap Edit to change it.
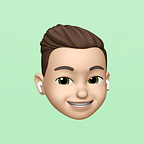
6) Choose your Animoji that you want to be your profile picture or you can create yours in the add (+) blue button.

7) If you have an iPhone with Face ID, you will make your pose using the sensors. But if your iPhone doesn't have Face ID, don't panic, he'll show some pre-made poses for you to choose, they're different from the Memoji Stickers.
For those who have Face ID: The process is like to take a selfie. To save your Memoji pose you only need to make the pose you want and hit the capture button.
For those who have Touch ID: Choose the pose you liked the most and tap Next.
8) Time for Move and Scale your pose. After completed, tap Choose.
9) Now you'll choose one of the eight smoothly gradient backgrounds made by Apple.
10) Choosing one background and hit done, you’ll be asked if you want to “Use this photo everywhere?” tap use.

11) You finished this part. Great job. ✅
Part II — Picking up your profile picture
Retrieving the image file of the avatar you created, just follow:
1) This is achievable with any browser, I'll show here using Google Chrome.
2) You need to go to icloud.com and sign in.

3) There you can see the Memoji that you created earlier.

4) Now using the Inspect Elements tool "⌥⌘C " click on your avatar.

5) Inside the code shown, you want a link that start with https://getaway.icloud.com/contacts/…, just copy the link without the quotes and paste it in a new tab and hit enter. The image will download automatically.

6) Now you have the JPG file of your Memoji.

Part III — Using wherever you want
Now that you have your Memoji JPG file, you're free to use this file wherever you want.
You can use it in all your Social Media, like Facebook, Instagram, WhatsApp, Twitter, Reddit, Slack for just citing a few.
So that’s it. I hope this tutorial was very useful for you and share with someone you know that wants to achieve this and doesn’t know-how. I’ll be very appreciated.
Thanks for reading and have fun! 😆