I Built My Own Self-Driving Car. Part #2
Learning to See: Slightly More Sophisticated Car Vision
Introduction
In my last article, I have played around with OpenCV and Haar Cascade Classifier in order to detect vehicles. It did not perform very well though. There were many false predictions and the FPS could not get above 15. Today I will introduce you to the third version of the YOLO algorithm developed for the Darknet and ported to Tensorflow and Keras so we can use a nice and shiny Python environment. We are not going to train our own model today and use pre-trained weights.
Jumpstart
First off, let’s download the ported YOLOv3 with the following command: git clone https://github.com/qqwweee/keras-yolo3.
If you are on Mac do the brew install wget first. Then, cd ./keras-yolo3 and do the wget https://pjreddie.com/media/files/yolov3.weights as long as we don’t want to waste our time training the model ourselves. There are different resolution models available and this particular one is 608 pixels. You can adjust it for your system and vary between performance and accuracy. The yolov3-tiny model can perform above 220 FPS. But remember, who said you can only have one camera aboard ;).
Run python3 convert.py yolov3.cfg yolov3.weights model_data/yolo.h5 to convert darknet .weights to Keras .h5.
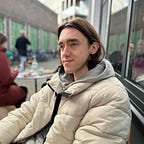
When your weights are translated you can run python3 yolo_video.py --input <path to your video>. It is a ready-made demonstration to set labels on a video. You will see something like that:

Looks better, right? Thanks to the YOLOv3 we have solved the object detection accuracy problem. We will use this model as a basement for our own prediction model. I plan to build a vehicle map approximation basing on plain visual data and make certain predictions basing on it. Don’t worry we’ll get there soon.
Lane detection
Now when we have an improved and more sophisticated object detection we can proceed with detecting the road surface and the markup.
I will show you a way to implement the simplest lane detection algorithm. The fact that the markup in our city is so bad that even humans struggle to distinguish it every once in a while makes it a rather complicated task.
Our primary goal is cleaning up our input data to make the best use of the Probabilistic Hough Transform algorithm. Let’s start by separating whites and yellows from our image. These colors are the common markup colors in our city.
After you run the code, you are going to see something like this:

Perfect! We can clearly distinguish the lanes now. However, we have too many things here which have nothing to do with the road markup. Lights, reflections, and everything else that falls under the domain of the white and yellow colorspace is here. Supposedly, we can apply the k-means clustering first and then remove clusters that don’t belong to the shape of the road markup. However, I have promised you a simple solution, so we will just mask off all the garbage leaving our field of interest concentrated around the road. Buckle your belts, boys, and girls, here comes the code:
Image processing pipeline as it is:
- Convert to a grayscale colorspace
- Mask yellows and whites
- Apply canny edges transform
- Mask your area of interest
- Apply Probabilistic Hough transform
After you launch it, you should see something like:

Despite the fact, that there is a lot of noise it performs decently. I have purposefully chosen the night time footage due to the fact, that there are many white lines from the different light sources (which is bad for our algorithm) so we can test how it performs in non-ideal conditions.
To be continued…
In the next article, I will put everything together and improve the lane/surface detection results by adding additional processing to what we already have.