Securing gRPC connection with SSL/TLS Certificate using Go
In this article, we are going to take a look How can we secure grpc connection using SSL/TLS Certificate in Go.
For a while, I was researching about SSL/TLS and Digital Certificate. I was wondering that How they can be created and How they can be implemented in the application especially with Go Programming language. Finally, I got experiences on it and decided to write in this article :)
Introduction
SSL/TLS Certificate is keeping your application connection secure way and protect your application from unauthorized request. Besides on, both server and client can verify authenticity and sharing data each other safely.
If you are not familiar SSL/TLS Certificate, I should recommend you to read my article about TLS and Digital Certificate.
Prerequisites
- Familiar with Go Programming Language.
- Installed openssl command tool
- Basic knowledge of grpc
What is grpc?
The grpc is high performance Remote Procedure Call (RPC) framework developed by Google. The Remote Procedure Call is a protocol that allows a program execute procedure from another program located or another network.
To understand better, you can define a service like a Rest API and use it from another program located even without understanding the network details. This simplify server-client communication quickly. Sometimes they call it server-client model.
The grpc is a long subject to learn and they have very influential sources on the web :) If you want to understand deeply, visit official grpc web site with this link
Let’s focus in our subject. To create TLS Certificate, we should install a tool.
Installed openssl tool
If you are already using Mac, it’s probably installed. You can run the following command to check which version you are using
$ openssl versionYou will receive the following result
LibreSSL 2.8.3You can install by following document for other operations system
You can take a look documentation at this link
Create Project
In your local machine, create directory for your project and name it grpc-tls-go
$ mkdir grpc-tls-goWe are going the generate all certificate in cert folder. Create certdirectory in the root directory
$ cd grpc-tls-go
$ mkdir cert
$ cd cert
Generate TLS Certificate
If we want to generate a certificate, we need a Certificate Authority and it will be verify owner’s identity in the certificate.
- Generate CA private key and self-signed certificate
openssl req -x509 -newkey rsa:4096 -nodes -days 365 -keyout ca-key.pem -out ca-cert.pem -subj "/C=TR/ST=ASIA/L=ISTANBUL/O=DEV/OU=TUTORIAL/CN=*.tutorial.dev/emailAddress=mert@tutorial.com"-x509flag provides self-signed certificate instead of a certificate request
X509 is format of public key certificates. The public key certificates also known as a digital certificates or identity verification using to prove ownership of public key.
-newkey rsa:4096flag provides both RSA key with 4096-bit and its certificate request at the same time-nodesflag to not encrypt the private key-daysflag certificate valid date.-keyoutflag write the created private key to ca-key.pem file-outflag write the certificate to ca-cert.pem file
Note that: We are adding -nodes flag to develop and test the certificate without asking passphrase key.-subj command explanation
- /C=TR is for Country
- /ST=ASIA is for State or province
- /L=ISTANBUL is for Locality name or city
- /O=DEV is for Organization
- /OU=TUTORIAL is for Organization Unit
- /CN=*.tutorial.dev is for Common Name or domain name
- /emailAddress=mert@tutorial.com is for email address
When you run command, you will receive the following result.

2. Generate Web Server’s Private Key and CSR (Certificate Signing Request)
$ openssl req -newkey rsa:4096 -nodes -keyout server-key.pem -out server-req.pem -subj "/C=TR/ST=ASIA/L=ISTANBUL/O=DEV/OU=BLOG/CN=*.mertkimyonsenblog.com/emailAddress=info@mertkimyonsenblog.com"-x509flag is deleted because we don't want to self-sign certificate as like as CA certificate.-daysflag is deleted because we are creating CSR instead of certificate-keyoutthe name of the output key-outthe name of the certificate request
When the run command, you will see the files that namedserver-key.pem and server-cert.pem has been created. At this point, It’s not certificate just Certificate Request.
server-cert.pem looks like following.
-----BEGIN CERTIFICATE REQUEST-----MIIE1jCCAr4CAQAwgZAxCzAJBgNVBAYTAlRSMQ8wDQYDVQQIDAZFVVJPUEUxETAPBgNVBAcMCElTVEFOQlVMMQwwCgYDVQQKDANERVYxDzANBgNVBAsMBkNMSUVOVDEZ
...3QBb02h8ImYxHIac2pdd+FIyZ0fGogrXV2ZqyVPFMbpMxW9BTce/Tm4K-----END CERTIFICATE REQUEST-----
3. Sign the Web Server Certificate Request (CSR)
$ openssl x509 -req -in server-req.pem -CA ca-cert.pem -CAkey ca-key.pem -CAcreateserial -out server-cert.pem -extfile server-ext.conf-reqflag is we are going to pass in certificate request-inflag is the name of the request file that is server-req.pem-CAflag is pass Certificate File of CA:ca-cert.pem-CAKeyflag is pass private key of CA: ca-key.pem-CAcreateserialflag is CA must ensure that each certificate it signs with a unique serial number-outflag is output to certificate file: server-cert.pem
-extfile option tell to openssl we have extra options such as alternative name, email, IP address …
subjectAltName=DNS:*.mrtkmynsnblog.com,DNS:*.mrtkmynsnblog.org,IP:0.0.0.0Here we set multiple domains .com & .org then we set IP to 0.0.0.0 for developing on local side.
If you delete IP Adress from the options, the client couldn’t establish secure way connection.When the run command, server certificate will be created with server-cert.pemfile name.
If you want to see what is inside the certificate, run the following command.
$ openssl x509 -in server-cert.pem -noout -textYou will receive the following result. You can see the server-extra.conf options in the certificate.

For client certificate process as same as the web server certificate. Creating client Certificate Signing Request (CSR) and sign the client certificate request by CA private key.
4. Generate client’s private key and certificate signing request (CSR)
$ openssl req -newkey rsa:4096 -nodes -keyout client-key.pem -out client-req.pem -subj "/C=TR/ST=EUROPE/L=ISTANBUL/O=DEV/OU=CLIENT/CN=*.someclient.com/emailAddress=someclient@gmail.com"5. Sign the Client Certificate Request (CSR)
$ openssl x509 -req -in client-req.pem -days 60 -CA ca-cert.pem -CAkey ca-key.pem -CAcreateserial -out client-cert.pem -extfile client-ext.confWe can create script file to make all these stage and automate the process. Create generator.shfile and add above commands into step by step.

Now, from your terminal you can run the following command and create all certificates in one step.
$ cd cert
$ sh ./generator.sh
We are generated CA, Server and Client certificates. Now, we are going to use this certificates in our application.
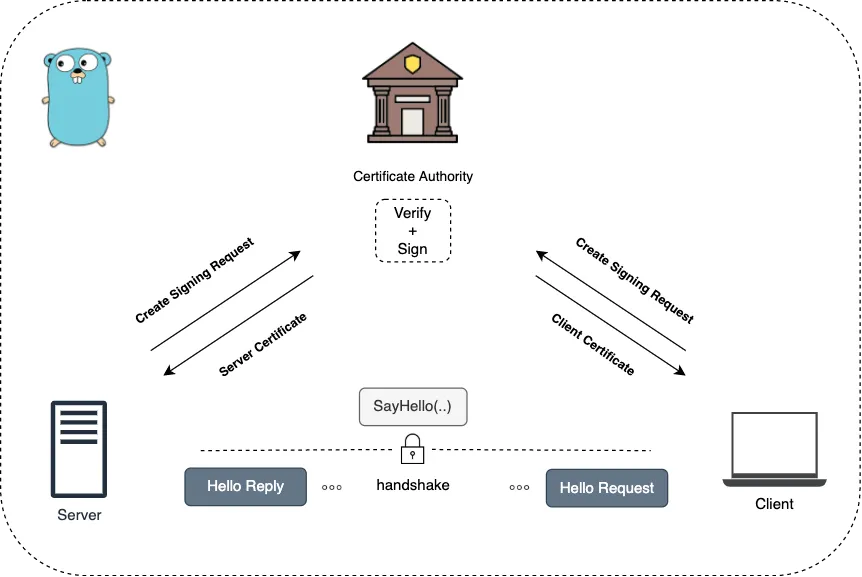
Our application purpose, we want the implement both server and client certificates and share theirs certificates each other to establish connection secure way.
For this demonstration, we are going use same Certificate Authority (CA) for both server and client certificate process. Normally, they can have different Certificate Authority.
Let’s start with server implementation.
Implemented grpc server
- First, we are going to load trusted CA’s certificate. Because, when the client send its certificate to server, the server should ensure valid client certificate by using CA’S key. In short, the server should ensure that we are talking right client.
2. We need to create x509 cert pool and appends Ca’s cert into.
3. We’re going to load server certificate and key using byLoadX509KeyPair(..) method.
4. Now, we should make a configuration of the certificate by using tls.Config then we set fields which are server certificate, required client authentication and CA’s certificate to identify client certificate.
5. Finally, we are ready to create TLS Credential using bycredentials.NewTLS(..) and we initiate grpc server with this TLS Credentials using by grpc.Creds(..) options.
Here is full code of server.go
At this point, you can see the SayHello(..)methods in the above codes. This method will be call by client side after.
Now, we are ready to implement client side.
Implemented grpc client
It is same process as server. As we mentioned above, we use the same CA to sign and verify both server and client’s certificates. Because, we should ensure that we are talking right server.
1. We should load CA’s certificate to identify server certificate.
2. We need to create cert pool and append CA’s cert into
3. We need to load client certificate, set certificates and RootCAs then create client TLS Credential as same as the server.
4. Finally, we are ready to pass TLS Credential to client grpc using by grpc.WithTransportCredentials(…)
Here is full code of client.go
And we are done. Let’s run the server and client and see the result.
Run the server with the following command.
$ go run server/server.goRun the client with the following command.
$ go run client/client.goYou will receive the following result.

Conclusion
In this article, we’ve created server and client certificates using by openssl tool. We’ve add all the certificates command in a script file to automate the process .We’ve implemented some codes in Go both server and client using by this certificates. Finally, we’ve communicate each other using by their TLS Certificates.
Thanks for reading, see you next time :)