Modular Game Worlds in Phaser 3 (Tilemaps #1) — Static Maps
This is a series of blog posts about creating modular worlds with tilemaps in the Phaser 3 game engine. In this first post, we’ll go from zero to creating a Pokemon-style top down game world that a player can explore:

The next post covers how to create a dynamic platformer and the posts after that will cover procedurally generated dungeons and wall-jumping maps with Matter.js.
Before we dive in, all the code that goes along with this post is in this repository. These tutorials use the latest version of Phaser (v3.55.2) as of 08/13/21.
Why
I'm a creative developer and professor at Columbia College, but I was brought on to the Phaser team in the sprint leading up to the initial public v3 release to develop the Tilemap API. I created ~40 guided examples and wrote weekly newsletter updates, but I wanted to collect all of that information into a more guided and digestible format so that people can more easily jump into Phaser 3.
Intended Audience
This post will make the most sense if you have some experience with JavaScript, Phaser and the Tiled map editor. If you don’t, keep reading but also keep Google, the Phaser tutorial and the Phaser examples & documentation handy to fill in any gaps.
Alright, Let’s get into it!
What is a Tilemap
A tilemap is a technique for creating a game world out of modular building blocks. When you break a world down into lego-like pieces, you get memory, performance and creative wins.
Imagine trying to recreate Mario from scratch. Let’s say we decide to try loading each level as a giant image file. World 1–1 would be over 3500px wide:

We’d need a lot of pixels to store that first level and the other 31 levels in the NES game as images. Additionally, it would be hard to sync up the image with logic with the game. Which pixels can Mario stand on? Which pixels correspond to pipes he can enter?
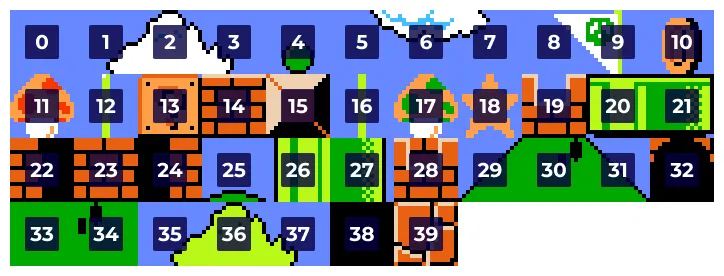
The tilemap approach defines a set of modular, regularly-sized tiles that we can use to build our levels. That way, we only need one image, a tileset:

So that 304px x 192px image holds the possibility of recreating all the levels of the original mario game, plus any new levels you can imagine. (*Of course, you’d still be missing a mustached man and a bipedal turtle, among other things.) Each tile is just 16 x 16 pixels. An arrangement of those tiles into a level is called a tilemap. With tilemap editing software, we can easily configure properties of the tiles too. For example, we can mark some tiles — like the ground tiles — as solid tiles that Mario can stand on.
So with tilemaps, we’ve got a smaller image (performance & memory win) that we can use to easily create and iterate on level designs (creative win).
Phaser 3 Basic Template
Before we jump into loading up some tilemaps in code, let’s take a look at the structure of a Phaser 3 game. In v3, games are structured around Sceneobjects. These are like State objects from v2, but more flexible.
This is a template that you’ll see throughout the Phaser examples repository. It’s an easy way to get started. It creates a game and defines a scene as a collection of functions — preload, create and update.
Here’s a slightly more complicated example that shows how to load and create a background and some text:
There might be a lot of new concepts in this series if you haven’t used Phaser, so check out the extensive examples and documentation if you get lost.
First Step
Let’s start with the simplest setup and re-create a mini-mario level using this stripped down Mario tileset:

We’ll start with the boilerplate from the last section. Inside of preload, we can load up the tileset image:
this refers to our current scene and this.load is the scene's loader which handles, well, the loading of assets. The create function won't get run until after all the assets in preload are done loading.
level is just a 2D array of numbers, or indices, that point to a specific tile from our tileset. 0 is the top left tile, 1 is the one next to it, etc.
Note: an index that is less than zero is considered an empty tile.
Breaking down that code, we’ve got three main parts: a Tilemap, a Tileset and a TilemapLayer. You create a Tilemap through this.make.tilemap (or this.add.tilemap) - you can think of this as a container for tilesets & tilemap layers. A tileset stores information about each tile in the map. A map can then be composed of one or more layers (TilemapLayer instances), which are the display objects that actually render tiles from a Tileset.
Loading from a File: CSV
In addition to loading a map from a 2D array, you can also load it from a CSV:
Note: this example is basically a copy of a Phaser example which features Rich Davey & Ilija Melentijević’s Cat Astro Phi assets.
We can easily add some interactivity here by letting the player pan around the world using Phaser’s camera system. The code is commented to explain the new pieces of Phaser used, but check out the Phaser camera examples for more on cameras.
Building a Map in Tiled
Loading from a 2D array or CSV is great when you want to test out something simple or you are generating a procedural world, but odds are, you’ll want a level design tool. That’s where Tiled comes in. It’s a free, open source tilemap editor that can export to CSV, JSON and a bunch of other formats.
We won’t dive into how to use Tiled — that’s an expansive topic by itself — so check out Tiled’s documentation and the Game from Scratch tutorial series for a crash course. You can also download the tilemaps (.tmx files) and tilesets from the demos here. Open them up, play around and you should get the hang of it.
When working with Tiled to generate maps for Phaser, there are a few things you’ll want to make sure to do:
- When you load a tileset into your map, make sure to check the “Embed in map” option. (If you forget to do this, then you can click the embed tileset button the bottom of the screen.) See first two images below.
- Make sure you aren’t using a compressed “Tile Layer Format.” You can adjust that in map properties sidebar… which you can open by hitting “Map → Map Properties” in the top toolbar. See third image below.
- When you export your map, save it as a JSON file.


Loading a Tiled Map
Using the tilemapTiledJSON loader method, we can load up and display a tilemap that we've exported from Tiled:
This step is mainly about connecting up data. To help making the naming slightly more clear, here’s where the names come from:

You’ll notice that the map is composed of multiple layers placed on top of one another:

This is a common design pattern when working with Tiled. It allows us to separate out elements to be placed at different “depths” in the game. With these layers, we can ensure the “Below Player” layer (the ground & path) are displayed under the player sprite and the “Above Player” layer (roof/statue/sign tops) are displayed on top of the player sprite. The “World” layer has all the rest of the stuff, including the colliding/solid stuff in the world.
If we add in our camera code, we end up with:
Moving with Physics
Now that we’ve got a world, we can add a proper character to the world and have them walk around with physics. There are currently three physics engines that are integrated into Phaser: arcade physics (AP), matter.js and impact. AP is fast and simple, so that’s where we’ll start — we’ll get to matter.js later.
In AP, you can create physics bodies that are either rectangles or circles. Rectangle bodies are axis-aligned bounding boxes, which roughly means they can’t be rotated. Colliding tiles in our map loaded up with AP will be given a rectangular body that matches the size of the tile.
There are four things we’ll need to do:
- Mark certain tiles in the
worldLayeras colliding so that AP knows to use them for collisions. - Enable the AP physics engine.
- Create a physics-based sprite for the player.
- Set the player to collide with the
worldLayer.
The first step to use a tilemap with physics is that you need to mark which tiles should be solid (“colliding”). One way to do that would be to mark certain tile indices as colliding within a layer:
If you are working with tile indices, then there’s setCollision, setCollisionBetween and setCollisionByExclusion. But thinking in terms of indices is hard, so there's a better way: setCollisionByProperty. Tiled allows you to add properties to a tileset via the Tileset Editor, so we can just mark which tiles collide directly in Tiled.
Steps (or see GIF below):
- Open up the Tileset Editor by clicking on the “Edit Tileset” button (at the bottom right of the screen).
- Click and drag (or CTRL + A) to select all the tiles.
- Under the properties window (left side of the screen), click the plus icon and add a boolean property named “collides.”
- Select only the tiles that you want to collide and set “collides” to true by checking the box
- Re-export your map.

Back inside of Phaser, we can simply do the following to mark our colliding tiles within worldLayer:
If you want to verify that you’ve got the right tiles marked as colliding, use the layer’s debug rendering:
Which will look like this:

Once we’ve got tiles marked as colliding, we can add physics. In our game’s config, we can turn on the arcade physics engine by doing the following:
We can create a simple player sprite that moves around using physics:
Note: I’m using a texture atlas here. See this tutorial for more info.
The last step is to collide the player and the tilemap layer against one another. We could use collide or addCollider. We'll go with the latter:
And putting it all together, with a few extras like adding in player animations:
There’s a whole lot of powerful stuff you can do with Tiled and Phaser to make the creative process of developing a game world easier. For example, the code for this section uses an object layer to embed the player’s spawn point directly in the map.

But that’s just scratching the surface! Keep an eye out for the next post, where we’ll dive into dynamic tilemap layers and creating a procedural dungeon.
Next Up
This is all just scratching the surface. Check out the next post where we dive into dynamic tilemap layers to create a puzzle-y platformer:

Thanks for reading, and if there’s something you’d like to see in future posts, let me know!
Addendum on Tile Bleeding
You may have noticed the word “extruded” in the name of the tileset in the last two sections. If you ever notice a slight “bleeding” in your tilemap where you start to see the seams between your tiles, one way to solve that is to extrude your tiles using a small command line utility I wrote called tile-extruder.
About Me
I’m a creative developer & educator. You can see more of my work and get in touch here.