Meet ToyStacK AI – one of the best tools in the Node.js world! With AI-powered deployment, you’ll breeze through app development and add some flair to your workspace. It’s the ultimate way to keep things fun and efficient!

As a DevOps professional, I've been searching for a tool to automate the deployment of Node.js API projects. These projects typically use Docker images and require deployment across multiple machines. In the past, I used a manual process: pushing code to GitHub, pulling it onto each machine, and then deploying. It was a time-consuming and cumbersome process.
While browsing the latest AI updates and news, I discovered an intriguing tool called Toystack AI. Initially, I overlooked it, but when I saw the same ad again, it claimed to auto-deploy Node.js projects with just a few clicks. Intrigued, I decided to give it a shot.
I began by searching for Toystack AI. Subsequently, I navigated to the documentation but found it hard to understand. Regardless, I clicked on "Start Deploying." The option to log in via GitHub was convenient and user-friendly. Now, my Toystack dashboard displays the following.

Everything looks good so far, and the dashboard seems simple to navigate. so Let’s dive right in
As it can be seen, it needs a dedicated git repo to import.
I had simple code node js express code in the git repo already pushed which looks like this.
const express = require('express');
const app = express();
const PORT = 3000; // You can choose any available port

// Sample route
app.get('/', (req, res) => {
  res.send('Hello, Nikhil');
});

// Starting the server
app.listen(PORT, () => {
  console.log(`Server is running on http://localhost:${PORT}`);
});
and my package.json
{
  "name": "nodeproc",
  "version": "1.0.0",
  "description": "",
  "main": "index.js",
  "scripts": {
    "test": "echo \"Error: no test specified\" && exit 1"
  },
  "keywords": [],
  "author": "",
  "license": "ISC",
  "dependencies": {
    "express": "^4.19.2"
  }
}
And Docker files with it, as the toystack is easy with it.
# Use an official Node.js runtime as the base image
FROM node:14

# Set the working directory in the container
WORKDIR /usr/src/app

# Copy package.json and package-lock.json to the working directory
COPY package*.json ./

# Install dependencies
RUN npm install

# Copy the rest of the application code to the working directory
COPY . .

# Expose the port the app runs on
EXPOSE 3000

# Command to run the application
CMD ["node", "app.js"]
Now it’s ready to import, Get back to the Toy Stack dashboard, and import the repo using the same GitHub repo, it will ask you to install the Toy Stack app in the GitHub marketplace, make sure you do it, so the repo will be imported.
During installation, configure a single repository, as granting access to the entire code within it is necessary. After configuring, return to the Toystack dashboard. You’ll notice an active repository that hasn’t been imported yet. Proceed to import it, and your dashboard should resemble this.
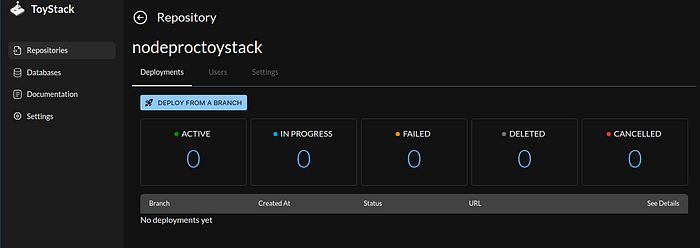
Now Deploy FROM A BRANCH, select the branch and deploy.
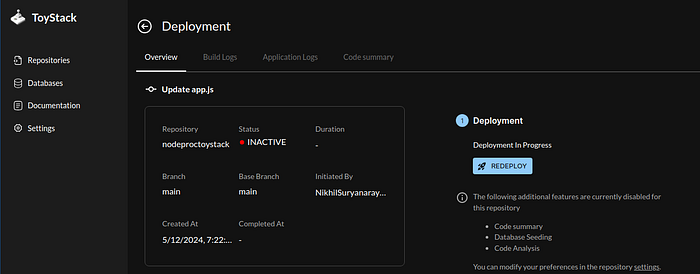
Now it will look like this
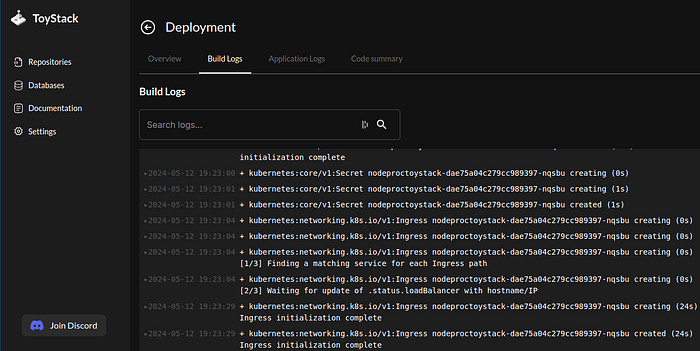
The good part, you can see real time building logs.
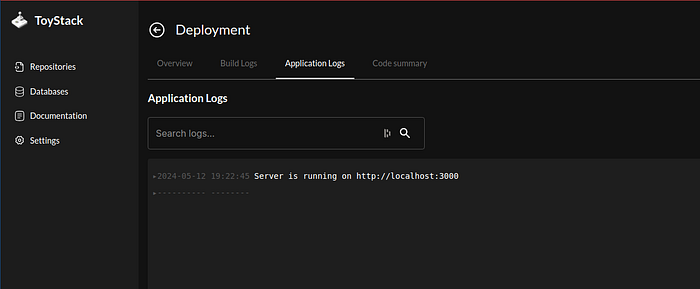
And application logs, where i can see my node js console log.
The application has been successfully deployed and is now up and running. How can I access it?
For heaven’s sake, they provided us with the temporary IP address, which is like...

The domain wasn’t working for me due to propagation, so I used the IP address to access it in the browser, and it was working.

Conclusion
As observed above, the entire process took only a few minutes, primarily for the initial setup. Once the setup is complete, redeployments are as easy as can be.
This might be the beginning of a major shift in how applications are automatically deployed. While GitLab and Jenkins are already in use, this new approach seems to be cloud-based and easier to manage. It’s like upgrading from a basic tool to a more advanced and user-friendly one, making the deployment process smoother and more efficient.
