Single to Multiple Profile Generation of a Face using Conditional GANs

Abstract
The aim of this project is solely to aid the police in searching for the missing or wanted people, or maybe have some fun among our peers. The basic idea of this project is to implement an image translation model for generating multiple profiles (0°, 45°, 135°, 180°) of a face given a single profile (center profile) using Conditional Generative Adversarial Networks (CGANs). This project is an implementation and application of the work presented in pix2pix [1]. The methodology, architecture, and hyperparameters of [1] have been used to train the model on an entirely new dataset with an entirely new aim. We will utilize the KDEF and CVL Face Database for training, evaluation, and testing purposes. All the code can be found on my Github.
Introduction
The main motivation behind this project was to help the police and other private security firms in searching for wanted criminals or missing people. As we all know whenever a person is convicted of a crime and taken into custody, the police capture their mugshot photos from all their profiles (i.e., left, center and right). This is done so that it’s easier for them to identify that person if they do anything in the future, as it’s always easier to identify that person if we have all their profiles rather than just one. In case the criminal hasn’t been caught yet by the police and they are looking for the said criminal using some CCTV footage they found. The CCTV footage might not have all the profiles of the face of the said criminal making it harder for the police to find them. In a similar scenario if a person goes missing the family of the said person might only have their photos from a single profile making it harder for the police to find the person. This is where our project comes in handy.
This project aims to generate all the profiles of a face of a person given only a single profile view image. We aim to do this using CGANs. CGANs give us the ability to map image to image as described by the authors in their original paper [1]. Given one image as input, we can generate another image as its corresponding output image. So in this case we wish to train 4 models for generating images of different angles (i.e., 0°, 45°, 135°, 180°), given the center profile image (i.e., 90°). We aggregate and align the KDEF and CVL Faces Database consisting of images of faces of different individuals from 5 different angles (0°, 45°, 90°, 135°, 180°), with different facial expressions for training, evaluation, and testing purposes.
Dataset
For this project we’ll be combining 2 datasets i.e., KDEF and CVL Face Database as these are all the datasets I could get permission to use and would fit the purpose of this project.
A. KDEF Dataset
This dataset has 4900 images of 70 individuals, having 7 different facial expressions from 5 different angles. All the images are 562 x 762 pixels.

B. CVL Face Database
This dataset has 798 images of 114 individuals, having 3 different expressions from 5 different angles. All the images are 640 x 480 pixels.

When combined and preprocessed it gives us a total of 1094 sets of images with each set containing 5 images (i.e., 0°, 45°, 90°, 135°, 180°), making a total of 5470 images occupying 1.28 GB memory. After processing all these images using Photoshop to change the background to white the dataset folder size was reduced to 1.07 GB.
Programming Tools
A. Programming Language
Python
B. Libraries
Pytorch, OpenCV, Mediapipe, Numpy, Matplotlib, and Tkinter
C. Tools
Rutgers iLab, Jupyter Notebook, and Adobe Photoshop
Methodology
Stage 1: Data Preprocessing
1) KDEF Dataset: For all the individuals in this dataset there were a total of 5 images in the correct angles as needed for the purpose and scope of this project per expression. There were a total of 7 expressions per person making it a total of 35 images per person. These images were also renamed and kept in the correct folder structure. No extra pixel space was observed in these images so no cropping was done.
Apart from this while going over the dataset, I found that some of the images were missing, so as all the missing images were luckily of a side profile rather than the center profile, I was able to generate those images using Photoshop by simply flipping the image of the other side angle.
2) CVL Faces Database: For all the individuals in this dataset, there were a total of 7 images. 5 images were in different angles with neutral expressions and 2 other images were with different expressions from the center profile. So for the purpose and scope of this project, I discarded those extra facial expression images and renamed and saved the remaining 5 images in the correct folder structure optimal for training.
Apart from this, it was observed that all the images in this dataset had a lot of extra pixel space on the sides which wasn’t necessary, and was different from the first dataset, so I cropped the images from the sides to convert the images from 640 x 480 pixels to 354 × 480 pixels. This was also done to make the image’s height and width proportional to the first dataset.
3) Common preprocessing: After the initial preprocessing of both datasets, to generalize our dataset, I changed the background of all the images of both datasets to white. I did this so that our model could ignore the background and learn more important aspects of the face. I implemented this process first through the selfie segmentation model of Mediapipe, though it gave me pretty quick results we saw that its segmentation wasn’t that good. In a lot of images, some parts of the person were also turned white, so then I used Photoshop to complete this process. I automated a transformation for all our images, taking much more time to process as compared to Mediapipe but giving excellent results. We could even notice different strands of hair of all the individuals.
Since the aim of this project is to help the police in searching for wanted criminals and missing people, therefore turning the background to white doesn’t really matter as the face is all that we’re interested in. It doesn’t matter what the background is. So we can do a similar process to the test images we’re going to download from the web. As we don’t need to retain their background as we’re only interested in the face part.
Stage 2: Creating four data loaders
As we train 4 models, one for each output angle image (i.e., 0°, 45°, 135°, 180°), 4 data loaders were made from scratch. These data loaders would use OpenCV to read the input and target images and resize them to uniform 256 x 256-pixel images. As we had RGB images and OpenCV reads the images in BGR format, we had to split the read images and then merge them in the correct format. After this, we use transpose to change the 256 x 256 x 3 image arrays to 3 x 256 x 256 image arrays as that is the shape in which the images will go into the model to train. Lastly, we normalize all the images from the range between 0–255 (pixel value range) to between -1 to 1, as this is mentioned in [1] to give better results. The batch size was also kept at 16 again as mentioned in [1].
The code snippet above is just for the 0° model. We make similar data loaders for the rest of the angles as well i.e., (45°, 135°, and 180°).
Stage 3: Algorithm — Generative Adversarial Networks (GANs) and CGANs
GANs are generative models that learn a mapping from random noise vector z to output image y, G:z → y.
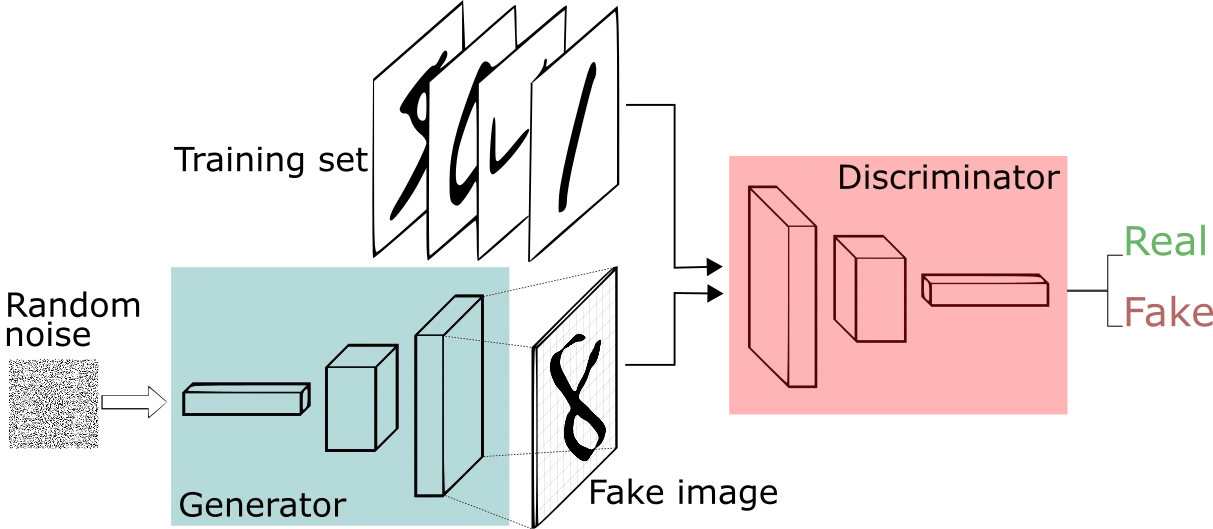
In contrast, CGANs learn a mapping from observed image x and random vector z to y, G:x, z → y.

GANs are algorithmic architectures that use two neural networks, that compete against each other (“thus the “adversarial”) in order to generate new, synthetic instances of data that can be passed for real data. These two neural networks are called Generator and Discriminator. The Generator’s job is to artificially generate fake images in an attempt to fool the Discriminator for real images. The Discriminator’s job is to identify which outputs it receives have been artificially created and which are real. Both models are trained in tandem and follow a cooperative zero-sum game framework to learn. In other words, they play a min-max game in order to make each other better. The CGANs is one of the first GAN innovations that made targeted data generation possible as it works on the paired data. It also adds labels to the Discriminator input to distinguish data better.
Stage 4: Architecture

I have used a 286 x 286 convolutional PatchGAN for the Discriminator, as mentioned in [1].
Let Ck denote a Convolution-BatchNorm-ReLU layer with k filters. CDK denotes a Convolution-BatchNorm-Dropout- ReLU layer with a dropout rate of 50%. All convolutions are 4 x 4 spatial filters applied with stride 2. Convolutions in the encoder, and in the discriminator, downsample by a factor of 2, whereas in the decoder they upsample by a factor of 2.
286 x 286 Discriminator: C64-C128-C256-C512-C512-C512

For the Generator, I have used the U-net architecture as again mentioned in [1], which is a convolutional network architecture for fast and precise segmentation of images. As named, it is a U-shaped architecture consisting of a specific encoder-decoder scheme. A U-Net architecture allows low-level information to shortcut across the network by serving the skip connections.
Encoder: C64-C128-C256-C512-C512-C512-C512-C512
Decoder: CD512-CD512-CD512-C512-C256-C128-C64
The objective of a GANs can be expressed as:

As opposed to this, the objective for CGANs can be expressed as:

Where G tries to minimize this objective against adversarial D which tries to maximize it. In addition, the most important part of CGANs which differentiates them from vanilla GANs is the L1 loss, which makes the pairing of images possible. We use L1 loss as opposed to L2 loss as it offers less blurring.

The final objective thus becomes:

The weight initialization was again done according to [1]. Weights were initialized from a Gaussian distribution with a mean of 0 and a standard deviation of 0.02. For Batchnorm layers, the weights were initialized with mean = 1 and standard deviation = 0.02.
Stage 5: Training
As mentioned in [1], to train the model, BCE with logits loss and L1 loss was used to calculate the loss, and Adam optimizer was used with a learning rate of 0.0002 with betas (0.5, 0.999). Alpha (the multiplying factor for the L1 loss) was set to 100. All the models were trained for 200 epochs with batch size 16 while saving the results of the second last batch into files and logging the loss as well. We had the train test split as 1089 sets of images for the training purpose and 5 sets of images for the testing purpose. I included more data in training than normal convention because of the nature of the problem statement of this project. As we can’t really calculate the accuracy for the image generation problems but can only judge the results from our human eyes, also having limited data, plus we’re anyway going to test our model on images from the web, I decided to put more data in the training set so as to train our models better.
The code snippet above is just for the 0° model. We train similarly for the rest of the angles as well i.e., (45°, 135°, and 180°).
We can finally save the model weights using the code snippet above to directly use it for testing and evaluation purposes.


I have attached above some training results. As can be clearly seen that we have gotten pretty good training results. The models have been able to learn and generate facial features quite well.
Evaluation
All 4 models were evaluated based on their Generator and Discriminator loss.


As can be clearly seen from the loss graphs, the loss of Discriminators has some oscillations in the beginning but afterward, it starts to become constant. As for the loss of Generators, for all the models it steadily decreases across the 200 epochs which again is a good thing certifying that our models trained well.
The code snippet above is just for the 0° model. We can similarly plot the loss graphs for the rest of the angles as well i.e., (45°, 135°, and 180°).
Testing and Results
The performance of our models has been tested using two categories of data. For testing, we first load all 4 models as provided in the snippet below.
A. Test Category 1
In this category, we test our model on the images from the test set of the dataset. As these images are part of the dataset they have a lot of features similar to the other images in the training set of the dataset, such as camera, lighting, background, person’s ethnicity, etc. But at the same time since these are the test images and not included to train the models, our models have never seen the faces that are in these images. So keeping that in mind I think that our models have done a good job in generating the different profiles for these images as we can clearly see that our model has been able to learn and generate facial features such as hair, nose, ears, mouth, eyes, etc very similar to the target images. There’s still a long way to go as we can observe that the generated images are a bit pixelated, but I believe this has been the case because of a limited dataset. If we could have gotten bigger datasets with more diversity and ethnicity in their subjects, then this probably wouldn’t have been the case.


Test Category 2
In this category, we test our model on the images obtained from the Web. This is a more difficult category for our models as these images have nothing similar to the images from our dataset. As our datasets were very limited with very little diversity and ethnicity in them, it's reasonable that our model didn’t quite perform as well on the web images as it did on the test images. We can also observe some editing in one of the images, forcing our model to perform badly. But again there were some positives that we can take. We can see that our model has been able to learn and generate facial features like hair and nose quite correctly. The angle of the generated facial images is also correct, but I can agree that these images could have been much better.


Building the GUI using Tkinter

I finally built a seamless and user-friendly GUI using Tkinter given the nature of our project, it seemed a good choice to build a GUI so that people form both CS and non-CS backgrounds could benefit from our project. This GUI will ask you to select the image file you need to generate more profiles of. Once the image is selected, you can see the results displayed on the GUI within a matter of seconds. The GUI even shows a “Loading...” text while processing the image just to let the user know that the program is working. As this project is training and using 4 models to predict the different profiles, one for every profile. Choosing the path of all 4 models in the GUI did not seem very user-friendly, so it was removed and now the user only needs to select the image that they want to generate the multiple profiles. But in order to run the GUI successfully the user needs to change the path of all 4 models.


Challenges Faced
Getting the dataset was the first challenge that I faced for this project. All the relevant good datasets I found for the purpose of this project are open-source but require approval from their owners. They are not openly available as it’s not allowed to use them for commercial purposes. So the owners need to check my background affiliation with a renowned university in order to grant me the approval to use their datasets.
Secondly, the datasets that I acquired were primarily for facial expression recognition, plus there were some missing images in the dataset, so I had to manually go over the dataset to generate the images using Photoshop, and clean the data to make it usable for our purpose. Also, the CGANs algorithm is the latest research with few online resources to understand it, so I had to read the original paper in order to understand and implement this algorithm. Since we’re working with a custom dataset, I also had to make a custom data loader to cater to the needs of this project.
I initially trained the models using 70 x 70 PatchGAN Discriminator architecture but then evaluating the results had to re-train the models using 286 x 286 PatchGAN Discriminator architecture. These models were giving good results on the test set from the dataset but when I used them for testing on the images from the web, they gave poor results. I figured it was because all the images in the dataset had the same background, so my model was unnecessarily learning the background and when getting an image with a different color background got confused. So to fix this I used Photoshop script to remove the background from all the images and then train all 4 models again.
Lastly, I built a GUI using Tkinter which was my first time using that library. Learning a new library from scratch is always a challenge, but given the nature of this project, it seemed a good choice to build a GUI, so that people from both CS and non-CS backgrounds could use this project.
Conclusion and Future Work
In conclusion, this project did a good job being a prototype. We can see from the evaluation plots that the losses of both the Generators and Discriminators are exactly as they as supposed to be. In addition to that, we saw good results on the test images from the Dataset meaning that our model learned pretty well given the small diversity in our dataset. For the images from the web, we can see that the results are not that good as compared to the dataset test images but they are still quite reasonable.
For future work I would like to get a bigger dataset that has more diversity, meaning it has people from different ethnicity, currently one of our datasets only consists of Caucasian people and the other dataset only has White people. Therefore training our model on a dataset with people from different ethnicities would give even better results.
References
- Isola, Phillip, et al. “Image-To-Image Translation with Conditional Adversarial Networks.” ArXiv:1611.07004 [Cs], 26 Nov. 2018, arxiv.org/abs/1611.07004v3. Accessed 16 Nov. 2022.
- E.Lundqvist, D., Flykt, A., and O ̈hman, A. (1998). The Karolinska Directed Emotional Faces — KDEF, CD ROM from Department of Clinical Neuroscience, Psychology section, Karolinska Institutet, ISBN 91–630–7164–9.
- Langner, Oliver, et al. “Presentation and Validation of the Radboud Faces Database.” Cognition and Emotion, vol. 24, no. 8, Dec. 2010, pp. 1377–1388, 10.1080/02699930903485076.
- PEER,Peter,EMERSˇICˇ,Zˇiga,BULE,Jernej,ZˇGANECGROS,Jerneja, SˇTRUC,Vitomir. Strategies for exploiting independent cloud implementations of biometric experts in multibiometric scenarios. Mathematical problems in engineering, vol. 2014, pp. 1–15, 2014.
- Taherkhani, Fariborz, et al. “Profile to Frontal Face Recognition in the Wild Using Coupled Conditional GAN.” ArXiv:2107.13742 [Cs], 29 July 2021, arxiv.org/abs/2107.13742. Accessed 16 Nov. 2022.