Understanding Composited Layers to improve the performance of Flutter apps
In Flutter, besides Widget, Element and RenderObject trees, there’s also a Layer tree. And the same way the Element tree generates the RenderObject tree during the build phase, the RenderObject tree generates the Layer tree during the paint phase. A new Layer is created when RenderObject.isRepaintBoundary equals true.

Layers are expensive. The documentation fragment below explains why:
When layers are used, they cause the rendering pipeline to have to switch render target (from one layer to another). Render target switches can flush the GPU’s command buffer, which typically means that optimizations that one could get with larger batching are lost. Render target switches also generate a lot of memory churn because the GPU needs to copy out the current frame buffer contents from the part of memory that’s optimized for writing, and then needs to copy it back in once the previous render target (layer) is restored.
However, by isolating parts of the UI into separate layers, Flutter can avoid repainting the entire screen when only a small part of the UI changes. Layers help in achieving smooth animations by allowing certain parts of the UI to be animated independently without affecting the rest of the UI.
So, to keep the app layers optimal, follow these rules:
- If something is animated, try to isolate it on a separate layer, so that it won’t cause too much excess rendering
- On the other hand, keep as few layers as possible. Every layer adds additional computational and memory overhead
Let’s have a look at how to achieve that:
1. Avoid excess painting
The easiest way is to use a RepaintBoundary widget. It extends SingleChildRenderObjectWidget, which means that this widget has a single RenderObject assigned to it. And of course, that one has isRepaintBoundary set to true.
1.1 Isolate animations
RepaintBoundary(
  child: CircularProgressIndicator() // <- our animated widget
),
In this example, we limit the scope of repainting to the animated widget, otherwise the whole parent layer would be repainted on every tick of the animation.
Layers before adding a repaint boundary
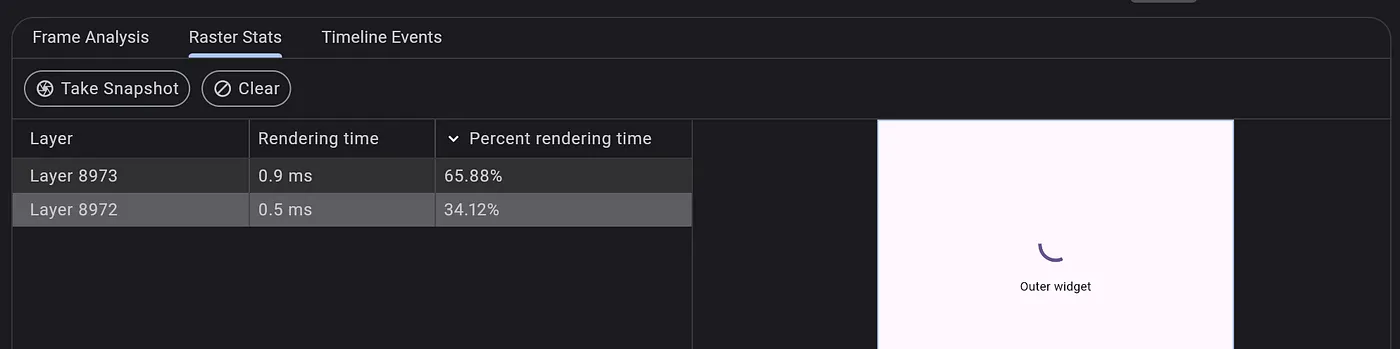
Layers after adding a repaint boundary:

RenderRepaintBoundary has a metrics property, that calculates if usage of RepaintBoundary widget is useful or not. The easiest way to access it is through DevTools:

As we see, the usage of RepaintBoundary in this case is useful according to the metrics.
1.2 Isolate fixed and scrollable content
It is also worth noticing, that by default the AppBar is painted in a separate layer as well. If we check the AppBar’s code, we can notice that its layout contains AnnotatedRegion, which in turn has a RenderObject with alwaysNeedsCompositing set to true.
This makes sense because when you scroll the body of the Scaffold, the AppBar remains fixed and there’s no need to repaint it. In case you implement a custom AppBar in your application, don’t forget about isolating its painting on a separate layer.
2. Avoid excess layers
2.1 Don’t use Opacity or ColorFiltered widgets on images.
That creates a new composited layer. Use Image’s color and blendMode parameters. You can read more about that in this article.
2.2 Don’t use Opacity for animations
AnimatedOpacity is way more performant and it won’t repaint the entire child widget tree but will only animate the opacity value.
2.3 Use decoration instead of clipping whenever possible
According to the documentation:
A
saveLayercall is especially expensive in older devices because it creates an offscreen render target, and a render target switch can sometimes cost about 1ms.Even without
saveLayercall, a clip is still expensive because it applies to all subsequent draws until it's restored. Therefore a single clip may slow down the performance on hundreds of draw operations.
In case you want to add a shape to your widget, use the decoration property of DecoratedBox or Container if content clipping is not necessary. More about shapes and clipping can be read in this article.
2.4 Disable clipping where possible
Some standard widgets have clipping enabled by default. If you know that this won’t add any use to your layout, for example, widgets won’t ever go beyond the Stack box, better to disable clipping:
Stack(
  clipBehavior: Clip.none,
  child: ...
)ClipPathdefaults toClip.antiAliasClipRRectdefaults toClip.antiAliasClipRectdefaults toClip.hardEdgeStackdefaults toClip.hardEdgeEditableTextdefaults toClip.hardEdgeListWheelScrollViewdefaults toClip.hardEdgeSingleChildScrollViewdefaults toClip.hardEdgeNestedScrollViewdefaults toClip.hardEdgeShrinkWrappingViewportdefaults toClip.hardEdge
Also, be aware that by default, ListView adds repaint boundaries for every child. If you are sure, that children of the list will not be independently updated, you can disable that by adding addRepaintBoundaries: false to the constructor. You can read more about ListView optimizations in this article.
2.5 Be aware of the cost of some other widgets
Widgets like Transform, BackdropFilter, ShaderMask and Texture also create a new layer. While it might be tricky to replace them with something else, just be aware that they are not free.
Hope you’ve found this article useful. I will update it with more techniques whenever I find something useful. Follow me on Twitter to get the latest updates.