How to Setup a Virtual SSID with hostapd
Whether you’re willing to setup a guest access-point, or a dedicated wireless network for your VPN needs, you’ll have to setup a virtual SSID at some point. This article will walk you through the required steps to achieve it using hostapd.
This article is a companion to my previous serie “How to Build Your Own Wireless Router” and is assuming you already setup your wireless card as an access-point. If this is not the case, head up to my previous article.
Diagram
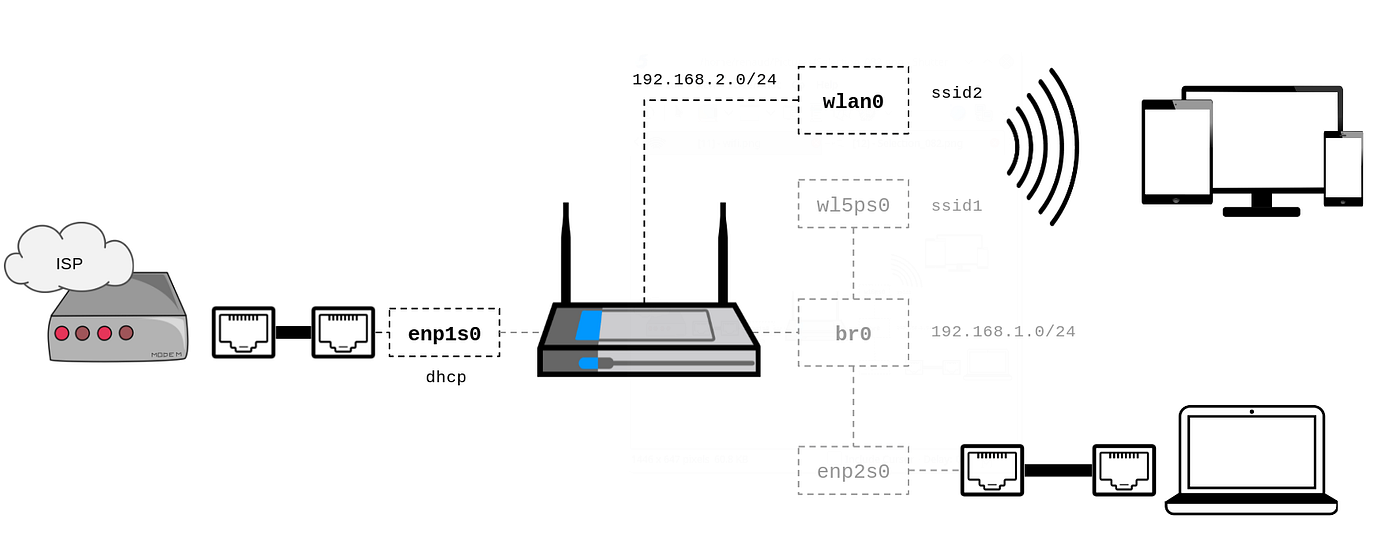
Based on my current setup, here’s an updated diagram of what I want to achieve. Assuming wlp5s0 is the physical wireless interface, the virtual SSID will run on a virtual wlan0 interface, using its own 192.168.2.0/24 sub-network:
Preliminary
First of all, let’s check that your wireless device supports multiple SSID:
$ iw list
    ...
    valid interface combinations:
    * #{ AP, mesh point } <= 8,
    total <= 8, #channels <= 1, STA/AP BI must match
    ...
From the output above, we know that the chipset supports up to 8 AP on a single channel. That mean we can setup up to 7 virtual SSID, and they will all run on the same channel.
Network interfaces
According to the documentation found in hostapd.conf, there’s a strong requirement between the MAC address of the physical interface, and the BSSID of the virtual interfaces:
hostapd will generate a BSSID mask based on the BSSIDs that are
configured. hostapd will verify that dev_addr & MASK == dev_addr. If this is not the case, the MAC address of the radio must be changed before starting hostapd. If a BSSID is configured for every secondary BSS, this limitation is not applied at hostapd and other
masks may be used if the driver supports them (e.g., swap the locally administered bit)BSSIDs are assigned in order to each BSS, unless an explicit BSSID is specified using the 'bssid' parameter.If an explicit BSSID is specified, it must be chosen such that it:
- results in a valid MASK that covers it and the dev_addr
- is not the same as the MAC address of the radio
- is not the same as any other explicitly specified BSSID
In order to fulfill the requirements above and let hostapd automatically assign the BSSID of the virtual interface(s) without complaining, we’ll update the MAC address of the physical wireless interface by forcing its four least significant bits to zero. That’s enough to allocate 15 virtual BSSID, way more than necessary.
First, let’s determine the current MAC address:
$ ip addr show wlp5s0 | grep link | awk '{print $2}'
44:c3:06:00:03:eb
According to the output above, by clearing the four least significant bits and also setting the U/L bit (for sanity), the new MAC address would be 46:c3:06:00:03:e0.
Now, let’s update the network interface configuration to change the MAC address right before the interface is brought up, and also declare the virtual wireless interface according to the diagram:
$ cat /etc/network/interfaces
...
# Physical Wireless
auto wlp5s0
iface wlp5s0 inet manual
    pre-up ip link set dev wlp5s0 address 46:c3:06:00:03:e0# Virtual Wireless
allow-hotplug wlan0
iface wlan0 inet static
    address 192.168.2.1
    network 192.168.2.0
    netmask 255.255.255.0
    broadcast 192.168.2.255
    post-up /usr/sbin/dnsmasq \
		--pid-file=/var/run/dnsmasq-wlan0.pid \
		--conf-file=/dev/null \
		--interface=wlan0 --except-interface=lo \
		--bind-interfaces \
		--dhcp-range=192.168.2.10,192.168.2.150,24h
    post-down cat /var/run/dnsmasq-wlan0.pid | xargs kill
...
That’s it. I’m using dnsmasq as DHCP server - feel free to use your prefered weapons. Please note that allow-hotplug is required on the virtual interface to properly work.
Access point configuration
Now, the easiest part: we’ll add a virtual SSID to the current hostapd configuration. Simply append, at the bottom of your existing hostapd.conf, the desired configuration:
$ cat /etc/hostapd/hostapd.conf
...
### Virtual SSID(s) ###
bss=wlan0
ssid=MyVirtualSSID
wpa=2
wpa_key_mgmt=WPA-PSK
rsn_pairwise=CCMP
wpa_passphrase=you_cant_guess
In the example above, I used a WPA2 encryption but most of the options are available apart from radio interface specific items (like channel). We could add more virtual SSIDs by simply appending more configurations — according we declared and properly configured the corresponding virtual interfaces.
Now, reboot, and you should be able to see your new SSID, along with your new wireless interface (notice the MAC address):
$ ip addr show wlan0 | grep link | awk '{print $2}'
46:c3:06:00:03:e1
That’s all folks!