Getting started with Containers using Docker and Azure Container Instances(ACI)

Developing quality software is definitely a laborious task. From large teams of developers working in synchronization to testers hunting for loopholes, the entire process is time-consuming, expensive, requires numerous configurations and set up to be done at every developer's machine, vulnerable to errors and less secure. These overheads invoke the need for a new framework that could enhance the entire process and shift attention towards quality software development.
Containers do exactly the same. A container is basically a software that wraps up code together with all its setup and dependencies, converts into a single package, hence allowing code to be executed on any infrastructure without the need to perform the setup again.
Imagine you have created a web application using React, Node and Express JS, that takes input from the user during runtime, and generates prediction based on a model that you have coded in python. The project is in a directory that has all the files for the web application and the model. You have installed numerous libraries on your workstation and also set up the model to run on a GPU with many adjustments. One of your friends wants to help you finish the project before the deadline, which is two days from now, but does not want to modify his computer in any way setting up and installing dependencies and wants to start coding right away. How would you ship the environment that you set up onto his machine?
Containers are here to your rescue. Lets look at the containerization process with analogous reference to your project, cargo containers and shipping terminology.
You are a mechanic and are developing a new car. You need help from your friend who is an excellent mechanic but has a tiny workshop only to work on motorcycles. Here, an underdeveloped car is your cargo . In order to ship the cargo to your friend, you make another replica of the car and go to the docks from your workshop. You request for a shipping container and then put your cargo along with the tools and equipment needed in the container. A token of the cargo is generated and sent to the dock’s headquarter. The cargo is loaded onto an enormous ship and it leaves your port and goes to your friend’s dock. Your friend now collects the token from the headoffice, goes onto the ship, navigates to your container on the huge cargo ship with the token, opens the container, takes out your cargo, takes it to a suitable car workshop on the dock itself and starts working with the tools you sent along with the cargo without having to move into his workshop. You both can now work on the project.
The analogy above is pretty clean to the important terms used in containerization. The new car is your project, the tools and equipment are your setup and dependencies, your workshop is your computer, the cargo is your entire environment , your friend’s workshop is his computer with a completely different configuration, the dock is a docker, the shipping container is a software container(simply container), the token is a container image, the headquarter is a container registry and the dock’s workshop is docker engine.
Container terminologies
Container
A container is defined as a standard unit of software that packages up code and all its dependencies so the application runs quickly and reliably from one computing environment to another. Containers isolate software from its environment and ensure that it works uniformly despite differences for instance between development and staging. With the need for a container oriented architecture for software development more apparent, Docker jumped into existence.
Docker

Docker is a ready to use service that delivers containers. In 2013, Docker Inc. introduced the industry standard for containers. Containers allow allows developers to isolate their applications from their environment. and can be created using docker. With containers, we can be ship, work and maintain on a different hardware configuration and OS. Microsoft brought Docker containers and its functionality to Windows Server referred to as Docker Windows containers.
Today there are multiple services dealing with container architectures but the most common is docker. Azure Container Instances (ACI) offers the fastest and simplest way to run a container in Azure.
Containerization
The process of packaging software with its environment into a container is called containerization. Containerized software will always run the same, regardless of the infrastructure.
An important result of this is the ability to integrate microservice architecture into our application. Microservices are basically various smaller units of our application running independently instead of running on one machine as a unit.
Container image
When an application or software is containerized, its container image is generated. Container images become containers at runtime. A container image is a lightweight, standalone, executable package of software that includes everything needed to run an application: code, runtime, system tools, system libraries and settings.
Docker images are read-only templates with instructions to create a docker container. You can create your own docker images using a dockerfile.
Dockerfile
A dockerfile includes all the instructions to create a docker container and run it. It will also create your docker image.
Container Registries
A container registry is a repository where the container images are stored. It can be public or private. Docker Hub is the default registry of docker images. You can also create and run your own private registry. Azure Container Registry is the container registry managed by Azure.
How do containers work?
We will talk mainly about the architecture in Docker.
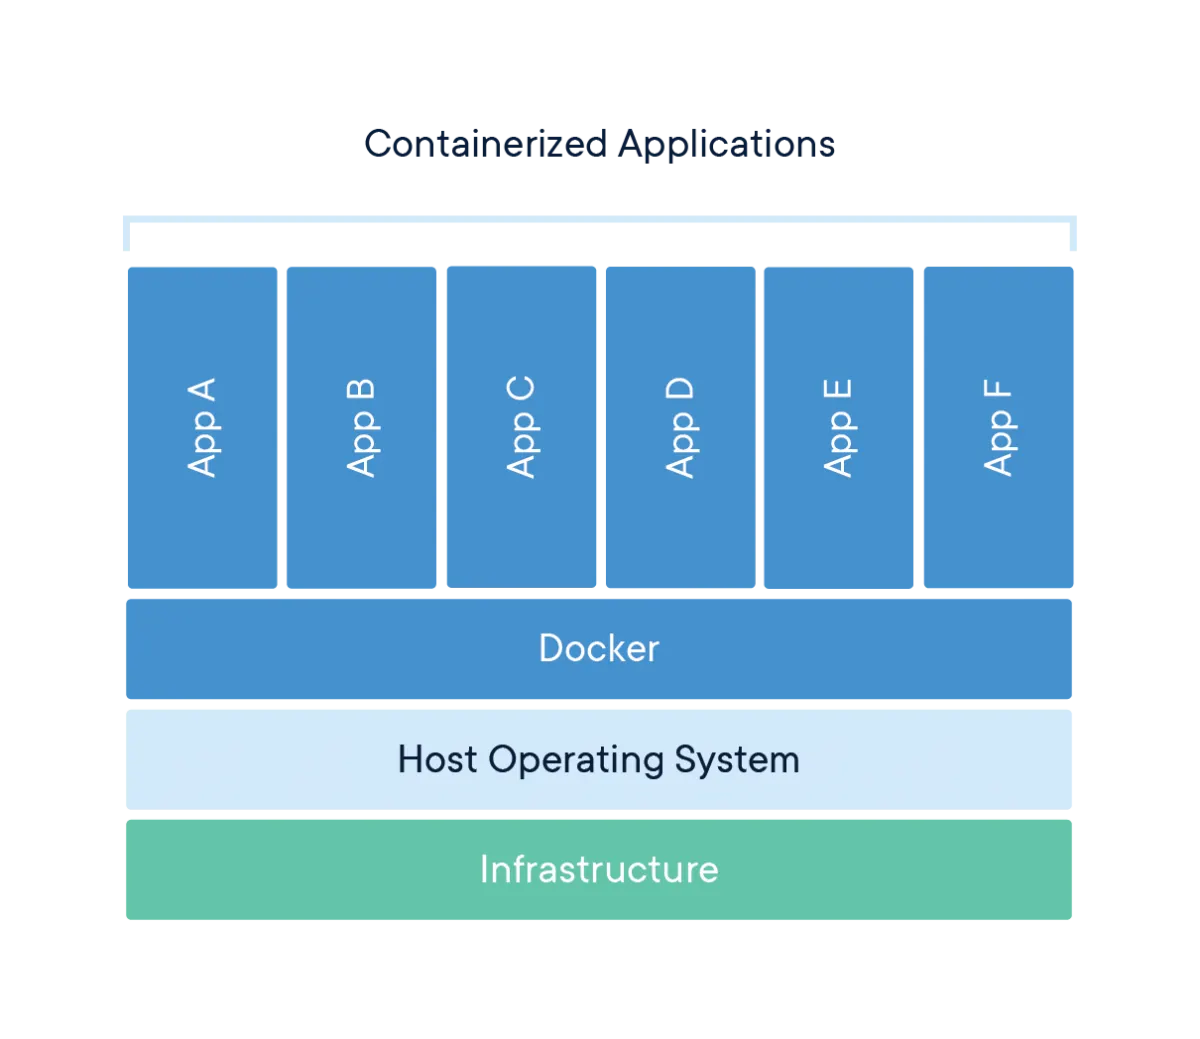
Containers are said to offer OS virtualization for running applications. They run on top of the host operating system i.e OS of any computer on which the container runs, known as the container host. Therefore, containers don’t include an operating system and bundle the libraries and components needed to run the application and use the container host OS to run the container. This makes containers lightweight.
Docker is a PaaS to deliver containers. It follows a client-server architecture. To start working with containers, you first download Docker on your computer. The CLI which is used to enter docker commands acts as the client. Using the CLI, you run commands to create a container image. Once an image is created, the container is put onto a container host. Docker daemon manages the containers and container images on the host and forms the server. The CLI communicates to the docker daemon via a REST API. Next, you push the container image onto a container registry. It can be Docker Hub, Azure Container Registry or any other public or private registry.
Docker engine
IT is the core part of the whole system and is composed of three things.
- Server — Docker daemon
- Client — CLI
- REST API
Docker users can interact with Docker through a client. When any docker commands runs, the client sends them to docker daemon, which carries them out. Docker API is used by Docker commands.

Working with Docker and containers
We will now create, deploy and run a web app into a container.
Pre-requisites: An active Azure subscription and Azure CLI. You may use the Azure for Students to get a subscription for free or else you can use Azure free account.
Coding and making a web app ready for deployment
Refer code from my repo here.
- Creating server.js
Create a new directory and add server.js into it with the above code. The server shall print a Hello World message as a response on port 8080 of the host.
2. Creating package.json file
Add the package.json file as below. A package.json file gives npm relevant metadata and information regarding the project and allows it to manage dependencies.
3. Creating a Dockerfile
Create a Docker file as below. A Dockerfile is a text document that contains all the commands a user could call on the command line to assemble an image.
From node:10 : This commands creates our image from an existing image node:10 which is an LTS (long term support) version 10 of node available from the Docker Hub.
WORKDIR /usr/src/app : This creates a working directory to hold application code inside our image.
COPY package*.json ./ : Ensures that package.json file is copied to the image.
RUN npm install : Thi command ensures that npm dependencies are installed.
COPY . . : Ensures that the app’s source code is copied to the image.
EXPOSE 8080 : Our app binds to port 8080 on the container host. The EXPOSE instruction allows us to have the port mapped by the docker daemon to our localhost.
CMD [ “node”, “server.js” ] : The command to run our app.
4. Creating a .dockerignore file
Create a .dockerignore file in the same directory as your Dockerfile with following content:
node_modules
npm-debug.log
This will prevent your local modules and debug logs from being copied onto your Docker image and possibly overwriting modules installed within your image.
Deployment to container
- Download Docker desktop from here.
- Once the setup is complete, make sure docker is running and Linux containers are configured by clicking on the docker icon in the windows tray and check if ‘Switch to Windows containers..’ is available.

3. Navigate to your project directory via the CMD and type the following.
docker ps
docker images
docker pslists all running containers in docker engine on docker host. Since we have no containers configured, our prompt should be something like this.

docker image lists all container images on your computer. The output in my case is as follows:

4. Creating a container
In order to create a container image, execute the following into your CLI.
docker build -t web_app .The docker build command creates an image with the name web_app. This command executes the Dockerfile from our application directory. Once an image is built, executedocker images and check your container image.
Now we spin a container from the image by executing the command below:
docker run -p 5000:8080 web_appThis command creates the container and maps the container’s port 8080 to our local port 5000. After successful execution, the output can be seen at localhost:5000.

Now, again execute docker ps and this time you will see your container in the list. Copy the container id and type this command into the CLI:
docker kill <container-id>This would kill our container and localhost:5000 would no longer be serving us the response.
We have successfully launched and killed a container using docker.
5. Registering our container image to Azure Container Registry
Once your container image is ready, it can be pushed to the container registry. We will register our image to Azure Container Registry through the CLI. This can also be done through the Azure dashboard. Execute the following sequentially into CLI.
Note: Your registry name has to be unique and Azure CLI must be installed.
# login to your azure account
az login# create a resource group named my_container_registry_rg
az group create --name my_container_registry_rg --location eastus# create container registry named containerRegistry
az acr create --resource-group my_container_registry_rg --name containerRegistry --sku Basic# tag your container registry in following format,
docker tag poke-image containerRegistry.azurecr.io/web_app:v1# Push image to container registry, it will take a while
docker push containerRegistry.azurecr.io/web_app:v1# You can verify if it's uploaded b
az acr repository list --name containerRegistry --output table
You can now go to your Azure dashboard, navigate to Container registries and see your container image.
6. Creating a container using Azure Container Services
Spinning containers from Azure Container Instances is a matter of minutes using Azure dashboard.
Step 1: Type Container instances in the search bar and click on new. Fill the required subscription details. In the Container details, gave an appropriate Container name and then choose Image source as Azure Container Registry. Choose the registry you created above and select the same image.

Step 2: Add port 8080 as TCP and give a DNS name.

Step 3: Click on review+create.
Step 4: On successful deployment, go to your container page and copy the FQDN.

Step 5: Copy and paste the FQDN on your browser and append ‘:8080’ to its end. Press enter and you have your web app.
Why you should use containers
Containers specifically come in handy in some of the following ways:
- Agile application creation and deployment: Creating container images is easier and more efficient than creating VM images.
- Continuous development, integration, and deployment: CI/CD provides reliable and frequent container image build and deployment with quick and easy rollbacks caused due to image immutability.
- Microservice deployment is easier: Containers make it very easy to break the application into smaller independent and manage efficiently.
Summary
We have seen the important container terminologies and successfully developed a web application, deployed it to a container and published its image onto a container registry.
Further learning
Docker documentation — https://docs.docker.com
Azure Container Instances — https://docs.microsoft.com/en-us/azure/container-instances/