How Does The Kubernetes Networking Work? : Part 1

Holla!!! How are you? I am excited to meet you again. My previous article was about the architecture of Docker and Kubernetes. I was in the mood of breaking myths and that article exactly helped me do it. So what is this article about? Well, it is about Kubernetes Networking. We have discussed the working, so let us switch over to networking. For newcomers, please refer to my previous article. Also, the knowledge of basic networking and IP address space is recommended. It will help you understand Kubernetes networking in a better way!
So what does this article actually cover? It is about unwrapping the different networking layers of the Kubernetes cluster. A powerful platform and many intelligent design choices together make Kubernetes. But isn’t it confusing to discuss the real interaction? For example, there are things like pod networks, service networks, cluster IPs, container ports, host ports, node ports, etc. Yes, discussing the interaction makes things difficult. But, discussing each one of them, one piece at a time, makes sense! Once the understanding is clear, everything can be merged.
To stay focused and less loaded, I have decided to split the post into three different posts. The first part includes containers and pods. The second part includes service examination and the extraction layers. They allow the pods to be ephemeral. The third part includes ingress and accumulating traffic to the pods from outside the cluster.
So let us unwrap all the layers, understand them with ease, and then understand the interaction.
Time For The Pods
An atom is the basic unit of a chemical element, a cell is the basic unit of a living organism, and a pod is the basic unit of a Kubernetes application. It consists of one or more containers. They are collocated on the same host and share a network stack, as per their configuration. They also share some resources like volumes. After the brief introduction, let me ask you a question. What does “sharing a network stack” mean? I just mentioned it in the same paragraph, right? Practically, it means that the containers in a pod can reach each other on localhost.

For example, from the above image, look at Kubernetes Pod 1. It has 2 containers. Consider that container 1 is running nginx and listening on port 80 while container 2 is running scrapyd. Now, container 2 can connect to container 1 by http://localhost:80. But how does it work?
I can explain it with the help of a typical situation where we start a Docker container on the local machine.

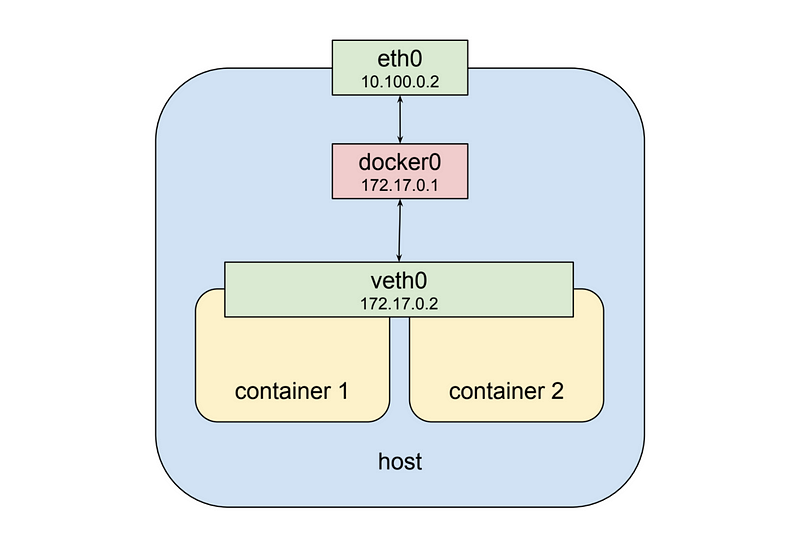
In the above image, you can see that we have a physical network interface. It is marked as eth0 and is attached to the bridge, marked as docker0. It is further attached to a virtual network interface marked as veth0. Please understand that docker0 and veth0 are both on the same level and share the same network. Their network address is 172.17.0.0/24. While their individual address is, 172.17.0.1 for docker0 and 172.17.0.2 for veth0.
During the launch of a container, the processes only see veth0. But their communication with the outside world is made possible by docker0 and eth0.
Now let us understand the second container.

In the above image, the next step is explained. The second container gets a new virtual network interface. It is known as veth1. Again, please remember that it is still connected to the same docker0 bridge. The address assigned to veth1 is 172.17.0.3. It shares the same logical network, like the bridge and container 1. The main thing is, both containers can communicate through the bridge. The only condition is that they should be able to discover the other container’s IP address.
But something is missing. We haven’t reached the “shared network stack” yet! Luckily, the namespaces are flexible. So Docker can begin with a new container and also create a new virtual network interface. But yes, one should specify that it shares an existing interface.
So what will the next image look like? A little different!

Yes, the image is different. The second container seems to be more interested in veth0, rather than its own veth1. So what does this mean? First of all, both the containers are now addressable from outside, i.e. 172.17.0.2. From the inside, each one is free to hit ports opened by the other on the localhost. The second thing is, both the containers can’t open the same port. So there is some kind of restriction. But this situation is similar if we compare it with running multiple processes on a single host! Is it one and the same? Here, the processes enjoy the privilege of decoupling and isolating containers. At the same time, they can collaborate easily!
Kubernetes networking system implements this pattern in a unique way. How? Kubernetes creates a special container for each pod. The special container is meant for a single task. It provides a network interface for the other containers. Now, ssh into a Kubernetes cluster node having scheduled pods and run Docker. What will you see? At least one container that was started with the pause command! This command suspends the current process. So until and unless a signal is not received, these containers will not do anything. One could say, they just sleep or go into a deep slumber. They wake up once Kubernetes sends a “SIGTERM” signal.
Surprisingly, this pause mode or the “pause container” is very important for any pod. One could say that it is the heart of the pod! Why? It provides the virtual network interface. It will be used by all the containers for internal as well as external communication.
So can you visualize the image now?

All this is pretty cool, right? But is this enough? A pod, full of containers, talking to each other, it isn’t the only thing! It isn’t enough to make a system. So what’s next?
The Working Of A Pod Network
The next thing, a pod network system! In the upcoming article, I will discuss “services”. It will enhance your knowledge and make you understand the pod network in a better way. So you will have to wait. For now, it is necessary to discuss the pod network. Let me tell you something very interesting. One of the main design requirement of Kubernetes is that the pods should be able to communicate with other pods. The communication is possible irrespective of the location of the pods, localhost or separate host.
So how does it all happen? To understand it, we need to look at the nodes in a cluster. The knowledge of IP routing is helpful in this section.

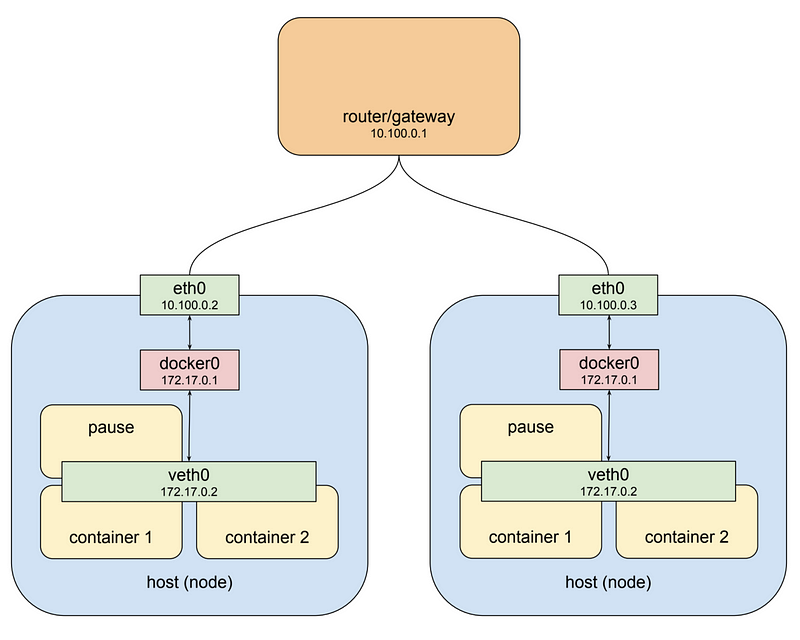
A Kubernetes cluster includes one or more nodes. Each node is a host system. It is either virtual or physical, with a container runtime and with its dependencies, mostly docker. It also consists of numerous Kubernetes system components. These are connected to some network. The connectivity to different nodes in the cluster depends on this network. The above image is of a complete Kubernetes cluster. Let us simplify it.
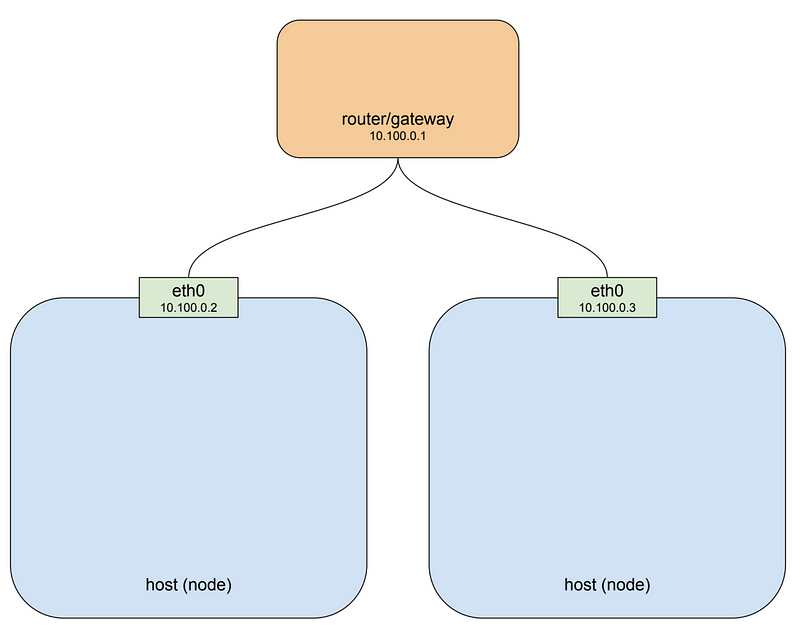
So how does a simple cluster, with two nodes look like?

Also, you don’t need to worry about the state of individual nodes because they are a part of the cluster. For example, if the individual nodes aren’t performing well, there should be someone to manage all this. All the nodes pool together their resources and together make a powerful machine.
The cluster runs on cloud platforms. Famous cloud platforms like GCP or AWS promote a single project environment. It is the default networking architecture. In the image, the private network address is 10.100.0.0/24. With respect to this network address, the router address is 10.100.0.1. The two instance addresses are 10.100.0.2 and 10.100.0.3 respectively.
Internal communication by each instance is made possible with the help of eth0. But understand that the pod, the earlier one, is not on the private network. It is lying somewhere off a bridge on some other network. It is virtual and is existing on a specific node.
The next image will help us understand this in a better way.

If you look at the image, the host on the left has an interface eth0. The address is 10.100.0.2 and its default gateway router is located at 10.100.0.1. Docker0 is connected to the same interface via a bridge. The address is 172.17.0.1, and connected to that is interface veth0 with address 172.17.0.2.
Remember the pause container? Yes, veth0 interface is created with the pause container. It is visible inside all the three containers. This is possible with the help of a shared network stack. The routing initiates with the help of local routing rules. These rules are created when the bridge is created. So any packet arriving at eth0 with a destination address of 172.17.0.2 will be forwarded to the bridge. It will then be sent to veth0. The routing sounds perfect for now. While reading this, please don’t forget to co-relate it with the image. So we know that we have a pod at 172.17.0.2. At this host, we should add rules as per our requirement and router setting. So next, the route leads us towards 10.100.0.2. From there, it will get forwarded to veth0.
Are you understanding the routing process? It sounds confusing though! Here’s a tip, I usually sketch the image on a piece of paper. Needless to say, a rough sketch! Then, I trace the route.
Now let us look at the other host. What’s happening in there?
So the host on the right side also has access to eth0. The address is 10.100.0.3 and will use the same default gateway 10.100.0.1. It is connected to the docker0 bridge with an address 172.17.0.1. But this is an issue! Why? This address might or might not be the same, as host1. Now, if the selected network is different then it is a bigger issue. It is a fundamental problem. None of the nodes has an idea about the private address space that was assigned to a bridge on some other node. Just imagine, what if we send packets to it and have them arrive at the right place? There should be some structure.

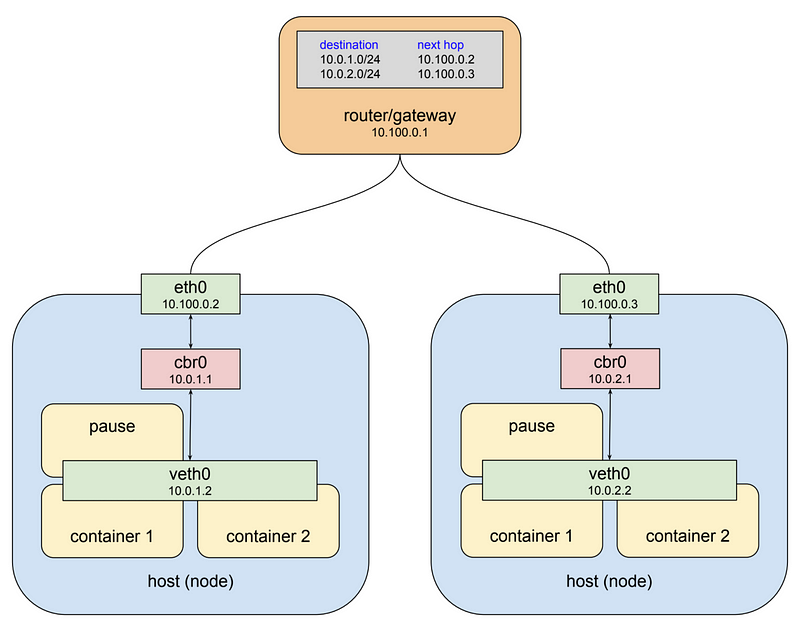
Yes, there is a solution! Kubernetes provides it. There are two ways. Number one, an overall address space is assigned for the bridges on each node. Then, it assigns the bridges addresses within the space depending on the node. Number two, routing rules are applied to the gateway at 10.100.0.1. The rules specify how packets are destined for each bridge and how they should be routed. So which node does eth0 bridge reach through? This is specified. If you notice, all this is a combination of virtual network interfaces, bridges, and routing rules. It is collectively known as an overlay network.
In relation to Kubernetes, it can be called as the “pod network”. Why pod network? The answer is simple, it allows pods to communicate on any node. The above image explains all this. In the image, “docker0” is replaced by “cbr”. It means “custom bridge”.
Conclusion

Honestly, everything mentioned in the above article is abstract. You don’t need to think about it, but understanding the concept is a must. You won’t even know how a pod talks to another pod! But pod network addresses are displayed in the logs. While debugging, in certain scenarios, there is a requirement to explicitly route the network. At that time, this understanding of pod network will come to your rescue.
Kubernetes offers a lot of freedom. A Kubernetes user gets the freedom to decide as well as define how the applications should run and communicate. The user is also allowed to scale up/down the services, perform rolling updates, switch traffic between different application versions, and more. Therefore, learn how to work with Kubernetes and enjoy the freedom.
Here is a link to the Kubernetes Bible, start learning from the basics now :
The Kubernetes Bible for Beginners & Developers
And here is the link to the Kubernetes Video Tutorial, for Free :
Learn Kubernetes from a DevOps guru Video Course on Kubernetes.

