Introduction
In the rapidly evolving field of computer vision, YOLO (You Only Look Once) models have consistently stood out for their remarkable balance between computational cost and detection performance. YOLOv10, the latest iteration, addresses key inefficiencies and introduces a slew of innovations, making it a game-changer for real-time object detection. This guide will walk you through the significant improvements in YOLOv10 and provide step-by-step instructions to implement object detection and region counting projects using YOLOv10.
Before we start! 🦸🏻
If you like this topic and you want to support me:
- Clap my article 50 times; that will really help me out.👏
- Follow me on Medium to get my latest article🫶
Let’s start!!!
Table of Contents
- Setup
- Example 1: Object Detection with YOLOv10

3. Example 2: Region Counting Using YOLOv10

4 — Comparing YOLOv10 to Previous Versions and Other Models
Academic Perspective
YOLO models are popular in real-time object detection for their balance between computational cost and detection performance. Over the years, researchers have improved their designs, objectives, and data strategies, but reliance on non-maximum suppression increases latency and hinders end-to-end deployment. Various YOLO components have inefficiencies that limit their capability.
YOLOv10 Improvements
YOLOv10 addresses these issues with NMS-free training for lower latency and an efficiency-accuracy driven design strategy. The authors introduced consistent dual assignments for NMS-free training, which simultaneously achieves competitive performance and low inference latency. They also proposed a holistic efficiency-accuracy driven model design strategy, optimizing various YOLO components from both efficiency and accuracy perspectives. This reduces computational overhead and enhances performance.
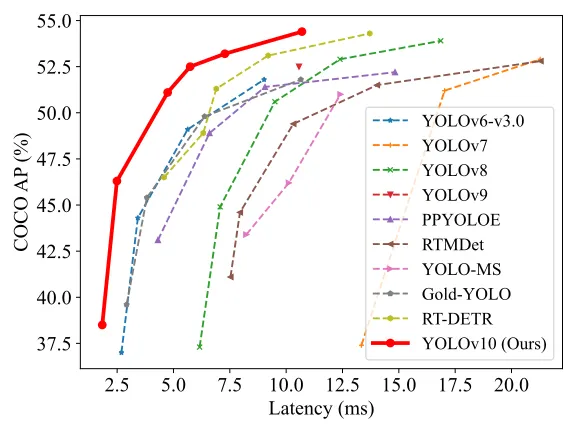
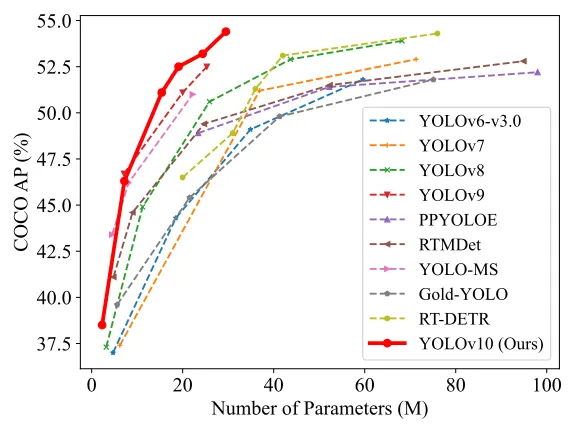
Performance Comparison
Experiments show YOLOv10 achieves state-of-the-art performance and efficiency. For example, YOLOv10-S is 1.8 times faster than RT-DETR-R18 with similar accuracy and has fewer parameters and FLOPs. Compared to YOLOv9-C, YOLOv10-B has 46% less latency and 25% fewer parameters for the same performance.
Visualization
Here are visual comparisons of YOLOv10 with previous YOLO versions and other models in terms of latency and number of parameters:
Setup
Before diving into the examples, let’s ensure we have the necessary setup. We’ll start by installing the required libraries.
Step 1: Install the Required Libraries
# Clone ultralytics repo
git clone https://github.com/ultralytics/ultralytics

# cd to local directory
cd ultralytics

# Install dependencies
pip install -r requirements.txt
Example 1: Object Detection with YOLOv10
Object detection is a fundamental task in computer vision. YOLOv10 enhances this by eliminating the need for non-maximum suppression (NMS) during inference, leading to lower latency and improved performance.
Step-by-Step Implementation
- Downloads the model of your choose please make sure to pick up small model that fits your gpu memory, Download link Yolov10-pt.
- also i will add python script to downlaods videos from youtube for testing
from pytube import YouTube

# Replace 'YOUR_VIDEO_URL' with the URL of the YouTube video you want to download
video_url = 'your link here'

# Create a YouTube object
yt = YouTube(video_url)

# Get the highest resolution stream available
video_stream = yt.streams.filter(progressive=True, file_extension='mp4').order_by('resolution').desc().first()

# Download the video
video_stream.download()

print("Download complete!")
3. Setup:
import cv2
import numpy as np
from ultralytics import YOLO

# Load YOLOv10 model
model = YOLO('yolov10.pt')

# Path to the video file
video_path = 'path/to/your/video.mp4'
cap = cv2.VideoCapture(video_path)
4. Process Video Frames
while cap.isOpened():
    ret, frame = cap.read()
    if not ret:
        break

    # Perform object detection
    results = model(frame)

    # Draw bounding boxes
    for result in results:
        boxes = result['boxes']
        for box in boxes:
            x1, y1, x2, y2 = box['coords']
            label = box['label']
            confidence = box['confidence']
            cv2.rectangle(frame, (x1, y1), (x2, y2), (0, 255, 0), 2)
            cv2.putText(frame, f'{label} {confidence:.2f}', (x1, y1 - 10), cv2.FONT_HERSHEY_SIMPLEX, 0.5, (0, 255, 0), 2)

    # Display the frame
    cv2.imshow('YOLOv10 Object Detection', frame)
    if cv2.waitKey(1) & 0xFF == ord('q'):
        break

cap.release()
cv2.destroyAllWindows()
Example 2: Region Counting Using YOLOv10
Region counting allows for tallying objects within specified areas, providing valuable insights in various applications such as surveillance and traffic monitoring. This example demonstrates how to count objects in defined regions using YOLOv10.
Step-by-Step Implementation
- Define Regions and Setup Model
from shapely.geometry import Polygon, Point

# Define counting regions
counting_regions = [
    {
        "name": "Region 1",
        "polygon": Polygon([(50, 80), (250, 20), (450, 80), (400, 350), (100, 350)]),
        "counts": 0,
        "color": (255, 0, 0)
    },
    {
        "name": "Region 2",
        "polygon": Polygon([(200, 250), (440, 250), (440, 550), (200, 550)]),
        "counts": 0,
        "color": (0, 255, 0)
    },
]

model = YOLO('yolov10.pt')
2. Process Video and Count Objects in Regions
cap = cv2.VideoCapture('path/to/your/video.mp4')
while cap.isOpened():
    ret, frame = cap.read()
    if not ret:
        break

    # Perform object detection
    results = model(frame)

    # Draw regions
    for region in counting_regions:
        points = np.array(region["polygon"].exterior.coords, dtype=np.int32)
        cv2.polylines(frame, [points], isClosed=True, color=region["color"], thickness=2)
        region["counts"] = 0  # Reset counts for each frame

    # Count objects in regions
    for result in results:
        boxes = result['boxes']
        for box in boxes:
            x1, y1, x2, y2 = box['coords']
            center = Point((x1 + x2) / 2, (y1 + y2) / 2)
            for region in counting_regions:
                if region["polygon"].contains(center):
                    region["counts"] += 1

    # Display counts
    for region in counting_regions:
        text = f'{region["name"]}: {region["counts"]}'
        cv2.putText(frame, text, (int(region["polygon"].centroid.x), int(region["polygon"].centroid.y)), cv2.FONT_HERSHEY_SIMPLEX, 0.5, region["color"], 2)

    # Display the frame
    cv2.imshow('YOLOv10 Region Counting', frame)
    if cv2.waitKey(1) & 0xFF == ord('q'):
        break

cap.release()
cv2.destroyAllWindows()If you have any question running the code in your environments contact me directly.
Thank you for reading! If you found this guide helpful, please give it a clap and follow me for more insightful content on real-time data analytics and web development with Django. Your support keeps me motivated to share more valuable resources. Let’s stay connected!
Editor’s Note: ProSpexAi is a contributor-driven online publication and community dedicated to providing premier educational resources for data science, machine learning, and deep learning practitioners. We’re committed to supporting and inspiring developers and engineers from all walks of life.