Implement Nested navigation with Bottom Navigation Bar in Android Jetpack Compose
Hello everyone 👋🏻, I’d like to share with you how to implement nested navigation with a bottom navigation bar in Android apps using Jetpack compose in the right way.
Abstract
Android Jetpack Compose is a modern way of building UI components in Android applications. It makes it easier to create and customize UI elements in a more declarative way. One common UI pattern in mobile applications is having a bottom navigation bar that can navigate between different screens or fragments.
Prerequisites
Before we begin, we need to have a basic understanding of android app development. We should have some practice to build UI in Android with Jetpack Compose and Navigation Component
What we are going to build?
We’ll build a very simple Android app with jetpack compose having a bottom nav bar where each tab will have its own nested navigation with its own back stack management.
Navigation graph
First of all, we have a Root Screen that holds the two components:
Bottom Navigation Bar: has four tabs (Home, Search, Favorites, and Profile)
NavHost: the root navigation host which will hold, 4 nested navigation graphs for each tab.
There is a separate nested navigation for each tab that will have its own navigation stack. It's like each tab has its own child nav host.
The graph below shows nested navigation for the home tab. In this tutorial, we’ll implement nested navigation only for the home tab and you can then implement it for other tabs in the same way.

Dependencies
We’ll be developing our app with the following components:
2. Lifecycle
4. Compose Navigation (Navigation Component)
And here is what it looks like in the build.gradle
dependencies {

    implementation 'androidx.core:core-ktx:1.10.0'
    implementation "androidx.lifecycle:lifecycle-runtime-ktx:$lifecycle_version"
    implementation "androidx.lifecycle:lifecycle-viewmodel-ktx:$lifecycle_version"
    implementation 'androidx.activity:activity-compose:1.7.0'
    implementation "androidx.compose.ui:ui:$compose_version"
    implementation "androidx.compose.ui:ui-tooling-preview:$compose_version"
    implementation 'androidx.compose.material3:material3:1.1.0-beta02'
    implementation "androidx.navigation:navigation-compose:$nav_version"
    implementation "com.google.accompanist:accompanist-systemuicontroller:0.28.0"
    implementation 'androidx.window:window:1.0.0'

    testImplementation 'junit:junit:4.13.2'
    androidTestImplementation 'androidx.test.ext:junit:1.1.5'
    androidTestImplementation 'androidx.test.espresso:espresso-core:3.5.1'
    androidTestImplementation "androidx.compose.ui:ui-test-junit4:$compose_version"
    debugImplementation "androidx.compose.ui:ui-tooling:$compose_version"
    debugImplementation "androidx.compose.ui:ui-test-manifest:$compose_version"
}
Let's Get Started
First of all, create a new project with android jetpack compose and Material 3, or if already created just open it in Android Studio.
Note: selecting material 3 Activity is optional. You can use normal Jetpack Compose Activity as well.
How to create a new Android project with Jetpack Compose and Material 3?
From android studio select the new project and then select Empty Compose Activity (Material 3) option from the templates list. This will make a few things ready for you.

Once you have created a new project, you can see the compose dependencies in the app build.gradle file. You just need to add a new dependency for navigation compose. And thus your build.gradle should have the following dependencies:
Create a new directory navigation under your package name and add two new Kotlin files to it.
1. Route.kt
2. AppNavigation.kt

Route.kt
In this file we define all routes of our application. Since we will implement nested navigation so its very important to manage all routes carefully. To make code more cleaner and readable we first define all routes for RootScreen and LeafScreens
package com.waseem.libroom.navigation

sealed class RootScreen(val route: String) {
    object Home : RootScreen("home_root")
    object Search : RootScreen("search_root")
    object Favorites : RootScreen("favorites_root")
    object Profile : RootScreen("profile_root")
}

sealed class LeafScreen(val route: String) {
    object Home : LeafScreen("home")
    object Search : LeafScreen("search")
    object Favorites : LeafScreen("favorites")
    object Profile : LeafScreen("profile")
    object HomeDetail : LeafScreen("home_detail")
    object BookReader : LeafScreen("book_reader")
}
AppNavigation.kt
This file will define the whole navigation of the app for all routes defined in Routes.kt.
NavHost() composeable is the root host and while nesated hosts are defined by navigation() composable.
package com.waseem.libroom.navigation

import androidx.compose.runtime.Composable
import androidx.navigation.NavController
import androidx.navigation.NavGraphBuilder
import androidx.navigation.NavHostController
import androidx.navigation.compose.NavHost
import androidx.navigation.compose.composable
import androidx.navigation.navigation
import com.waseem.libroom.feature.HomeDetailScreen
import com.waseem.libroom.feature.favorites.presentation.FavoritesScreen
import com.waseem.libroom.feature.home.presentation.HomeScreen
import com.waseem.libroom.feature.profile.presentation.ProfileScreen
import com.waseem.libroom.feature.search.presentation.SearchScreen

@Composable
fun AppNavGraph(
    navController: NavHostController,
) {
    NavHost(
        navController = navController,
        startDestination = RootScreen.Home.route
    ) {
        addHomeRoute(navController)
        addSearchRoute(navController)
        addFavoritesRoute(navController)
        addProfileRoute(navController)
    }
}

//home navigation
private fun NavGraphBuilder.addHomeRoute(navController: NavController) {
    navigation(
        route = RootScreen.Home.route,
        startDestination = LeafScreen.Home.route
    ) {
        showHome(navController)
        showHomeDetail(navController)
    }
}
private fun NavGraphBuilder.showHome(navController: NavController) {
    composable(route = LeafScreen.Home.route) {
        HomeScreen(
            showDetail = {
                navController.navigate(LeafScreen.HomeDetail.route)
            }
        )
    }
}
private fun NavGraphBuilder.showHomeDetail(navController: NavController) {
    composable(route = LeafScreen.HomeDetail.route) {
        HomeDetailScreen(
            onBack = {
                navController.navigateUp()
            }
        )
    }
}
//end of home navigation

//search navigation
private fun NavGraphBuilder.addSearchRoute(navController: NavController) {
    navigation(
        route = RootScreen.Search.route,
        startDestination = LeafScreen.Search.route
    ) {
        showSearch(navController)
    }
}
private fun NavGraphBuilder.showSearch(navController: NavController) {
    composable(route = LeafScreen.Search.route) {
        SearchScreen()
    }
}
//end of search navigation

//favorites navigation
private fun NavGraphBuilder.addFavoritesRoute(navController: NavController) {
    navigation(
        route = RootScreen.Favorites.route,
        startDestination = LeafScreen.Favorites.route
    ) {
        showFavorites(navController)
    }
}
private fun NavGraphBuilder.showFavorites(navController: NavController) {
    composable(route = LeafScreen.Favorites.route) {
        FavoritesScreen()
    }
}
//end of favorites navigation

//profile navigation
private fun NavGraphBuilder.addProfileRoute(navController: NavController) {
    navigation(
        route = RootScreen.Profile.route,
        startDestination = LeafScreen.Profile.route
    ) {
        showProfile(navController)
    }
}
private fun NavGraphBuilder.showProfile(navController: NavController) {
    composable(route = LeafScreen.Profile.route) {
        ProfileScreen()
    }
}
//end of profile navigation
MainScreen.kt
This is the root screen which has a BottomNavBar and AppNavGraph() as the content inside the scaffold. See the code below, In onClick of NavigationBarItem, we call navController.navigateToRootScreen to navigate between tabs screens.
package com.waseem.libroom.feature.root

import androidx.compose.foundation.layout.Box
import androidx.compose.foundation.layout.fillMaxSize
import androidx.compose.foundation.layout.padding
import androidx.compose.material3.NavigationBar
import androidx.compose.material3.NavigationBarItem
import androidx.compose.material3.Scaffold
import androidx.compose.material3.Text
import androidx.compose.runtime.*
import androidx.compose.ui.Modifier
import androidx.compose.ui.res.stringResource
import androidx.compose.ui.tooling.preview.Preview
import androidx.navigation.NavController
import androidx.navigation.NavDestination.Companion.hierarchy
import androidx.navigation.NavGraph.Companion.findStartDestination
import androidx.navigation.compose.rememberNavController
import com.waseem.libroom.R
import com.waseem.libroom.core.compose.FavoriteIcon
import com.waseem.libroom.core.compose.HomeIcon
import com.waseem.libroom.core.compose.ProfileIcon
import com.waseem.libroom.core.compose.SearchIcon
import com.waseem.libroom.core.ui.ThemedPreview
import com.waseem.libroom.navigation.AppNavGraph
import com.waseem.libroom.navigation.RootScreen

@Composable
fun MainScreen() {
    val navController = rememberNavController()
    val currentSelectedScreen by navController.currentScreenAsState()
    val currentRoute by navController.currentRouteAsState()
    /***
     * Define a list of routes if you wanna show it for specific routes.
     * For example I wanna show the app bar only for these routes
    val bottomNavRoutes = listOf(
        LeafScreen.Home.route,
        LeafScreen.Search.route,
        LeafScreen.Favorites.route,
        LeafScreen.Profile.route,
    )
    ***/
    Scaffold(
        bottomBar = {
            BottomNavBar(navController = navController, currentSelectedScreen = currentSelectedScreen)
            /***
             * Use [BottomNavBar] Like this if you wanna show it for specific routes
            if (currentRoute == null || bottomNavRoutes.contains(currentRoute)) {
                BottomNavBar(navController = navController, currentSelectedScreen = currentSelectedScreen)
            }
            ***/
        },
        modifier = Modifier.fillMaxSize(),
    ) {
        Box(
            modifier = Modifier
                .fillMaxSize()
                .padding(it)
        ) {
            AppNavGraph(navController = navController)
        }
    }
}

@Composable
private fun BottomNavBar(
    navController: NavController,
    currentSelectedScreen: RootScreen
) {
    NavigationBar {
        NavigationBarItem(
            selected = currentSelectedScreen == RootScreen.Home,
            onClick = { navController.navigateToRootScreen(RootScreen.Home) },
            alwaysShowLabel = true,
            label = {
                Text(text = stringResource(id = R.string.home))
            },
            icon = {
                HomeIcon()
            }
        )
        NavigationBarItem(
            selected = currentSelectedScreen == RootScreen.Search,
            onClick = { navController.navigateToRootScreen(RootScreen.Search) },
            alwaysShowLabel = true,
            label = {
                Text(text = stringResource(id = R.string.search))
            },
            icon = {
                SearchIcon()
            }
        )
        NavigationBarItem(
            selected = currentSelectedScreen == RootScreen.Favorites,
            onClick = { navController.navigateToRootScreen(RootScreen.Favorites) },
            alwaysShowLabel = true,
            label = {
                Text(text = stringResource(id = R.string.favorites))
            },
            icon = {
                FavoriteIcon()
            }
        )
        NavigationBarItem(
            selected = currentSelectedScreen == RootScreen.Profile,
            onClick = { navController.navigateToRootScreen(RootScreen.Profile) },
            alwaysShowLabel = true,
            label = {
                Text(text = stringResource(id = R.string.profile))
            },
            icon = {
                ProfileIcon()
            }
        )
    }
}

@Stable
@Composable
private fun NavController.currentScreenAsState(): State<RootScreen> {
    val selectedItem = remember { mutableStateOf<RootScreen>(RootScreen.Home) }
    DisposableEffect(key1 = this) {
        val listener = NavController.OnDestinationChangedListener { _, destination, _ ->
            when {
                destination.hierarchy.any { it.route == RootScreen.Home.route } -> {
                    selectedItem.value = RootScreen.Home
                }
                destination.hierarchy.any { it.route == RootScreen.Search.route } -> {
                    selectedItem.value = RootScreen.Search
                }
                destination.hierarchy.any { it.route == RootScreen.Favorites.route } -> {
                    selectedItem.value = RootScreen.Favorites
                }
                destination.hierarchy.any { it.route == RootScreen.Profile.route } -> {
                    selectedItem.value = RootScreen.Profile
                }
            }

        }
        addOnDestinationChangedListener(listener)
        onDispose {
            removeOnDestinationChangedListener(listener)
        }
    }
    return selectedItem
}

@Stable
@Composable
private fun NavController.currentRouteAsState(): State<String?> {
    val selectedItem = remember { mutableStateOf<String?>(null) }
    DisposableEffect(this) {
        val listener = NavController.OnDestinationChangedListener { _, destination, _ ->
            selectedItem.value = destination.route
        }
        addOnDestinationChangedListener(listener)

        onDispose {
            removeOnDestinationChangedListener(listener)
        }
    }
    return selectedItem
}

private fun NavController.navigateToRootScreen(rootScreen: RootScreen) {
    navigate(rootScreen.route) {
        launchSingleTop = true
        restoreState = true
        popUpTo(graph.findStartDestination().id) {
            saveState = true
        }
    }
}
currentScreenAsState() method converts the current route to a RootScreen state object and we use this state object to update the NavigationBarItem selection value.
There are four routes for MainScreen (a unique route for each tab screen):
- Home tab (home_root)
- Search (search_root)
- Favorites (favorites_root)
- Profile (profile_root)
See RootScreen sealed class in Routes.kt. Each tab has its own nested navigation and their routes are represented as LeafScreen in Routes.kt.
HomeScreen.Kt (home_root)
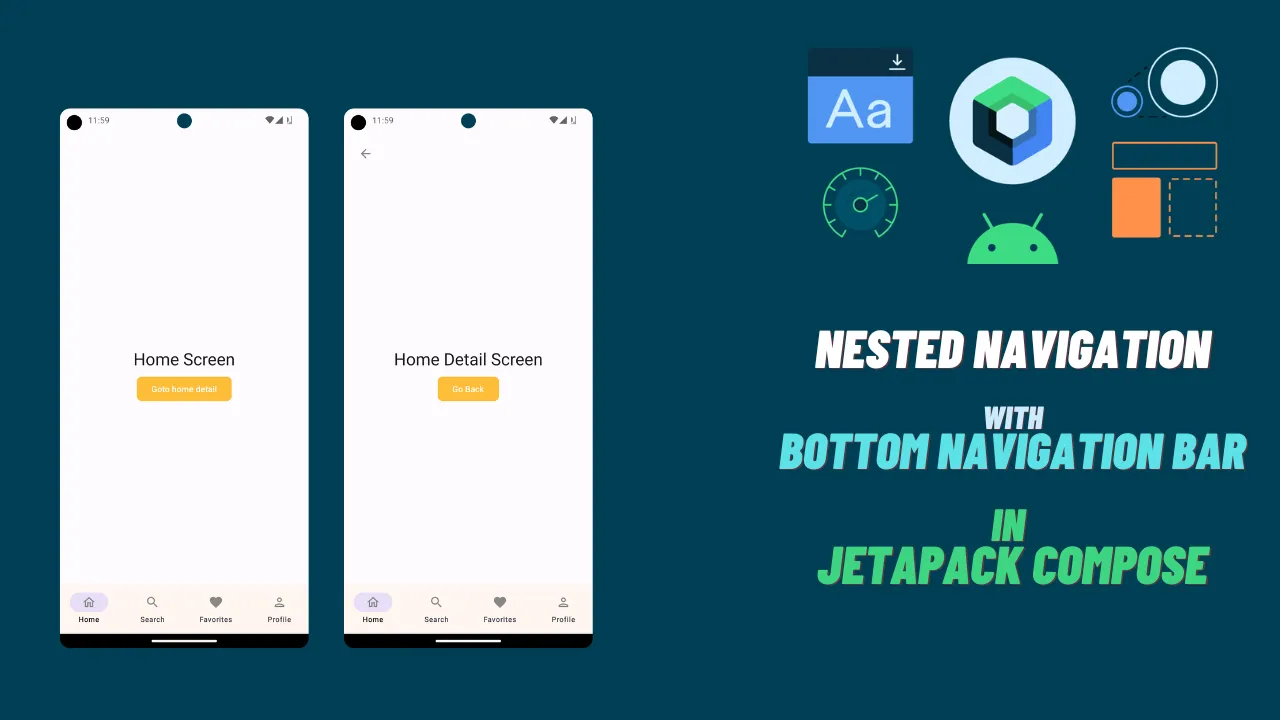
This is the first screen that is shown in the Home tab. For testing purposes, I have added a “Goto home detail” button. On click of this button, you can see we call showDetail() callback which navigates to the “home_detail” route.
showDetail() is implemented in AppNavigationKt.showHome() function.
package com.waseem.libroom.feature.home.presentation

import androidx.compose.foundation.layout.Box
import androidx.compose.foundation.layout.fillMaxSize
import androidx.compose.foundation.layout.padding
import androidx.compose.material3.MaterialTheme
import androidx.compose.material3.Scaffold
import androidx.compose.material3.Text
import androidx.compose.runtime.Composable
import androidx.compose.ui.Alignment
import androidx.compose.ui.Modifier
import androidx.compose.ui.tooling.preview.Preview
import androidx.compose.ui.unit.dp
import com.waseem.libroom.core.compose.FilledButton
import com.waseem.libroom.core.ui.ThemedPreview

@Composable
fun HomeScreen(
    showDetail: () -> Unit
) {
    Scaffold {
        Box(modifier = Modifier.fillMaxSize()) {
            Text(
                modifier = Modifier.align(Alignment.Center),
                text = "Home Screen", style = MaterialTheme.typography.headlineMedium
            )
            FilledButton(
                modifier = Modifier
                    .padding(top = 100.dp)
                    .align(Alignment.Center),
                text = "Goto home detail",
                onClick = {
                    showDetail()
                }
            )
        }
    }
}
HomeDetailScreen.kt (home_detail)
This screen is also a part of the home tab nested navigation. It has a “Go Back” button which simply allows navigating back to home_root.
package com.waseem.libroom.feature

import androidx.compose.foundation.layout.Box
import androidx.compose.foundation.layout.fillMaxSize
import androidx.compose.foundation.layout.padding
import androidx.compose.material3.MaterialTheme
import androidx.compose.material3.Scaffold
import androidx.compose.material3.Text
import androidx.compose.runtime.Composable
import androidx.compose.ui.Alignment
import androidx.compose.ui.Modifier
import androidx.compose.ui.unit.dp
import com.waseem.libroom.core.compose.ArrowBackIcon
import com.waseem.libroom.core.compose.FilledButton

@Composable
fun HomeDetailScreen(
    onBack: () -> Unit
) {
    Scaffold {
        Box(modifier = Modifier.fillMaxSize()) {
            ArrowBackIcon(
                modifier = Modifier.padding(all = 24.dp),
            )
            Text(
                modifier = Modifier.align(Alignment.Center),
                text = "Home Detail Screen", style = MaterialTheme.typography.headlineMedium
            )
            FilledButton(
                modifier = Modifier
                    .padding(top = 100.dp)
                    .align(Alignment.Center),
                text = "Go Back",
                onClick = {
                    onBack()
                }
            )
        }
    }
}
And again onBack() method is defined in AppNavigationKt.showDetail()
Similarly, you can implement nested navigation for all other tabs.
MainActivity.kt
class MainActivity : ComponentActivity() {

    override fun onCreate(savedInstanceState: Bundle?) {
        super.onCreate(savedInstanceState)
        actionBar?.hide()
        setContent {
            LIBroomTheme {
                MainScreen()
            }
        }
    }
}
We load the MainScreen in our MainActivity
Dear you, thanks for reading this article. I would love to hear your opinion in the comment section.
Feel free to hit me up on Instagram or Facebook.
Know more about me on waseemabbs.com, GitHub, and Linkedin