Generative Scribbling

When I first got into generative art, the first idea that came up in my mind was “controlled chaos.” How can I turn these chaotic, random bunch of numbers into something meaningful? In Scribbled Boundaries, I wanted to express this very concept: the juxtaposition of chaos and order in generative art. In a painting you start with blank canvas, but in generative art you start with an unmoulded set of random numbers. Art Blocks, particularly, you begin with hash containing 64 hexadecimal digits (with around 2×10⁶⁵ possibilities). So one can say that an AB project has virtually (or potentially) an infinite amount of variations. The role of the generative artist is to define the parameters, boundaries and limitations — a manager of sorts — to temper the chaos into order.

I have always been a fan of abstract expressionist paintings. Even though abstraction is an obvious departure from realism, it encapsulates our emotions succinctly. It’s funny how a Rothko painting can evoke deep emotions: the art is a bridge between the artist and the observer, almost like a conversation. The artist’s intentions for his work might be completely different from the observer’s interpretations, but both are equally valid in abstract art.
Scribbled Boundaries is an homage to all abstract artists of present and past generations. I’ve named the modes in honor of the artist, to name a few (not in order of significance): Josef Albers, Willem de Kooning, Helen Frankenthaler, Ron Gorchov, Hiroshi Sugimoto, Bridget Riley, Jean Arp, Cy Twombly.
Why Scribbles?
The scribbles represent the senseless thoughts inside the mind. Our thoughts make up our being and personality. One could say that each Scribbled Boundaries piece is a representation of one’s being. Each scribble is a thought that crosses one’s mind. Albeit chaotic, when seen in a macroscopic sense, the scribbles settle into some form of order. The beauty lies in the unpredictable: it applies to our life in general, but also in generative art. Imagine if your life is completely scheduled and ‘perfectly’ planned to your knowledge, how terribly boring would that be?
Outline of Algorithm
The algorithm has 6 main sections:
- Setup Function, scribble layers are generated here using p5’s createGraphic layers to avoid redrawing in the draw function. The setup function first determines the layers array and colors array, then it executes a loop that iterates the layers array and draw the scribbles inside the createGraphic layers
- Draw Function, createGraphic layers are displayed here (along with the parallax effect optional feature). if parallax mode is activated, display the createGraphic layers with an offset determined by the cursor position. If not activated, each graphic layer will be displayed on top of each other with no offset.
- Scribble Class, this class draws the individual scribbles, it is called in the setup function’s main loop.
- Get Layer Data Functions, multiple functions that fetch the layer information for each variation (e.g. for Gorchov, Melita, Josef, etc.)
- Boundary Checking Functions, these functions check if coordinate (x, y) lies inside a specific boundary
- Utility Functions: pseudorandom number generator and random color generator.
Scribble Layer
Essentially, each piece is a superimposition of multiple scribble layers. Each layer has around 25–50 scribbles with varying amount of curve vertices. An example of a scribble layer in JS object notation looks something like this:
scribbleLayer = {
 iterations: 300,
 boundary: [{type1, shape1}, {type2, shape2}, ...],
 closeness: 10,
 thicknessRange: 1.2,
 minThickness: 440,
 frame: [0.1, 0.9, 0.1, 0.9],
}
Each layer contains the following parameters:
- Iterations, number of scribbles per layer
- Boundaries, an array containing shape boundaries inside the frame, which could be in the form of circles, rectangles or random polygons
- Closeness, the minimum distance between the curve vertices (the closeness value is inversely proportional to the canvas length)
- Thickness Range, the range of how thick each scribble would be
- Minimum Thickness, the minimum width of a each scribble
- Frame, by default it is set to [0.1, 0.9, 0.1, 0.9]. The first two elements are the x-axis range (so the scribbles can only populate 10% to 90% of the canvas width), the last two elements are the y-axis range.
The hard part is to fine-tune these parameters so that the final output is not too chaotic, because I wanted the result to look similar to hand-drawn scribbles.
Drawing the Scribbles
Before drawing the scribbles, I determined the boundary mode (the layers in an array), colors array (I picked around 8–20 base colors), and color range array (the range of deviation from the base color — 4 values of range that change the hue, saturation, brightness and alpha from the base color). Then I iterate layers array in a for loop:
Main Loop (Iterating through Layers) in the Setup Function
----------------------------------------------------------
1. Begin loop iterating through layer array
  a. Get random base color from colors array
  b. Begin another loop (iterations are determined by layer's iterations parameter)
      i. Draw scribble by calling the Scribble class, putting the  layer information and random color from (a)
2. Loop Ends
The scribbles are drawn using P5’s curveVertex. To achieve this and for simplicity, I defined a class “scribble” with these constructor variables: closeness, line thickness, color, boundary, and number of vertices. Inside the class there is a display() function that draws the scribble. The pseudocode for one scribble is something like this:
Display Function in Scribble Class
----------------------------------
1. Begin Shape
2. Begin loop with number of points in the scribble
   a. Get random coordinate (x, y)
   b. Check if coordinate (x, y) is inside boundary
     i. If true, continue the loop, without including the coordinate
     ii. If false, add coordinate x and y as curve vertex
3. End Shape
Basically the scribbles are done in several nested loop. The range is somewhere between 50,000 to 200,000 total vertices.
Boundaries
There are three main boundaries: circles, partings and random polygon.


The circular boundary uses the common circle equation:

where (h, k) determines the position of the circle in the canvas, and r is the radius of the circle. I modified the equation above into a function to check if coordinate (x, y) lies inside the circle. The function will return true if it lies inside the circle, false otherwise:
function inCircle (h, k, r, x, y){
 let a = x - h;
 let b = y - k;
 return Math.pow(a, 2) + Math.pow(b, 2) <= Math.pow(r, 2)
}
The parting boundary is a strip on the frame that is avoided, like in Sugimoto or Piet modes. The parameters of a parting boundary is the orientation of the strip (horizontal or vertical), width of the strip, and position of the strip. The function below check if coordinate (x, y) lies inside the strip — the cw variable is the canvas width. Where variables rx1, rx2 are lower and upper bounds of x values, while ry1, ry2 are the lower and upper bounds of y values.
function inParting(parting, x, y){
    if (parting.orientation == "vertical"){
        let rx1 = cw*parting.location - cw*(parting.size/2)
        let rx2 = cw*parting.location + cw*(parting.size/2)
        if (x > rx1 && x < rx2) return true
        else return false
    } else {
        let ry1 = cw*parting.location - cw*(parting.size/2)
        let ry2 = cw*parting.location + cw*(parting.size/2)
        if (y > ry1 && y < ry2) return true
        else return false
    }
}
Lastly, the polygon boundary uses a random n-sided polygon as the boundary. First, you generate n random coordinates that lies inside the frame. The coordinates need to be in the correct order or else it wouldn’t create a closed non-intersecting polygon. To do this, I used the following algorithm:
1. Find left-most and right-most coordinates a and b
2. Separate coordinates that lies above and below the line ab into two separate arrays A and B.
3. Sort A in increasing order according to its x-values
4. Sort B in decreasing order according to its x-values
5. Merge arrays A and B.
The above algorithm will create a closed polygon. But the next problem is to figure out to check if a coordinate (x, y) lies inside the polygon. This is referred to the point-in-polygon (PIP) problem in computational geometry. I implemented the ray-casting algorithm to check whether the point is inside the polygon. Essentially it checks the number of intersections a ray passed the polygon from the tested point (x, y) to (∞, y). If the number of passings is odd, the point lies inside the polygon, but if it is even, the point lies outside the polygon.
count = 0
 foreach side in polygon:
   if ray_intersects_segment(P,side) then
     count = count + 1
 if is_odd(count) then
   return inside
 else
   return outside
Modes
The different modes use different ‘presets’ that mix-and-match different parameters together — including the different boundary types, frames, layers, and number of iterations. There are 14 modes in total; it would take forever for me to explain each mode, so I will pick and choose some of the outputs that I like, and kinda explain what’s going on in the mode.

#241 is in Josef mode, and as some of you might have guessed, it is an homage to Josef Albers’s Homage to the Square. This mode uses 4 nesting square of varying side lengths. This is achieved by using 4 layers: the outermost layer is the frame, with a square boundary inside of it of a smaller circle. The next layer has a smaller frame, with a smaller square boundary inside of it, and so on…

#358 is in Melita mode — it is also referred to as “split polygon” mode in the code. In this mode, the polygons are not intersecting/overlapping each other. This is achieved by first sectioning out the canvas into rectangular areas, and then define the polygons inside those areas. The number of layers depends on how many frames are there and how many polygons are there. So in this case, there are 3 layers, one for each polygon (the green and purple colored polygons), and one for the frame with the polygonal boundaries.

#469 is a Gorchov. In this mode, I have two parallel slits on the canvas (kinda reminds me of Thomas Young’s double-slit experiment). Just realized that it’s similar to the Rothko piece I attached earlier, this was purely by accident actually, I wasn’t inspired by that particular piece when came up with this mode.
The slits could sometimes collide and form one slit, like below:

I really like the simplicity and minimalism of Gorchovs. I can feel the calmness from it; almost like the light at the end of the tunnel. The chaos and irregularity subside if you look at it from afar.


#467 and #90 are in de Kooning mode. In this mode, I subdivide rectangular sections of the canvas and sometimes fills in a random polygons inside of it. This mode creates a wider range of outputs, which I really like. It’s hard to predict what will come out, and I love that aspect of this (you can see how different the two outputs above are).

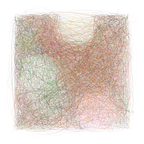
#484 is in Twombly mode. In this mode I wanted to make a gradient, from more dense scribbles to less dense scribbles (also with an optional small polygon boundary in the middle). Again, I like the minimalism aspect of it, and it pays homage to Cy Twombly’s work too. This particular mode reminds me of the scribbles I drew when I was a child, I was just fascinated by the texture and colors of pencils and crayons. These scribbles represent a child’s innocence, wonder and curiosity.


#355 is a Mark (an allusion to Mark Rothko). In original code, I named this mode “overlapping blocks.” As the name suggests, it fills different rectangular (vertical and horizontal) blocks with scribbles of random colors. I like how the blocks create new shades of color as it overlap each other.

#381 is in Bridget mode. This mode is basically strips of different colors, creating like a rainbow/spectrum of colors. The strips are close to each other so that it blends with each other, creating a gradient. As the name suggests, it’s inspired by Bridget Riley’s works.

Final Words
As a newcomer in the field of generative art, I feel tremendously blessed by all the support from everyone: the Art Blocks team (artists, curators, developers, engineers, everybody involved!), the NFT collectors, and crypto-communities of the world for making this happen. It was a rollercoaster ride for me. Especially in the last 3–4 days before the launch, someone in the AB team encountered a bug that makes the output look different across different platforms. I’m really grateful to the AB team and artists who have helped me solve the problem, and for being so considerate to give me more time to actually fix the problem before releasing it to the public.
It was also such a huge honor for me to be given the opportunity to help Indonesia with the COVID-19 crisis. This year, Indonesia suffered with a huge scarcity of oxygen supply, those who contracted the virus desperately needed oxygen to live. I partnered with Oxygen for Indonesia, an organization built by rising tech startups, venture capitals, and also with the Indonesian government to build oxygen plants and supply oxygen concentrators to hospitals around Indonesia. The project ended up raising 222 ETH (around 700k USD at the time).
I can’t thank everyone enough for this opportunity! Thank you so much 😆
Don’t forget to read my interview with Jeff Davis: https://beta.cent.co/artblocks/+3vuarj
Check out unreleased Scribbled Boundaries outputs from here: scribbled-boundaries.webflow.io
Art Blocks Project Page: artblocks.io/project/131