ReelAbilities Film Festival
Process documentation
Hierarchy: Part 1
At first, part one seemed quite restrictive to me. Once I started iterating upon each section, I began to realize the numerous possibilities there were. Since freshmen year, I’ve started to grasp onto the idea that restriction lends new opportunities; this part proved that statement.
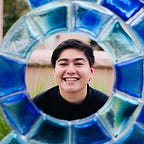
#1 — Section one only focused on using two-stroke weights. One challenge was differentiating the title and the different movies.


Left: I pushed the text to the right of the page. Due to the size of the page, I imagined that by placing text to the right, people could hold the page without covering text. What I didn’t think about was that it’s really only useful for left-handed people like me so…In terms of stroke weights, I used light and bold. In terms of differentiating movies to movies, only bolding the titles was effective. However, differentiating the event title from the movies was not as effective. Both “SouthSide Works Cinema” and “The R-Word” were bolded making it look like they were grouped.
Middle: This one is just as ineffective as a page with just one line weight in my opinion. I thought that to only make the title bold, I would lead the eye to the title. However, by not adding hierarchy to the titles of the movie, it becomes just as confusing to decipher.
Right: I placed text in the center to be held on any side of the page. Although I do think considering how it would be held was an interesting idea, the placement lends itself a somewhat traditional style that may not be as effective. For stroke weight, I iterated upon the left design. I bolded the whole title sequence to group it.
What I could do more: During the class critique, people who experimented with different margins were visually more intriguing. Youie’s margins caught my eye the most as they lead my eye to the bottom right corner. This approach made an unconventional entry point into the content. If I were to approach this exercise again, I would focus on how various margin approaches can lend greater readability and clarity.
#2 — Section 2 focused on how I can use line spacing to effectively group content. The use of stroke weights was not allowed.


Left: Content was grouped into threes based on the title, date, and location of the event. Fortunately, the movies followed this general style. What line spacing enhances in this letter-size page is allow distinction between certain events. The only piece of content that isn’t grouped into three is the web page. In terms of font choice, I personally prefer using bolder style fonts. Once I printed this out and hung it up on the wall for the class critique, the text created a blob.
Three viewing points: Last semester, my design professors mentioned to take a step back and look at work at a distance. What Vicki told me today of looking at work at three different viewing points will be very helpful to implement in the next design exercise.
Middle: Instead of grouping content only in threes, I wanted to explore how even more varied line spacing and grouping can lend greater readability. With this iteration, I used a 1—2—1 format where titles are isolated and sub-content are grouped. What this caused is lessened visual appeal. The content was spaced out too much making it look like a list. Also, one thing I’ve thought about is that people might get confused if the title is on the top or bottom of the sub-content.
Right: With this approach, I tried to blend the left and middle together because I thought that each approach had elements that I both liked and disliked. I moved the text to the right out of the decision for experimentation. I grouped the title and the title and date together but left the location separate. With certain movies, I grouped the content by title, directed by, and dates together.
My thoughts: When I was going through this line spacing exercise, I read the text out loud to see if the group and separation of content made sense. After reflecting on the New York Times project, I found how similar interpreting music and type are. It’s interesting for me to apply what I’ve learned from playing piano in terms of sentencing, tones, and rhythm to generate different type-based designs.
#3 One indent


Left: With having the ability to only indent once, I wanted to be experimental with the length of the indent. With this one, I may have gone too far where I lose visual rhythm because the indent splits the page in half. The reason why I chose this indent length was to match the width of the film festival title.
Middle: The middle one somewhat improves on the middle one as there is a slight overlap between the two bodies of text. So when the audience reads the text, they will be let off into the date. One adjustment I made was group both the film name and the directed by together. I wanted to understand it would communicate differently compared to the left. By having these two grouped, I believe it achieved a stronger sense of rhythm.
Right: Compared to the left and middle approaches, this page is a lot denser. However, it still carries the influence of my past iterations. This most significant change is the size of the indent. What this achieves is a greater sense of an entry point throughout the piece. After the critique, I think it would have been beneficial for me to experiment more with margins in this part of the project.
#4 Two indents


Stroke weight choice: For this part of the exercise, I choose Neue Haas Grotesk Bold. Out of the available font stroke weights, I prefer Bold due to its sheer punchiness.
Left: Having the opportunity to indent at two different sizes can either be beneficial or hurtful to the communication of the page. If done right, content is comprehensible. If done excessively, it can become overdone and ineffective in communicating/highlighting different pieces of information. With this first attempt in using two differently sized indents, I tried to improve the right page of exercise three. What I used the extra indent for was the location and date of the film festival. The rest remained the same. One issue I found with this design was that it looked liked notes. This might be that I’ve primed myself with outlines though. During the critique, Vicki talked about using an untraditional spacing of typography that is both familiar and different.
Middle: In this and the right exercise, I revisit the approach in using large indents. What I like about this attempt is how it creates a zigzag line to move the readers across the page. However, I think it’s slightly excessive.
Right: The right page builds off the page from the middle. With this version, I wanted to limit the asking of times the viewer had to move their eye across the page. With this version, the reader only has to look back and forth once. In terms of micro-adjustments, the smaller indentation was used to distinguish different details of the individual films. What I like about this approach is that it clearly points out the key overall information points of the event and places sub information to the right. Again, I would like to experiment with varying margins.
ReelAbilities Film Festival — Hearts of Glass

Before the short film and documentary started, members of ReelAbilites and Pittsburgh organizations focused on enabling the disability community talked about the purpose of organizing the film festival. People were recognized for their work on organizing this event and also people who have worked to improve the lives of people with disabilities. Hearts of Glass was an amazing documentary that showed how a startup vertical farming company had the mission of providing quality produce to local resturant while hiring people with disabilities to be included in the workforce. The overall experience I had will greatly influence my approach to design choices for the poster.
Hierarchy: Part 2
#5 Color and Everything Before


Magazine color selections:
I decided to select three differently styled pieces from magazines. I specifically choose three to focus on due to the varied design style.

#1 From the MIT tech review, the overall design language is swiss design. Simple and clearcut, this graph removes unnecessary content and uses scale to its advantage. The page uses a very simple color palette. However, a very unnoticeable dark green is used. Aside from that hard to see color, it’s quite effective. Although I really like the color yellow, I don’t think using contrasting colors with the yellow would be appropriate to ReelAbilites. The choice of yellow has more of a scientific and cautious tone that I want to be careful about avoiding.

#2 Ths spread from the Carnegie Magazine is quite different to the MIT page. Although the page uses fairly saturated colors, it is toned down by a newspaper-like grey. What this does is lend a more handmade quality not seen in the MIT Tech Review magazine. Additionally, the illustrative quality of the page is quite nice and maybe a possible approach in creating elements for the poster.

#3 This final poster that I selected is somewhat in between both the MIT Tech Review and the Carnegie Magazine design style. The page has the warm colors of the Carnegie Magazine but straightforward design style. The warm red and rich cream lend itself to be related to caring colors. Bold, clean stroke weights enhance the clarity of the poster.


Color selections:
Reflections on color:
- Colors that lend a feeling of care. (Thoughtfully saturated colors)
- Colors that don’t have a medical attachment. (Turquoise, standard reds, and faded greens)
- Color(s) that bring humanity out in all of us. (Lively yet grounded)
- The absence of colors. Possibility in experimenting how few colors can offer a greater impact on the poster.
Applying color to exercises 1–4
Before moving onto have the freedom to change stroke weights and placement, we were assigned to see how color can improve or hinder the effective communication of content. Here are my attempts:


#6 Size change & Stroke Weights
Before going onto the computer, my professor wanted the class to experiment with type through tactile exploration. What this exercise made me do was to take time. On the computer, I can easily change the size and position. With paper, I need to individually cut out text and place items with more care. Additionally, I gain a greater understanding of text size to the scale of the paper.
My initial overall approach into experimentation with scale:
- Using the largest type for legibility
- Type that forms shapes (metaphorical or literal)
- Easy to distingue between main and sub-content.


Out of the many approaches, I choose six to unpack in this medium post. My overall intent was to use the type in a way that was lively and playful. Especially in the top middle, I use the type to create a time marker used in film production. On the bottom left, I use the type to divide the page and create stairs. The one that shows the most constraint is the top left as I place the titles in the bottom right corner.
Digitalizing my pages


After the critique…I realize how chaotic my pages were
- The large heading text was disorienting and didn’t have an easy entry or exit point
- Too many font sizes and offputting scale shifts
- Rotating and shifting text to create shapes was way too cliche
#6 Size change & Stroke Weights — REVIEWED with more restraint
A word that was used throughout the whole critique was restraint. Works that were most effective used a little variation of font sizes and placement of the text was thoughtful and intentionally placed. Before moving onto part three of the project, I wanted to revisit this and understand what visual restraint meant and how it can be used effectively.


Woah…Looking back at what I did for the critique compared to my reattempt at the series now looks completely different.
What I did:
- Using InDesign! Although I love illustrator, it personally gave me too much freedom to move text across the page. With InDesign, the grid lines kept me grounded within each iteration. In addition, InDesign made more conscious of increasing font size. Compared to illustrator, I would just scale using my mouse.
- Sticking to a grid…but still having fun! For these pages, I kept to a 12 column grid.
- Create shapes of text but not in a literal sense. In my first attempt at this part, I tried to forcibly make text create objects or shapes. With this reattempt, I considered how space can form whitespace and how text can act as entry points.
What I kept:
- Grouping text. I kept the 3 main groups of title, event information, and films consistent with my first attempt.
Hierarchy: Part 3
When our class was tasked to find images that reflect our events, I was hesitant to select a photo focusing on disabilities. What I found very insightful from the film festival was the overall message of looking past someone's disability and to connect to the humanity within all of us. The film festival’s message greatly aligned with my personal views as well. After the exercise, I knew that selecting an image that was abstract or too apparent wouldn’t reflect ReelAbilites. Through this reflection, I decided to hone in graphic representations for the final poster.


An illustration that unites everyone together.

With a disability, one often has to heighten a sense to counterbalance another sense. This doesn’t make someone with a disability lesser but in actuality stronger! By including all five senses in this illustration, I wanted to showcase how all of us use our senses in different ways that makes us the best version of ourselves. In the sketches above, I make multiple attempts in creating graphics that are understandable but not structured icons.
In the illustration above, I placed it into adobe capture where I could refine the structure further.


Placing the graphic in:
- Keeping the same content structure. In the first two iterations, I left the overall structure the same as in the reattempt of the scale and stroke weight exercise. By converting the sketch into a vector through Adobe Capture, I was able to scale the designs to the size that I desired. The left and middle image focus on scale and creating layering in the piece. However, I felt by keeping all the senses at a relatively equal size, my overall design message would be intact.
- Shifting film text to the center. (Right Page) Instead of cornering the text to the left, I wanted to try to space out the films and its content into three columns. In terms of visual appeal, it somewhat divides the page creating a sense of detachment from the illustration. What the let and middle page achieve is leading one's eye from the top right to bottom left in a swift manner.


Experimenting with scale and color:
- Trying to scale the graphics. I had some thoughts that the illustrations may be too overbearing. However, once I shrunk them down, I realized how much I missed the scale!
- A color palette that doesn’t communicate effectively. With this color choice on the right, my intention was to make it playful. In actuality it made it seem more art and craft like which didn’t align with the film festival. Through this, it made me realize that there are definitely other colors that can create liveliness without being over-saturated.


Dots and Framing
- A possible approach in framing. One idea I had was to frame the illustrations with a shape. Since the illustration itself was already circular, I placed a circle around it. With the red gradient, it’s bold and draws your eye in.
- Problem…it splits the page. After talking to my Professor and TA, I realized although it is punchy, it doesn’t create visual rhythm throughout the entirety of the work. If I were to speak this poster it would be “I—” and nothing else. This is because the text about the film is not significant enough to be noticed. Overall, I would say this poster iteration visually sounds like an incomplete sentence.
- Verdict…Deciding to go to previous iterations. Although this was a great learning experience, my previous iterations without the dot were more impactful.


Using colors instead of shapes:
Pink might be an option. Although this pink color pallete may not be the answer, the two tints of color are definitely an option. It still shows the illustration but allows for color to attract the viewer.
Yellow and blue together?…not really. Aside from color, I tried to use color blocking. However, this runs into the same issue where it divides the page. In terms of color, it’s a bit too similar to IKEA. I like yellow but maybe not combined with the blue.

Focusing in on line spacing:


To group or not to group. One of the significant micro details in this poster is the film text content. After the final class critique, I decided to go with the approach on the left as it visually seemed more intentional as going from 18pt to 14pt line spacing.


The poster on the left is what I displayed during the class critique. After comments from guests, students, and professors, I came to my almost final poster on the right. One of the significant changes was the use of background color. People appreciated the yellow but wished for more of it. So what the yellow achieves is still that boldness but still the soft qualities that the illustration has.

A transparent reflection:
I spent a lot of time thinking if I should add this part to my medium post— as this is a very public way of placing my thoughts. After some thought, I began to understand how important a part of my life was to my design process and overall approach to this project. Since birth, I was born with an eye condition called nystagmus—which is the uncontrollable movement of my eyes and head. Ultimately, this impacts my vision affecting how I perceive the world. Many people are somewhat perplexed that someone who his entering a career field where their eyes are the most used sense. However, I view it as an opportunity in my ability to design.
When people say the word disability, people get uncomfortable. No matter how open people are of accepting people with disabilities, there’s a fine line between celebrating diversity and inclusion. ReelAbilites highlights people who have included people with disabilities in daily life. Our society struggles to create a space where everyone is included. One might say that it can’t be so hard, right? However, through decades of mistreatment and exclusion from being a part of everyday life, reintegrating people with disabilities in a system that deflects us is a daunting reality.
Although I sometimes pass for not having a disability, I understand how people with disabilities yearn to be included and respected. With this project, I was so fortunate to further understand a community I belong to in Pittsburgh! Ultimately, this project was about familiarizing myself with visual hierarchy but also understanding how my disability has the opportunity to enhance my design process.