Introduction to Convolutional Neural Nets and Implementation in TensorFlow
Introduction:
Convolutional Neural Networks are deep neural networks that were designed typically to handle image datasets. When we are dealing with pixels, generalization becomes extremely difficult if we feed all the pixels directly to a fully connected network after flattening. Imagine, if we have a data-set with images each of size (360*360) in R.G.B, then we would have 388800 pixels(input vector) of a single image to feed to a multi layer Perceptron. Hence, there is need to highlight the features, get rid of noisy pixels and perform dimensionality Reduction.
Dealing with Images directly with Ordinary Neural Nets
For a better understanding, lets begin training our model without convolutions. Here we’ll use fashion-mnist data-set which consists of 70,000 Zalando’s article images. Each image is 28*28 in gray scale associated with 10 different classes.

Refer: https://github.com/zalandoresearch/fashion-mnist
Lets load the data using the following commands:

Now, let’s define our model layers sequentially. The first layer is the input layer where we have flatten the (28*28) matrix into a vector. Next is the first hidden layer, which consists of 521 Neurons. And in the output layer we have specified 10 neurons as we have 10 different classes. The activation used is “Softmax” to perform Multi-class classification. Moreover, we can use model.summary() to get the overall architecture in detail.

Next, we compile the model by specifying different parameters. Here we have used “Adam” as the optimizer, “sparse_categorical_crossentropy” as the loss function, and “accuracy” as the validation metric. Finally, we perform “model.fit” to begin the training with 10 epochs.


Here, the data-set consisted of images of size 28*28 and in greyscale. Hence, the training was quite fast and resulted in decent training accuracy however validation accuracy was much lower than the training at 0.87.

Shortcomings
- When we have higher resolution images, computation becomes expensive
- We can’t feed an image directly in this network, hence conversion of 2D pixels in a vector is required wherein we lose the spatial relationships within the data.
- Feature extraction becomes difficult where they are sparsely located within images belonging to the same dataset.
What actually is Convolutional Neural Network ?
ConvNets are similar to typical Neural Nets, they also perform several dot product (w1*x1,w2*x2…) , have the same activation functions(ReLu, Sigmoid, etc.) for adding non linearity and similar loss functions.However, the input is an image rather than a vector of pixels. Moreover, in CNN, we see the entire image through a window which keeps sliding over an image rather than seeing it entirely at once. Therefore, ConvNets captures sophisticated dependencies within the image pixels and fits it better due to less and presence of only important features . The filters also contains an additional dimension “depth” which gives them a block like structure.

Different Layers in ConvNets
- Convolutional Layer
- Pooling Layer
- Fully Connected Layer
1. Convolutional Layer:
This layer consist of filters whose values are learnable. A typical filter consist of width, height and depth (similar to the input image depth). During the forward pass each filter slides over the input image according to the stride. Stride is basically the number of pixel shifts the filter perform while moving over the image. The output is the dot product of filter and the image one at a time and by stacking the activation maps of all filters along the depth dimension.
Finally, the network will learn the filter values those activates when they see some type of visual feature such as an edge of some orientation or a blotch of some color on the first layer. The main function of these filters is to summarize the presence of features in an image.
As the filter is applied multiple times to the input array, the result is a two-dimensional array of output values that represent a filtering of the input. The two-dimensional output array from this operation is called a “feature map“. You might notice a reduction in dimension when applying this layer which can be removed by using padding.

2. Pooling Layer
The main function of Pooling layer is to down sample the feature map. A lower resolution version of an input signal is created that still contains the large or important structural elements, without the fine detail that may not be as useful to the task and thus removes noise from the image.
There are two types of Pooling:
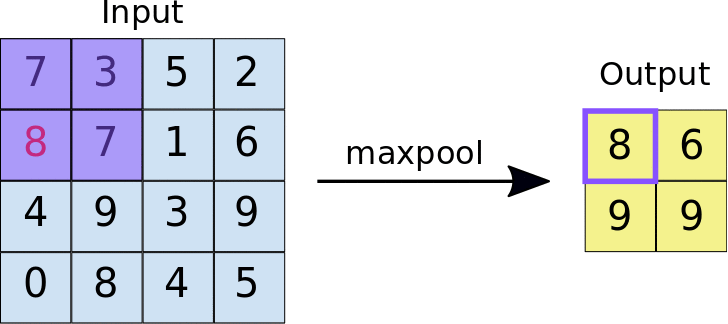
- Max Pooling
In max Pooling the largest value is selected in the region of feature map covered by the filter. Thus the output is the most prominent features. Max pooling is most widely used as it also remove the noisy data from the image.
2. Average Pooling
In Average pooling the average of all the values present in the range of feature map covered by the filter is taken. Max pooling throws away the data whereas in Average pooling everything is preserved hence it preserves localization.

3. Fully Connected Layer
The task of fully connected layer is to take the results from convolution process and perform prediction. The first layer is a flatten layer which converts the values into a single dimension vector. The fully connected layer works like a regular neural network and goes through forward and back propagation iterations where the weight parameters are learnt. Each hidden layer contains an activation function to add non-linearity.

Implementation in TensorFlow

Here, we have defined a Sequential model, where there are 3 layers of Convolution followed by pooling finally linking to a fully connected network with one hidden layer. “keras.layers.Conv2D” is used to define the Convolution layer wherein, the first parameter(16) defines the number of filters, second parameter defines the filter size(3,3) ,third parameter is the activation function, and the last parameter, input_shape defines the dimension of the input image. “keras.layer.Maxpooling2D” is used to define a Maxpooling layer with filter dimension.
Finally, we compile the model and perform model.fit by specifying the epochs. Sub-sequentially we can use model callback to stop its training if the validation metric crosses a certain desirable threshold which can be used to regularize the model and prevent over-fitting.