Mastering Multi-Tenant Architecture in Django: Scaling Your SaaS with Separate Databases per Tenant
What is a multi-tenant architecture?
In a hyper-competitive world, companies are trying to maximize their efficiency across the entire organization. Whether it’s upskilling employees, modernizing legacy infrastructure, or adapting the best production/development process, enterprises constantly look to make themselves better. Well, at least the ones that are planning to stay in the game for long certainly are! Hence it should come as no surprise that companies of varying scale and different verticals have adapted Cloud Computing for their infrastructure needs.
Scaling a Software as a Service (SaaS) application can be a daunting task, especially when the number of tenants (i.e., customers) starts to grow. As a developer, you want to make sure that your application can handle the increased traffic and user base, without compromising the performance or security of the system. One of the key techniques for scaling SaaS applications is multi-tenancy, which allows multiple tenants to share a single application instance while keeping their data isolated from one another.
In this article, we’ll explore how to implement multi-tenant architecture with separate databases per tenant in Django, a popular Python web framework. We’ll dive deep into the details, from the basic concepts to advanced techniques, and provide code examples to help you get started.
SaaS(software as a service)?
Software as a Service (SaaS) is a software delivery model in which software is hosted on a remote server and made available to customers over the internet. Instead of installing and maintaining software on their own servers, customers can access the software as a service, typically paying a monthly or annual fee.
SaaS applications have become increasingly popular in recent years, particularly for business applications such as customer relationship management (CRM), enterprise resource planning (ERP), and project management.
Why is multi-tenancy important for SaaS?
As a SaaS application grows, it can become difficult to manage the increasing number of tenants and their data. Multi-tenancy allows multiple tenants to share a single application instance, reducing the overhead of managing multiple instances of the application.
In addition, multi-tenancy can provide benefits such as:
- Improved security: Multi-tenancy allows for better isolation of tenant data, reducing the risk of data breaches.
- Scalability: Multi-tenancy can make it easier to scale the application horizontally, by adding more servers or instances to handle increased demand.
- Lower costs: By sharing resources among multiple tenants, multi-tenancy can reduce the overall costs of running the application.
What is multi-tenant architecture with separate databases per tenant?
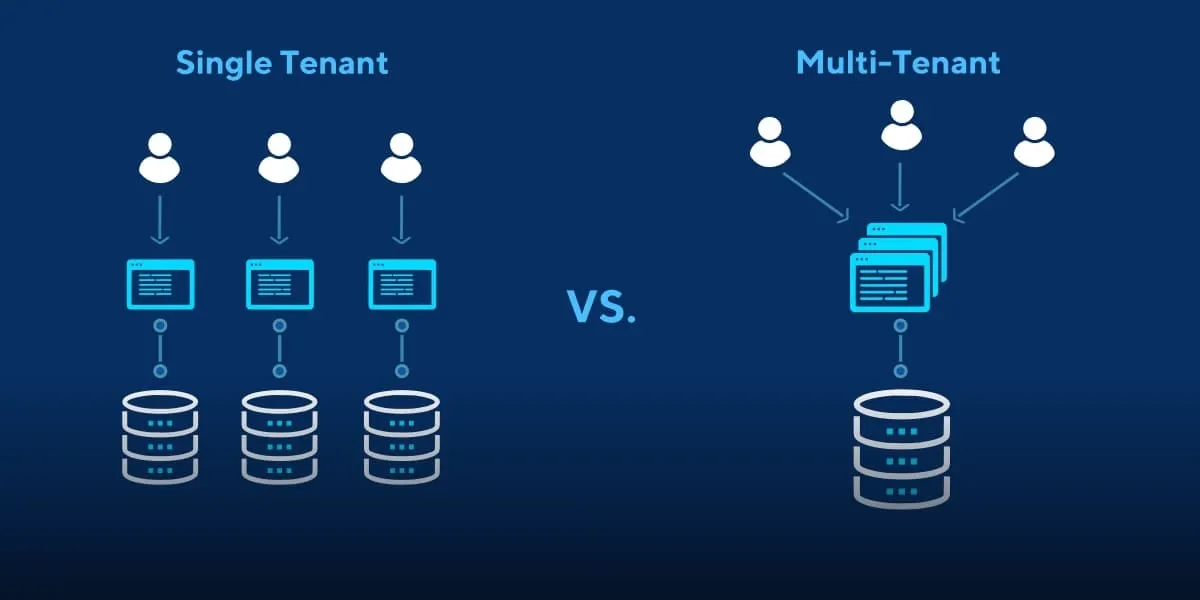
Multi-tenant architecture with separate databases per tenant is a powerful technique for implementing multi-tenancy in which each tenant has its own separate database. This approach allows for even greater isolation of tenant data, as each tenant’s data is physically separated from other tenants’ data.
In this approach, each tenant has its own separate database instance, typically on a shared database server. The application connects to the correct database instance based on the requested tenant, using techniques such as database routing or connection switching.
Implementing multi-tenant architecture with separate databases per tenant in Django can be a complex task, but it can provide significant benefits for scaling SaaS applications. In the next sections, we’ll explore the benefits and challenges of this approach and dive into the details of implementing it in Django.
Multi-tenant Architecture implimentation in Django
Now that we’ve covered the basics of multi-tenant architecture let’s dive into how to implement it using Django.
There are several approaches to implementing multi-tenant architecture in Django, including:
- Shared schema: All tenants share the same database schema.
- Shared database: All tenants share the same database but have separate tables.
- Separate databases: Each tenant has its own separate database.
In this article, we’ll focus on the separate database approach since it provides the most data isolation and security.
Step 1: Create a Tenant Model
The first step in implementing multi-tenant architecture is to create a Tenant model. This model will store information about each tenant, such as their name, domain, and database name.
from django.db import models

class Tenant(models.Model):
    name = models.CharField(max_length=100)
    domain = models.CharField(max_length=100, unique=True)
    database_name = models.CharField(max_length=100, unique=True)
Step 2: Create a Middleware to Switch Databases
The next step is to create a middleware that will switch the database connection based on the tenant’s domain. This middleware will intercept each request and switch the database connection before the view is executed.
from django.db import connection
from django.http import Http404

class TenantMiddleware:
    def __init__(self, get_response):
        self.get_response = get_response
    def __call__(self, request):
        try:
            # Get the domain from the request
            domain = request.get_host().split(':')[0]
            # Get the tenant based on the domain
            tenant = Tenant.objects.get(domain=domain)
            # Switch the database connection
            connection.disconnect()
            connection.settings_dict['NAME'] = tenant.database_name
            connection.connect()
        except Tenant.DoesNotExist:
            raise Http404("Tenant not found")
        return self.get_response(request)
Setting Up Django for Multi-Tenant Architecture
Creating Separate Databases for Each Tenant
One of the key components of multi-tenant architecture is the ability to create separate databases for each tenant. This allows you to isolate each tenant’s data, and also provides better scalability and performance compared to using a shared database.
In Django, you can create separate databases for each tenant using the PostgreSQL database engine, which supports database schema isolation. Here’s how you can create a new PostgreSQL database for each tenant:
from django.db import connection
from django.db.utils import ProgrammingError

def create_tenant_database(database_name):
    """
    Creates a new PostgreSQL database with the given name.
    """
    with connection.cursor() as cursor:
        try:
            cursor.execute("CREATE DATABASE {}".format(database_name))
        except ProgrammingError:
            # The database already exists
            pass
This function uses Django’s database connection to execute a raw SQL command to create a new PostgreSQL database with the given name. If the database already exists, it simply ignores the error and moves on.
Routing Database Requests to the Correct Database
Now that we have multiple databases created for each tenant, we need to route requests to the correct database based on the current tenant. In Django, we can achieve this by creating a database router.
Creating a Router to Route Database Requests
A database router is a Python class that tells Django which database to use for a given model. In our case, we want to route requests to the database associated with the current tenant. Let’s create a database router in routers.py file:
class TenantRouter:
    """
    A router to route database requests based on the tenant.
    """

    def db_for_read(self, model, **hints):
        """
        Attempts to read from the tenant's database.
        """
        tenant = get_current_tenant()
        if tenant:
            return tenant.database

    def db_for_write(self, model, **hints):
        """
        Attempts to write to the tenant's database.
        """
        tenant = get_current_tenant()
        if tenant:
            return tenant.database
    def allow_migrate(self, db, app_label, model_name=None, **hints):
        """
        Make sure migrations are only applied to the tenant's database.
        """
        tenant = get_current_tenant()
        if tenant:
          return db == tenant.database
        return None

    def allow_relation(self, obj1, obj2, **hints):
        """
        Allow relations if both objects are in the same tenant's database.
        """
        if obj1._meta.app_label == 'your_app' and obj2._meta.app_label == 'your_app':
            tenant1 = get_tenant_from_obj(obj1)
            tenant2 = get_tenant_from_obj(obj2)
            return tenant1 == tenant2
        return None
In the above code, we define a `TenantRouter` class with four methods: db_for_read(), db_for_write(), allow_relation(), and allow_migrate().
— db_for_read() and db_for_write() methods are used to route database read and write requests to the appropriate database based on the current tenant. If a current tenant is not found, the method returns None.
— allow_relation() method is used to allow relations between objects only if they belong to the same tenant’s database.
— allow_migrate() method is used to ensure that migrations are applied only to the tenant’s database.
Inspecting the Model being Queried to Route Requests
Inspecting the Model being Queried to Route Requests
Now that we have defined our router, we need to tell Django to use it. We can do this by adding the following to our `settings.py` file:
DATABASE_ROUTERS = ['path.to.TenantRouter']This tells Django to use our TenantRouter for routing database requests.
The final step is to ensure that we set the current tenant on each request, so that our router knows which database to use. We can do this by adding middleware to our Django application:
class TenantMiddleware:
    """
    Middleware to set the current tenant based on the request's hostname.
    """
  def __init__(self, get_response):
        self.get_response = get_response

    def __call__(self, request):
        hostname = request.get_host().split(':')[0]
        tenant = Tenant.objects.filter(domain_url=hostname).first()
        set_current_tenant(tenant)
        response = self.get_response(request)
        return response
This middleware sets the current tenant based on the request’s hostname. We can add this middleware to our Django application by adding the following to our settings.py file:
MIDDLEWARE = [
    # ... other middleware ...
    'path.to.TenantMiddleware',
]
With this in place, our application will automatically route requests to the correct database based on the current tenant.
Creating a Management Command to Create Tenants
One important aspect of a multi-tenant application is the ability to create new tenants as needed. In Django, we can create a management command that prompts the user for information about the new tenant and creates the necessary database and schema.
Creating a management command to create new tenants
To create a new management command, we first need to create a new file in a Django app’s management/commands directory. Let's call this file create_tenant.py. Then, we can define a new Command class that subclasses Django's BaseCommand.
from django.core.management.base import BaseCommand

class Command(BaseCommand):
    help = 'Creates a new tenant.'
    def handle(self, *args, **options):
        # code to create new tenant goes here
Prompting the user for information about the new tenant
Next, we can prompt the user for information about the new tenant using the input function. For example, we might ask for the new tenant's name and email address.
from django.core.management.base import BaseCommand

class Command(BaseCommand):
    help = 'Creates a new tenant.'
    def handle(self, *args, **options):
        tenant_name = input('Enter the new tenant name: ')
        tenant_email = input('Enter the new tenant email address: ')
        # code to create new tenant goes here
We can then use the information provided by the user to create a new tenant, which might involve creating a new database and schema, as well as any necessary records in the Tenant model.
from django.core.management.base import BaseCommand
from django.db import connection
from your_app.models import Tenant

class Command(BaseCommand):
    help = 'Creates a new tenant.'
    def handle(self, *args, **options):
        tenant_name = input('Enter the new tenant name: ')
        tenant_email = input('Enter the new tenant email address: ')
        # create new tenant
        tenant = Tenant.objects.create(name=tenant_name, email=tenant_email)
        # create new database and schema
        with connection.cursor() as cursor:
            cursor.execute(f'CREATE DATABASE {tenant.db_name}')
            cursor.execute(f'CREATE SCHEMA {tenant.schema_name}')
        self.stdout.write(self.style.SUCCESS(f'Successfully created new tenant {tenant_name}'))
This example assumes that we have a Tenant model that represents each tenant in the application. It also assumes that each tenant has a unique db_name and schema_name that are used to connect to the correct database and schema when handling requests.
By creating a management command to create new tenants, we can easily add new tenants to our application as needed.
The Benefits and Challenges of Multi-Tenant Architecture
Benefits and Challenges of Multi-tenant Architecture with Separate Databases
As we’ve already discussed, multi-tenant architecture with separate databases per tenant can provide significant benefits for scaling SaaS applications. Let’s take a closer look at some of the key benefits and challenges.
Benefits:
- Improved isolation of tenant data: By separating each tenant’s data into its own database, the risk of data breaches or leaks is reduced.
- Better performance: By isolating tenant data into separate databases, queries can be optimized for each tenant’s data, improving overall application performance.
- Simplified management: With separate databases, it’s easier to manage backups, migrations, and other database-related tasks for each tenant.
Challenges:
- Increased complexity: Managing multiple databases can be more complex than managing a single database. This can require additional tools or techniques to manage.
- Increased resource usage: Each tenant’s database requires its own resources, such as CPU, memory, and storage. This can increase the overall resource usage of the application, potentially leading to higher costs or scalability challenges.
- Data migration challenges: When adding a new tenant or updating the database schema, it can be challenging to migrate data across multiple databases.
- Security challenges: Managing multiple databases can increase the complexity of security management, such as ensuring that each database is properly secured and isolated from other databases.
Is Multi-tenant Architecture Right for Your Application?
Deciding whether to use multi-tenant architecture depends on several factors, including the nature of your application, the number of tenants you expect to support, and the scalability requirements of your application.
If you expect to serve multiple tenants with similar workflows, features, and data models, and want to reduce infrastructure costs and maintenance overhead, multi-tenant architecture may be a good fit for your application. However, if your tenants have vastly different needs, or if you have strict performance or security requirements, you may need to consider other architectures, such as separate instances or shared schema architectures.
Conclusion
Implementing multi-tenant architecture using Django and separate databases per tenant can be a complex but rewarding process. By following the steps outlined in this article, you can create a scalable, secure, and customizable SaaS application that can handle a growing user base. Remember to carefully consider the benefits and challenges of multi-tenant architecture before deciding whether to implement it in your application.
References
- https://medium.com/@MilanJovanovicTech/multi-tenant-applications-with-ef-core-9d8b2ba13644
- https://www.linkedin.com/pulse/multi-tenant-architecture-nutshell-omar-ismail
- https://medium.com/@techWithAditya/scaling-your-saas-with-django-mastering-multi-tenant-architecture-with-separate-databases-per-cb39311fe4d7
That’s it, I guess.
Cheers, Happy Coding!!!
🙏🙏🙏
Since you’ve made it this far, sharing this article on your favorite social media network would be highly appreciated. For feedback, please ping me on Twitter.