Generating Synthetic Music with JavaScript - Introduction to Neural Networks
Introduction
Recurrent Neural Networks (RNN) are a way to consider the dimension of time when training or inferring from the Neural Network. While talking about Neural Networks in general it is assumed that inputs map to the same output irrespective of the order or sequence of inputs. This is true in cases when you have to identify objects in an image or predict a candidate’s eligibility for loan based on various circumstances. This is because each entity is independent of the previous entity. But Neural Networks built on this assumption do not perform well in cases where the input sequence is one of the most crucial features like machine translation where a sequence of words matter, or in case of system log analysis where the order of events matter among other things.
In this tutorial we will briefly understand how LSTM considers a certain sequence of events. We will then explore Magenta a, an ML library that can be used to generate music and art. We will also build a small app that will play a different sequence of drums for us each time by using DrumRNN in the browser using Magenta.js.
Step 1: Understanding Neural Networks and Recurrent Neural Networks
Neural Networks are universal function approximators, i.e.given an adequate size of neural networks you can use it to define any function. In it’s simplest form neural network can be understood as a Perceptron. It has the following components:
- Inputs: The inputs to the perceptron
- Weights: These are the weights assigned to each input
- Bias: This is a constant that is added to the inputs
- Activation function: It maps input to output
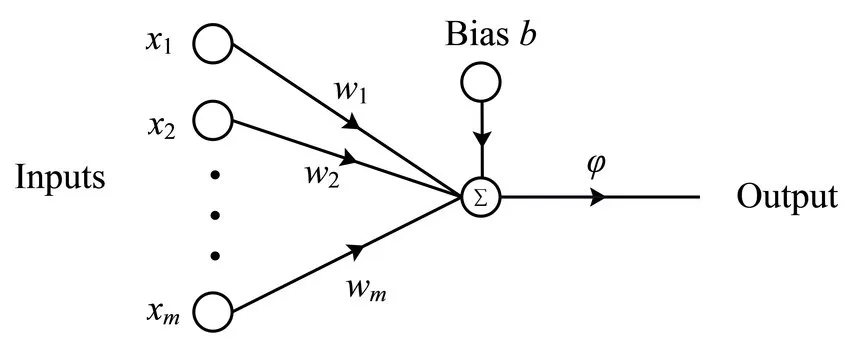
Weights help to give importance to certain inputs more than others. For instance, in order to decide if John should be granted a loan or not, the input related to his income should have a higher weight compared to the one that represents the initials of his name. Bias helps to make sure that given the same input, different perceptrons get different summed input by adding or subtracting a constant value from the input. This summed input is then passed through an activation function. This function has one job - to map the input to the output. There are many variations of activation functions, each suited for a different job. You would use a sigmoid activation function when you want to scale values in the range of 0 to 1, which is generally the case in a multi-class classification. In cases of binary classification where you want to know just one of the two classes- 0 or 1, you would use something like a binary step.
In essence, this perceptron is also a single-layer neural network. When you stack number of such perceptrons in a layer and increase the number of layers you get a deep neural network. The training data is used to adjust the parameters of each such perceptron in this network such as weights, biases etc. As a convention, the layer that receives the input is also known as the input layer and the one that provides output is called the output layer. All the layers in between, if present are known as hidden layers.
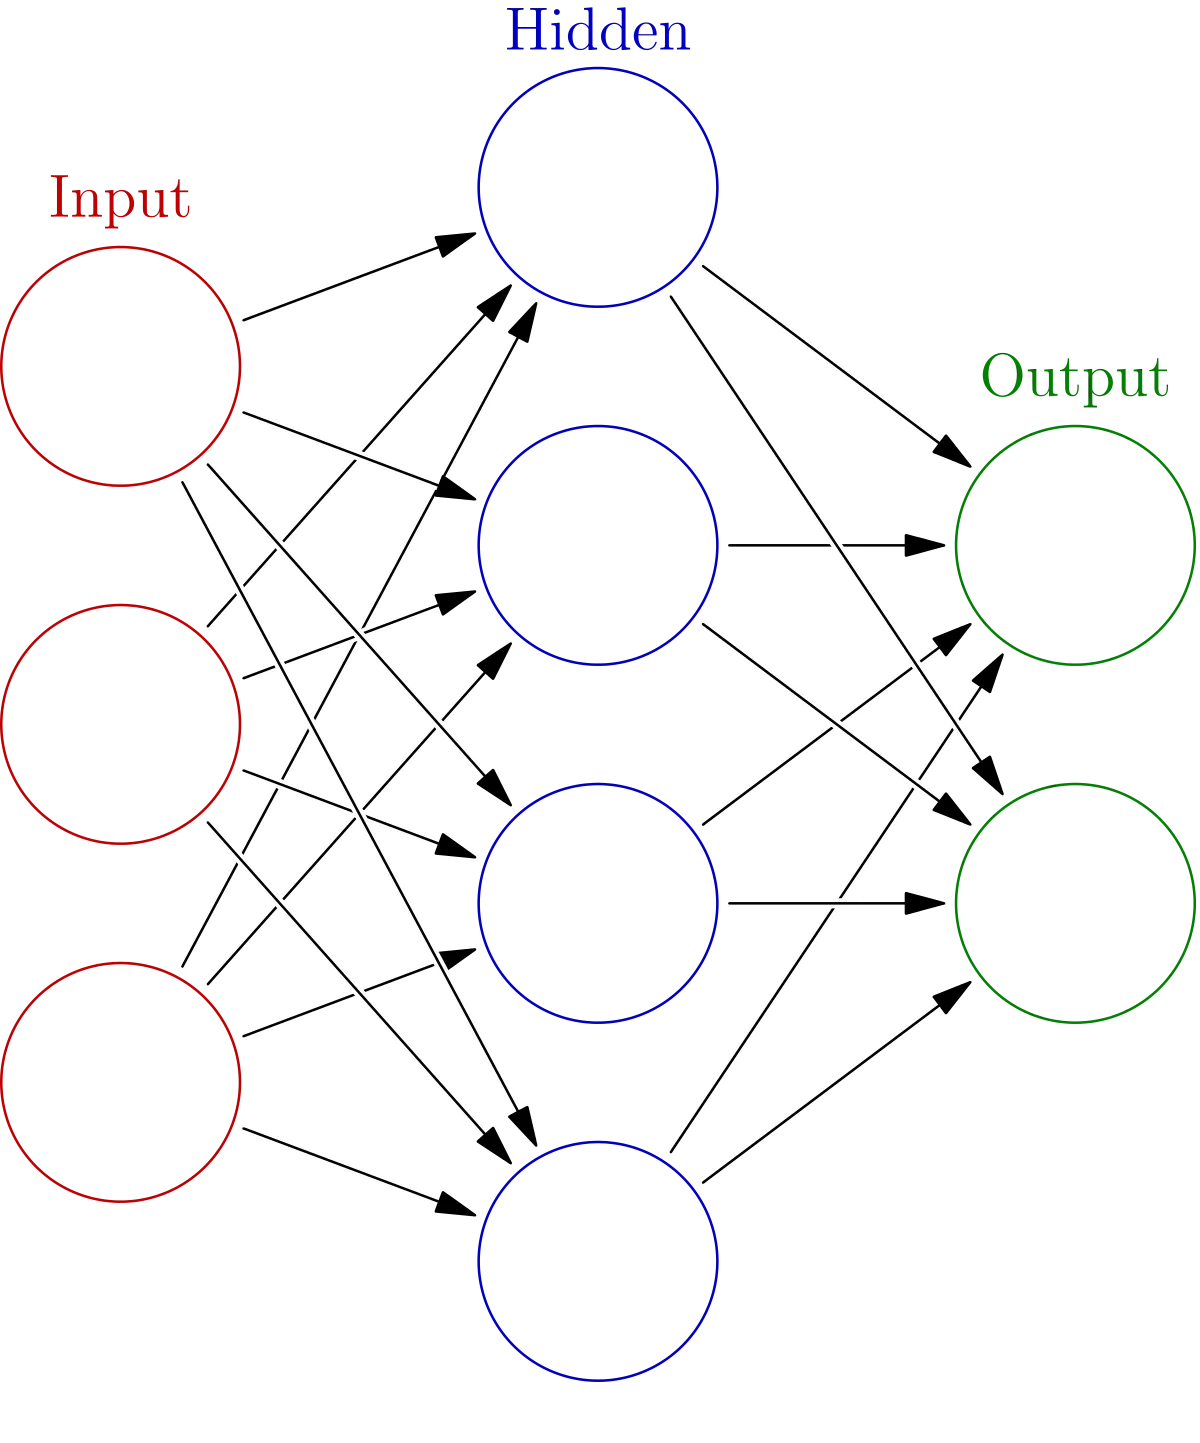
As you might have observed before, the output of a perceptron is only dependent on its input at a certain time. As they are the building blocks of a neural network, the output of the neural network is also dependent on only the input at a certain time. This is where recurrent neural networks come into the picture.

The output from the current state is fed again during the next state viz. the hidden layer. This makes the network capable of knowing what happened in the previous state or when the last input was passed through the network. As the previous state also has information about the states before it, this input represents the complete history to some extent. The term - “some extend” is used as there is a concept of a vanishing gradient which makes the memory of a state shrink as and when new states are seen.
In this section you leaned about what makes up a neural network and how they work. You also saw how recurrent neural networks are different from normal neural network and also how they work with time series data.
Step 2: Introduction to TensorFlow.js to Magenta.js
In this section you will learn about the Magenta project and look at Magenta.js. Although training the models is out of scope of this tutorial you will see how to use pretrained models to generate synthetic music using only JavaScript.
Magenta is a project lead by Google that focuses on using neural network in the domain of music and art. Although the core concepts can be implemented with any machine leaning library, the team behind Magenta has used TensorFlow for the task. TensorFlow is a library for machine learning developed and used by Google. It is an end-to-end system which means it is easy to not only develop with TensorFlow by using GPU’s and TPU’s for training but also deploy with it to multiple machines and even IOT devices. It also has TensorFlow.js which makes it easy to develop models and infer from them all within the JavaScript ecosystem. This means you can train and use the model in the browser itself.
In the next section you will use Magenta.js to create synthetic music.
Step 3: Creating the base
In this section we will design the base of the app. We will load all the libraries we need using Content Delivery Network or CDN. Start by creating a file named index.html and write the following snippet to it:
[index.html]
<html>
<head>
    <title>Synthetic Music</title>
    <style type="text/css">
        body {
            margin: 0;
            padding: 0;
            background-color: #f6f6f6;
            font-family: sans-serif;
        }        .play {
            width: fit-content;
            margin: 0 auto;
            padding: 12px;
            border: 2px solid #323232;
            border-radius: 50%;
        }        .play div {
            border-top: 10px solid transparent;
            border-bottom: 10px solid transparent;
            border-left: 20px solid #323232;
            height: 0px;
            width: fit-content;
            margin: 0 auto;
        }        .heading {
            text-align: center;
            margin-top: 5rem;
        }        #pattern-container {
            margin-top: 2rem;
            width: fit-content;
            border-radius: 5px;
            margin: 0 auto;
        }        .pattern-group {
            display: inline-block;
            background-color: #e4f9f5;
            padding: 5px 6px;
        }        .pattern-group.seed {
            background-color: #a8e6cf;
        }        .pattern.active {
            background-color: #11999e;
        }        .pattern {
            height: 10px;
            width: 5px;
            display: block;
            margin: 5px 0;
            padding: 3px;
            border-radius: 4px;
            color: transparent;
            background-color: #cbf1f5;
        }
    </style>
</head><body>
<h2 class="heading">Synthetic Music with Neural Networks </h2>
<div class="play" onclick="createAndPlayPattern(this)">
    <div></div>
</div>
<div>
    <div id='pattern-container'></div>
</div>
<script src='https://code.jquery.com/jquery-3.3.1.slim.min.js'></script>
<script type='text/javascript' src='https://cdn.jsdelivr.net/npm/lodash@4.17.5/lodash.min.js'></script>
<script type='text/javascript' src='https://gogul09.github.io/js/tone.js'></script>
<script type='text/javascript'
        src='https://cdn.jsdelivr.net/npm/@magenta/music@0.0.8/dist/magentamusic.min.js'></script>
<script>
    // Continue here...
</script>
</body>
</html>
We have defined a few custom CSS styles in the head section. Additional DOM elements were also defined to which we will later add the music patterns generated by out neural network. We have also loaded a few libraries like jQuery and loadash to clean up our code by using the API provided by them, tone.js to play tones and finally magenta.js which we will use to generate music patterns.
Step 4: Setting up Tone.js
In this section we will setup Tone.js so that it knows what notes are available to play. We will be playing drums, so we need sounds for different pieces of drums. You can get these sound files from the assets folder in this repository. You will find files named 808-hihat-open-vh.mp3, 808-hihat-vh.mp3, 808-kick-vh.mp3, 909-clap-vh.mp3, 909-rim-vh.wav, flares-snare-vh.mp3, slamdam-tom-high-vh.mp3, slamdam-tom-low-vh.mp3, slamdam-tom-mid-vh.mp3 and small-drum-room.wav. Among these small-drum-room.wav will be used to create reverb.
Start by creating a convolver which you will later use to create reverb. Also make sure that the wet value is set to 0.3 which means 30% of this effect will be applied to the tone on which it is used. Write the following snippet to do so.
let reverb = new Tone.Convolver(`assets/small-drum-room.wav`).toMaster();
reverb.wet.value = 0.3;
Next we have to define the individual components of the drum kit. These are Kick, Snare, Hi-hat closed, Hi-hat open, Tom low, Tom mid, Tom high, Clap and Rim. Write the following snippet that creates a drumkit with these components in order.
let drumKit = [
    new Tone.Player(`assets/808-kick-vh.mp3`).toMaster(),
    new Tone.Player(`assets/flares-snare-vh.mp3`).toMaster(),
    new Tone.Player(`assets/808-hihat-vh.mp3`).connect(new Tone.Panner(-0.5).connect(reverb)),
    new Tone.Player(`assets/808-hihat-open-vh.mp3`).connect(new Tone.Panner(-0.5).connect(reverb)),
    new Tone.Player(`assets/slamdam-tom-low-vh.mp3`).connect(new Tone.Panner(-0.4).connect(reverb)),
    new Tone.Player(`assets/slamdam-tom-mid-vh.mp3`).connect(reverb),
    new Tone.Player(`assets/slamdam-tom-high-vh.mp3`).connect(new Tone.Panner(0.4).connect(reverb)),
    new Tone.Player(`assets/909-clap-vh.mp3`).connect(new Tone.Panner(0.5).connect(reverb)),
    new Tone.Player(`assets/909-rim-vh.wav`).connect(new Tone.Panner(0.5).connect(reverb))
];
Notice how each component is defined as an instance of Tone Player. Components that need reverb effect applied to them, a tone panner was connected to the original tone player. Panning is a process of placing the instrument in the 3D space by deciding the shape of the signal that is given to each channel of audio. Suppose, in a 2 channel the audio, you pass a tone signal equally through both the channels, that creates the illusion of the tone originating from the centre, you can then move this perceived source of the tone by controlling the signal that goes to each of the channel.
In this section you created the components that make up your drumkit. You also loaded the sound files for each tone and added reverbs to the tones that require it.
Setting up Magenta.js
In this section you will use neural network to continue a provided seed pattern and create synthetic music. Before we actually start using the neural networks these are a few methods that need to be setup that will convert the music notes to sequences that the model understands. Similarly, we will have to convert back the sequence that the model gave back to a tone that can be played.
Start by creating a mapping of MIDI values for each tone. MIDI or Musical Instrument Digital Interface is the protocol by which various devices that deal with music communicate with each other. If you connect some synthesizer with your computer, this is the interface used for communication. As you may have guessed this is also how we will communicate with our model. Magenta has been designed in this way as it makes it a easy plug in existing devices into the model directly. You may have guessed it, there are already devices available that do just that.
A machine leaning model performs best when the range of input is defined. Thus we will create a mapping of values from MIDI range into the range that the model can work with. Use the following variables to create this mapping:
const midiDrums = [36, 38, 42, 46, 41, 43, 45, 49, 51];
const reverseMidiMapping = new Map([
    [36, 0], [35, 0], [38, 1], [27, 1], [28, 1], [31, 1], [32, 1], [33, 1],
    [34, 1], [37, 1], [39, 1], [40, 1], [56, 1], [65, 1], [66, 1], [75, 1],
    [85, 1], [42, 2], [44, 2], [54, 2], [68, 2], [69, 2], [70, 2], [71, 2],
    [73, 2], [78, 2], [80, 2], [46, 3], [67, 3], [72, 3], [74, 3], [79, 3],
    [81, 3], [45, 4], [29, 4], [41, 4], [61, 4], [64, 4], [84, 4], [48, 5],
    [47, 5], [60, 5], [63, 5], [77, 5], [86, 5], [87, 5], [50, 6], [30, 6],
    [43, 6], [62, 6], [76, 6], [83, 6], [49, 7], [55, 7], [57, 7], [58, 7],
    [51, 8], [52, 8], [53, 8], [59, 8], [82, 8]]);
Next, also set the temperature of the music you desire and also the length of the pattern as follows:
const temperature = 1.0;
const patternLength = 32;
To convert the notes into a sequence, write down the following function:
function fromNoteSequence(seq, patternLength) {
    let res = _.times(patternLength, () => []);
    for (let { pitch, quantizedStartStep } of seq.notes) {
        res[quantizedStartStep].push(reverseMidiMapping.get(pitch));
    }
    return res;
}
It takes two inputs, the sequence of notes and the pattern length. Loadash was used to first creat a list of length defined by patternLength consisting of empty lists that then filled up next. Individual notes are then iterated over to unpack the start time of the note and then the note is placed at that interval by using the reverseMidiMapping defined earlier.
The output from model can now be converted into a sequence that can be used to play the drum kit. The reverse has to happen as well i.e. pattern sequences should be converted into note sequences that the model can understand. Write down the following function that performs this job:
function toNoteSequence(pattern) {
        return mm.sequences.quantizeNoteSequence({
                ticksPerQuarter: 220,
                totalTime: pattern.length / 2,
                timeSignatures: [{
                    time: 0,
                    numerator: 4,
                    denominator: 4
                }],
                tempos: [{
                    time: 0,
                    qpm: 120
                }],
                notes: _.flatMap(pattern, (step, index) =>
                    step.map(d => ({
                        pitch: midiDrums[d],
                        startTime: index * 0.5,
                        endTime: (index + 1) * 0.5
                    }))
                )
            },
            1
        );
    };
Here are few details on the attributes that have been defined when creating this note sequence:
ticksPerQuarter: ticks is the unit of time in the MIDI standard. totalTime: The length of the sequence that has been provided in the notes attribute. This length is measured in terms of quantized steps.timeSignatures: This defines the time signature used in musical notation.tempos: Define the temps used in the tone sequence provided. qpm here refers to quarter notes per minute. notes: This represents the notes with the pitch and duration of each note in the sequence.
Once we have the pattern, there should be a way to play it as well. To play the pattern we will use the drumkit we created in the previous section. Write the following method that takes a pattern and plays it using Tone.js:
function playPattern(pattern) {
    sequence = new Tone.Sequence(
        (time, {drums, index}) => {
            drums.forEach(d => {
                drumKit[d].start(time)
            });
        },
        pattern.map((drums, index) => ({ drums, index })),
        '16n'
    );    Tone.context.resume();
    Tone.Transport.start();
    sequence.start();
}
Tone.Sequence has been used to accomplish this. It expects three inputs: callback: This method would be called for each event event: The individual events of this sequence. Here we map each individual pattern as an object that has the drum components to play as drums and the index of the pattern in the sequence as stepId subdivision: The subdivision between the events Tone.context.resume then starts the audio context which is required to connect to the audio interface provided by the browser. Tone.Transport makes sure the timing of the music stays perfect by not directly relying on browsers timing. sequence.start finally sets everything in motion.
With this you are now ready to finally use the model to create music. Before we actually start using the model let us look at how note pattern look. A specific pattern in a pattern sequence is an array of indexes from 0 to 8 of the 9 components in our drumkit. So a pattern [0,2,4] would play the Kick, Hi-hat closed and Tom low.
We now use a seed pattern that our model will then improvise upon. Use the following seed pattern for it.
var seedPattern = [
    [0, 2],
    [0],
    [2, 5, 8],
    [],
    [2, 5, 8],
    [],
    [0, 2, 5, 8],
    [4, 5, 8],
    [],
    [0, 5, 8]
];
Use the following snippet to define a function that creates this seed pattern and then creates a pattern of length patternLength which was previously set to 32:
let drumRnn = new mm.MusicRNN('https://storage.googleapis.com/download.magenta.tensorflow.org/tfjs_checkpoints/music_rnn/drum_kit_rnn');
drumRnn.initialize();function createAndPlayPattern() {
    drumRnn
        .continueSequence(seedSeq, patternLength, temperature)
        .then(r => seedPattern.concat(fromNoteSequence(r, patternLength)))
        .then(displayPattern)
        .then(playPattern)
}
We start by first loading the Drum RNN model and then initializing it. We have then created a function that uses this model to take a seed pattern and then continue it to create a new pattern using the continueSequence method. We then pipe this note sequence to convert it to sequence that we can play our drumkits with. We have also chained the displayPattern to visualize the pattern and then finally play the pattern with playPattern method. We will create the visualization method in the next section.
Adding visualization
In this section we will toe up everything to create visualization for our pattern. Modern browsers like Chrome require the user to make some interaction on the page before it allows the music to be played. This is actually a usability feature. You would not like it if a pop-up that opened in the background suddenly starts playing something. To make sure that we start our process only after the user interacts with the page, we had created a play button when writing the HTML and added an onclick attribute to it. The method referenced in this attribute was createAndPlayPattern which we created in the previous step that takes a seed pattern, generates music, visualizes it and plays it. We do not want this play button to be visible after the first click. Modify the createAndPlayPattern pattern to accept the click event and delete the element from the page as follows:
function createAndPlayPattern(e) {
    $(e).remove()
    let seedSeq = toNoteSequence(seedPattern);
    drumRnn
        .continueSequence(seedSeq, patternLength, temperature)
        .then(r => seedPattern.concat(fromNoteSequence(r, patternLength)))
        .then(displayPattern)
        .then(playPattern)
}
You are now ready to add the last and final part to the puzzle - displayPattern method that visualizes the pattern. Write down the following method to achieve this:
function displayPattern(patterns) {
    for (let patternIndex = 0; patternIndex < patterns.length; patternIndex++) {
        let pattern = patterns[patternIndex];
        patternBtnGroup = $('<div></div>').addClass('pattern-group');
        if (patternIndex <= seedPattern.length)
            patternBtnGroup.addClass('seed');        for (let i = 0; i <= 8; i++) {
            if (pattern.includes(i))
                patternBtnGroup.append($(`<span></span>`).addClass('pattern active'));
            else
                patternBtnGroup.append($(`<span></span>`).addClass('pattern'));
        }
        $('#pattern-container').append(patternBtnGroup)
    }
    return patterns;
}
It takes the pattern and creates multiple spans on the page. Each span is sorted out in a vertical stack of 9 blocks representing each component of the drum kit. It is highlighted if it is on or played when the respective sequence is played. Also the seed pattern is highlighted to make it easy to see what the model has generated.
Conclusion
Recurrent neural networks provide a mechanism to retain state over input. This makes RNN a great fit to predict music as at it’s core, music is a sequence of tones which are all dependent on each other. Magenta is a great starting point for any such projects.