Create a Custom Network and Deploy your own Chaincode with Hyperledger Fabric v2.1

In this story, we will create a custom network and deploy a sample chaincode with Hyperledger Fabric v2.1. After that, we will query the chaincode and interact with the network by 2 peers that we will create.
Firstly, we need to install all prerequisites listed here. If you don’t have installed it before, you can use the following link as a guide. There is more than the installation of prerequisites but it can be good if you complete the whole guide. However, only the installation of prerequisites and the installation of samples, binaries, and docker images parts are necessary for this story.
If we installed prerequisites, samples, binaries, and docker images successfully, we must have a fabric-samples folder and we can start from creating a custom network.
Create a custom network and bring it up
We create a folder whose name is burakcan-network under the fabric-samples folder. In our network, there are 3 nodes including 2 organizations, which areBurakcan1 and Burakcan2 , and 1 orderer so we need to generate all certificates and keys for proving whether the nodes are really themselves. We will use the cryptogen tool that provides to generate the cryptographic material for our network entities and we had already installed it when we installed platform-specific binaries. It places under fabric-samples/bin folder. It consumes the crypto-config.yaml file that contains the network topology and allows us to generate a set of certificates and keys for both the Organizations and the components that belong to those Organizations.
I don’t mention more than this but you can learn more about the tool from here.
That’s why we create the following file under the burakcan-network directory. We define an Orderer Org (OrdererOrg) and 2 Peer Org (Burakcan1 and Burakcan2). Each count value in organizations specifies the number of peers in that organization.
After defining the crypto-config.yaml file, we execute the following command channel under the burakcan-network directory.
../bin/cryptogen generate --config crypto-config.yaml --output=crypto-configWe should see the message looks like below.

Then we will continue with the configtxgen tool that we had already installed when we installed platform-specific binaries and it places under fabric-samples/bin folder too. It provides the generating these important configuration artifacts;
- 1
orderer genesis block - 1
channel configuration transaction - 2
anchor peer transactions(It must be for each organization and we haveBurakcan1andBurakcan2organizations so we will generate 2 of them)
You can learn more about the configtxgen tool from here.
It consumes the configtx.yaml file that contains the definitions for the network so we will create the following file under the burakcan-network directory.
After defining the configtx.yaml file, we execute the following commands orderly to generate configuration artifacts we mentioned above under the burakcan-network directory;
- To generating orderer genesis block;
../bin/configtxgen -profile OrdererGenesis -outputBlock ./channel-artifacts/genesis.block -channelID channelorderergenesis
- To generating channel configuration transactions;
../bin/configtxgen -profile ChannelDemo -outputCreateChannelTx ./channel-artifacts/channel.tx -channelID channeldemo
- To generating anchor peer transaction for
Burakcan1;
../bin/configtxgen -profile ChannelDemo -outputAnchorPeersUpdate ./channel-artifacts/Burakcan1Anchor.tx -channelID channeldemo -asOrg Burakcan1MSP
- To generating anchor peer transaction for
Burakcan2;
../bin/configtxgen -profile ChannelDemo -outputAnchorPeersUpdate ./channel-artifacts/Burakcan2Anchor.tx -channelID channeldemo -asOrg Burakcan2MSP
Then, we need to create some files under the burakcan-network directory due to specify docker files and define their locations. We create base folder under the burakcan-network directory and the following docker-compose-base.yaml and peer-base.yaml files, which set up that base for our network, inside it.
There is only one file remain we need to create. It is the docker-compose-cli.yaml file that is extended from the docker-compose-base.yaml file and it must be placed under the root of the burakcan-network directory. We will use a cli-container for each organization by bringing up the network or deploying, querying, and interacting chaincode so we create the following file.
Then set up the COMPOSE_PROJECT_NAME variable due to it may cause a problem when we bring our network up.
echo COMPOSE_PROJECT_NAME=net > .envNow, we can bring our network up and we should see something looks like in the image below;
docker-compose -f docker-compose-cli.yaml up -d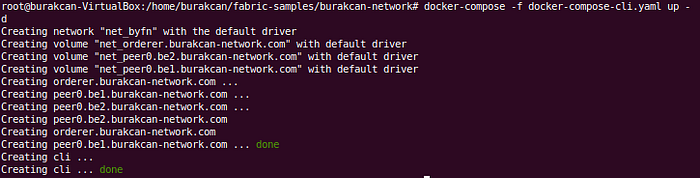
Configure and create the channel
If you have brought the network up successfully, we can continue by configuring and creating the channel we will use. We open 2 more terminals to configure the channel to our peers.
We will enter the CLI container separately for each peer by docker exec command. Also, we can define the environment variables together with this command or after when we execute it. It doesn’t matter which way you choose.
- Enter the following command from one terminal to peer
Burakcan1
docker exec -e "CORE_PEER_LOCALMSPID=Burakcan1MSP" -e "CORE_PEER_TLS_ROOTCERT_FILE=/opt/gopath/fabric-samples/burakcan-network/crypto-config/peerOrganizations/be1.burakcan-network.com/peers/peer0.be1.burakcan-network.com/tls/ca.crt" -e "CORE_PEER_MSPCONFIGPATH=/opt/gopath/fabric-samples/burakcan-network/crypto-config/peerOrganizations/be1.burakcan-network.com/users/Admin@be1.burakcan-network.com/msp" -e "CORE_PEER_ADDRESS=peer0.be1.burakcan-network.com:7051" -it cli bash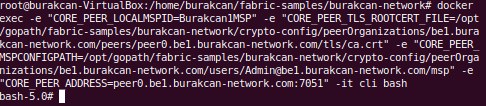
- Enter the following command from the other terminal to peer
Burakcan2
docker exec -e "CORE_PEER_LOCALMSPID=Burakcan2MSP" -e "CORE_PEER_TLS_ROOTCERT_FILE=/opt/gopath/fabric-samples/burakcan-network/crypto-config/peerOrganizations/be2.burakcan-network.com/peers/peer0.be2.burakcan-network.com/tls/ca.crt" -e "CORE_PEER_MSPCONFIGPATH=/opt/gopath/fabric-samples/burakcan-network/crypto-config/peerOrganizations/be2.burakcan-network.com/users/Admin@be2.burakcan-network.com/msp" -e "CORE_PEER_ADDRESS=peer0.be2.burakcan-network.com:7051" -it cli bash
From here, some operations will be made in just one peer and some of them will be made together. We are starting from setting ORDERER_CA variables in all terminals by following way;
export ORDERER_CA=/opt/gopath/fabric-samples/burakcan-network/crypto-config/ordererOrganizations/burakcan-network.com/orderers/orderer.burakcan-network.com/msp/tlscacerts/tlsca.burakcan-network.com-cert.pemThen we create the channel by the following command. There is no need to execute it in both terminals; just one is enough. We entitled the channel name as channeldemo.
peer channel create -o orderer.burakcan-network.com:7050 -c channeldemo -f /opt/gopath/fabric-samples/burakcan-network/channel-artifacts/channel.tx — tls — cafile $ORDERER_CA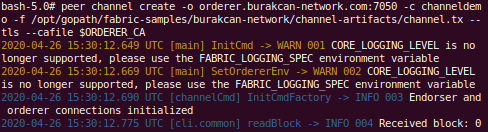
Then we join this channel from each peer separately so we will execute the following command in both terminals and we should see the image below.
peer channel join -b channeldemo.block --tls --cafile $ORDERER_CA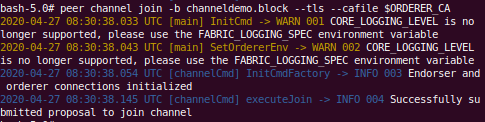
After joining the channel we update the channel from each peer separately.
- To peer
Burakcan1
peer channel update -o orderer.burakcan-network.com:7050 -c channeldemo -f /opt/gopath/fabric-samples/burakcan-network/channel-artifacts/Burakcan1Anchor.tx --tls --cafile $ORDERER_CA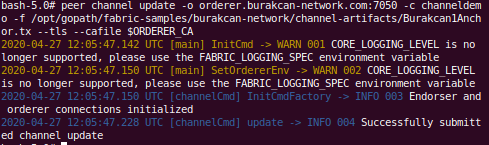
- To peer
Burakcan2
peer channel update -o orderer.burakcan-network.com:7050 -c channeldemo -f /opt/gopath/fabric-samples/burakcan-network/channel-artifacts/Burakcan2Anchor.tx --tls --cafile $ORDERER_CA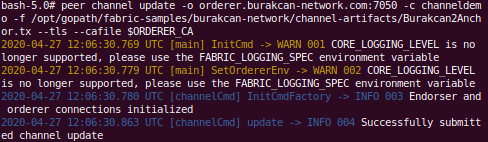
Define and deploying the chaincode
If we have finished the channel stuff successfully, we can continue by defining and deploying the chaincode as the new chaincode lifecycle that has changed with Hyperledger Fabric v2. We won’t look inside this new lifecycle, but if you want, you can look at the following story for more detail.
A chaincode can be written by Go, Java, or Javascript. We will create our chaincode by using the Go language in this example. Firstly we create a directory whose name is be_chaincode to keeps our chaincode.
Since we have defined
../chaincodepath as the/opt/gopath/src/chainpath in the volume part of CLI in thedocker-compose-cli.yamlfile by the row./../chaincode/:/opt/gopath/src/chain
we can access this directory only used by the
/opt/gopath/src/chainpath in CLI container. In addition to creating the chaincode by the way that will be defined below, we can directly create thebe.gofile under the../chaincode/be_chaincodedirectory.
mkdir /opt/gopath/src/chain/be_chaincode
mkdir /opt/gopath/src/chain/be_chaincode/go
vi /opt/gopath/src/chain/be_chaincode/go/be.go
Then we copy the following chaincode in the file whose name is be.go that was created with the command above. “github.com/hyperledger/fabric-contract-api-go/contractapi”
In here, we need to get the dependency github.com/hyperledger/fabric-contract-api-go/contractapi that we wrote inside the chaincode and other go dependencies. We will be able to execute it any terminal we want. There is no need to execute both terminals.
go get github.com/hyperledger/fabric-chaincode-go/shim
go get github.com/hyperledger/fabric-contract-api-go/contractapi
We can modify the go.mod and vendor files in your directory to avoid the command above, and execute GO111MODULE command. But the chaincode under abstore example that has been downloaded with Fabric samples has correct files, so we use their go.mod and vendor files by the following commands
cd /opt/gopath/src/chain/abstore/go
GO111MODULE=on go mod vendor
cd -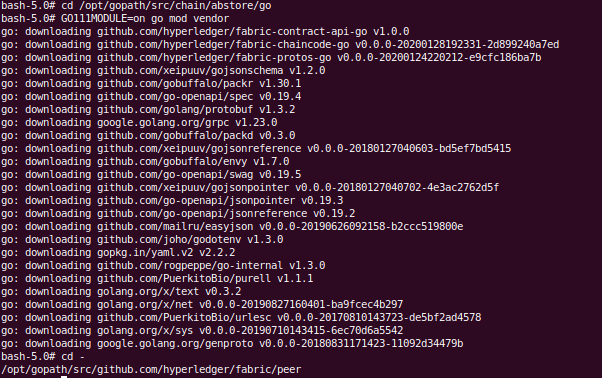
According to the chaincode lifecycle, we package our chaincode by executing the following command in any terminal.
peer lifecycle chaincode package becc.tar.gz --path chain/be_chaincode/go/ --lang golang --label becc_1
Now, we will install this package from all peers so we execute the following command from all terminals.
peer lifecycle chaincode install becc.tar.gz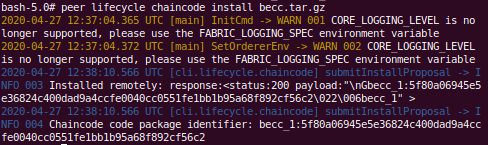
We will query install from all peers so we execute the following command from all terminals and we will get Package ID that will be used at the next steps.
peer lifecycle chaincode queryinstalled
To easy usage, we set Package ID into the CC_PACKAGE_ID variable.
CC_PACKAGE_ID=becc_1:5f80a06945e5e36824c400dad9a4ccfe0040cc0551fe1bb1b95a68f892cf56c2We will approve the chaincode definition after the chaincode package has been installed on our peers, so we execute the following command from all terminals.
peer lifecycle chaincode approveformyorg -o orderer.burakcan-network.com:7050 --tls true --cafile $ORDERER_CA --channelID channeldemo --name becc --version 1 --init-required --package-id $CC_PACKAGE_ID --sequence 1 --signature-policy "OR('Burakcan1MSP.peer', 'Burakcan2MSP.peer')"

Before committing the chaincode, we can check whether Burakcan1MSP and Burakcan2MSP are ready to commit. It is not necessary, but beneficial. Therefore, we execute the following command in one peer.
peer lifecycle chaincode checkcommitreadiness --channelID channeldemo --name becc --version 1 --sequence 1 --output json --init-required --signature-policy "OR('Burakcan1MSP.peer', 'Burakcan2MSP.peer')"
If we see Burakcan1MSP and Burakcan2MSP are ready from approvals, we can commit the chaincode. Before committing the chaincode, we set the path of certificates of each peer that we have defined aspeer0.be1.burakcan-network.com:7051 and peer0.be2.burakcan-network.com:7051 into PEER_BE1_TLSROOTCERTFILES and PEER_BE1_TLSROOTCERTFILES variables to easy use.
PEER_BE1_TLSROOTCERTFILES=/opt/gopath/fabric-samples/burakcan-network/crypto-config/peerOrganizations/be1.burakcan-network.com/peers/peer0.be1.burakcan-network.com/tls/ca.crt
PEER_BE2_TLSROOTCERTFILES=/opt/gopath/fabric-samples/burakcan-network/crypto-config/peerOrganizations/be2.burakcan-network.com/peers/peer0.be2.burakcan-network.com/tls/ca.crt
Then, we commit the chaincode in one peer and we saw it is valid for peer0.be1.burakcan-network.com:7051 and peer0.be2.burakcan-network.com:7051 peers.
peer lifecycle chaincode commit -o orderer.burakcan-network.com:7050 --tls true --cafile $ORDERER_CA --channelID channeldemo --name becc --peerAddresses peer0.be1.burakcan-network.com:7051 --tlsRootCertFiles $PEER_BE1_TLSROOTCERTFILES --peerAddresses peer0.be2.burakcan-network.com:7051 --tlsRootCertFiles $PEER_BE2_TLSROOTCERTFILES --version 1 --sequence 1 --init-required --signature-policy "OR('Burakcan1MSP.peer', 'Burakcan2MSP.peer')"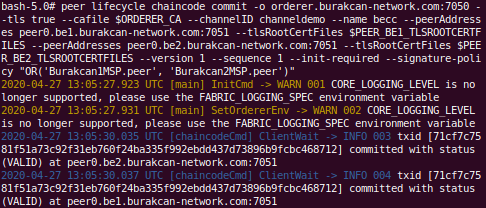
We can check the chaincode definitions that we have committed by the following command.
peer lifecycle chaincode querycommitted --channelID channeldemo --name becc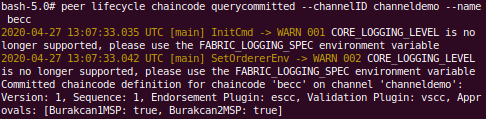
Query the chaincode and interact with the network
After committing the chaincode, we are ready to query the chaincode and interact with the network if everything is ok. We can use the old chaincode lifecycle while we are querying with Hyperledger Fabric v2.
Since we must invoke the chaincode firstly, we use peer chaincode invoke command in any terminal and call the InitLedger method as you see in chaincode that we have defined previously.
peer chaincode invoke -o orderer.burakcan-network.com:7050 --tls true --cafile $ORDERER_CA -C channeldemo -n becc --peerAddresses peer0.be1.burakcan-network.com:7051 --tlsRootCertFiles $PEER_BE1_TLSROOTCERTFILES --peerAddresses peer0.be2.burakcan-network.com:7051 --tlsRootCertFiles $PEER_BE2_TLSROOTCERTFILES --isInit -c '{"function":"initLedger","Args":[]}'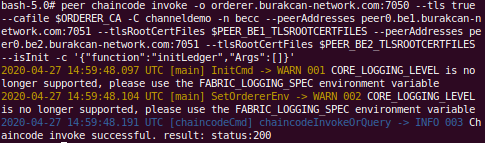
If we see the status:200 message, we can query the chaincode whatever peer we want. That’s why we call the QueryAllProducts method in peer0.be1.burakcan-network.com:7051 peer and it will show all products which we put the ledger in the InitLedger method.
peer chaincode query -C channeldemo -n becc -c '{"Args":["queryAllProducts"]}'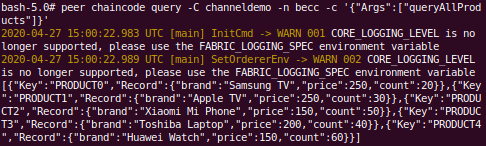
Now, we call the invoke command again due to we want to change product price which means we want to make a change on an asset. When a network member wants to transfer or change an asset on the ledger, the chaincode is invoked. Therefore we call theChangeProductPrice method by executing the following command in peer0.be1.burakcan-network.com:7051 peer.
peer chaincode invoke -o orderer.burakcan-network.com:7050 --tls true --cafile $ORDERER_CA -C channeldemo -n becc --peerAddresses peer0.be1.burakcan-network.com:7051 --tlsRootCertFiles $PEER_BE1_TLSROOTCERTFILES --peerAddresses peer0.be2.burakcan-network.com:7051 --tlsRootCertFiles $PEER_BE2_TLSROOTCERTFILES -c '{"function":"changeProductPrice","Args":["PRODUCT0", 350]}'
If the command above worked correctly, we should see the PRODUCT0 price as 350 instead of 250. That’s why we call the QueryAllProducts method in peer0.be2.burakcan-network.com:7051 peer.
peer chaincode query -C channeldemo -n becc -c '{"Args":["queryAllProducts"]}'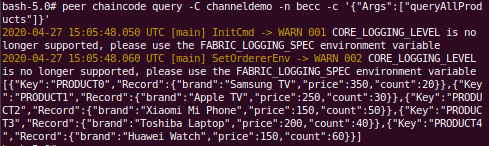
Yes, we can see the PRODUCT0 price as 350 instead of 250 so it means everything is working correctly.
Down the network
When our job is finish, we can down our network so we go to the terminal that we used to bring up the network and execute the following command.
docker-compose -f docker-compose-cli.yaml down
After down the network, using the following commands are beneficial to avoid the possible problems.
docker rm $(docker ps -aq)
docker volume prune
Sometimes we want to upgrade or deploy the new chaincode we may face the kind of error which says “chaincode definition for ‘becc’ is exist but chaincode is not installed” although we executed peer chaincode lifecycle installed command. At this moment, we need to delete the images of the chaincode that we installed for peers. We can see these images by executing the following command. The top 2 images belong to the chaincode that we installed in
peer0.be1.burakcan-network.com:7051andpeer0.be2.burakcan-network.com:7051peers.
docker images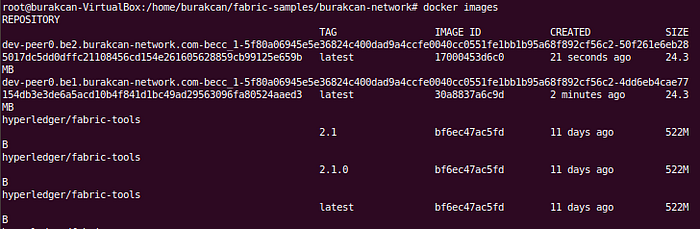
docker rmi <IMAGE_ID>We can delete it by their IMAGE ID property. You can write the image id from above instead of the <IMAGE_ID> variable for each chaincode docker image. You can make a fresh start.
That’s it, we have;
- installed Prerequisites
- installed Samples, Binaries, and Docker Images
- brought up the custom
burakcan-network - created a channel whose name is
channeldemo - deployed
be.goas the chaincodebecc - queried and invoked the chaincode
- interacted with the custom
burakcan-network
in this story.