The book: Gabby, Their Stories
Our final task for this semester was to create a book. This included everything from the content, to the craft, and we were absolutely free to do whatever we wanted.
It just so happened that I’ve been working on my senior thesis, a full length novel, this semester, and at the time of receiving this assignment, was working hard to better develop my characters. I decided this would be a great opportunity to construct my characters in a more concrete sense, by working on some character profile for them.

The concept
Meet Gabby and Olly, my two protagonists for my senior thesis. The illustration to the left was my first attempt at bringing them to life, and I was so excited for the opportunity to do that even more.
Gabby is a troubled ten-year-old, who’s trying to figure out the confusing life she leads in the care of her aunt, Mere. She also had a grandmother, Irene, who plays a big role in the story.
Olly is a twenty-six-year-old radio jockey who is struggling to break out of his comfort zone. He meets Gabby one night in the museum that Irene works in.
My novel explores a lot of struggles, and has a lot of sub-plots that I don’t have the time to delve into. As a result, a lot is left unsaid. While that works in the sense of a novel, I didn’t see why I couldn’t immortalize those sub-plots somewhere, to help them become more real for both me and my readers.
With that, I started sketching.
Sketches
My first set of sketches were looking into elements as simple as overall style, and initial page layouts. I started with some cartoonish sketches, silhouettes, eyes, and other forms that I thought would be interesting to include in the profiles. I then went a little further and started imagining what a spread would look like, and which characters I wanted to devote pages to.


I then started playing around with more ideas for spreads. I decided I wanted to use this opportunity to reveal interesting details about my characters that one could not get from the book. I thus turned to blown up and illustrated quotations, collaged elements, and lots of easter eggs from the book. I also started thinking a little more about how I wanted to start each section of the book, and fell in love with the idea of creating a silhouette on some sort of transparent page, that would reveal a full color image.


My next set of sketches looked more concretely into the spreads, based on the characters I was most likely going to include in the book.


By the end, I had come up with a lot of interesting prototypes, most of which were character specific. I narrowed down my content to the four main characters, and then proceeded to think more carefully about what this book was going to look like. I even made a list of what I wanted to reveal about each character:

As you can see, I had a lot to say. Luckily, all the content I needed was already written in my novel. I did, however, have a LOT of illustrating to do.
Planning

Because I was making such a long book, it was crucial that I knew exactly how it was going to be organized. Additionally, with the transparent elements, I had to make sure that I could include the silhouettes on the same printed sheet, albeit on different spreads.
I also decided that I wanted to create a hardcover book, which meant that I was going to have to organize my content into smaller, saddle-stitched booklets called signatures. I made dummy versions of all my pages, and roughly labeled what I wanted to put where.
In the end, I settled on four signatures, of varying page lengths, and made sure that I could easily keep track of what was on InDesign, and what the physical pages would look like.


Digital Iterations

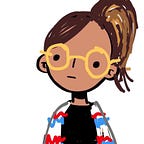
It was then time to start creating some basic spreads. I had fortunately been playing around with illustrator a week prior, and had managed to create the face of my titular character: Gabby.
It was helpful to have her to start with, as it helped dictate what my illustration style would look like for the book.
For our mid-crit, a checkpoint in the creation timeline, we had to come up with some sample spreads. I decided to create a full set of spreads for Gabby, so that I could get feedback on everything from the amount of copy on each page, to the illustration style.
Here’s what I had ready for the mid-crit.


Everyone loved the silhouette idea, which I was really happy to hear. So I was definitely going forward with it. These images didn’t all bleed off the page, and I later decided to make sure that they did.


On these pages, people commented that the illustration style on 8–9 didn’t match the other pages, and also that there was way too much text on the pages. Additionally, there was a lack in consistency on the bleeds. Some pages were full, while others had chopped images. There needed to be more uniformity.


People liked 12–13 the best in terms of the illustrations. The quotation at the top was working, but the quotation at the bottom was a little too small, distracting, and out of place. I decided to delete it later.
The “hand-drawn” elements on 14–15 definitely needed to actually be drawn by hand. After hearing people’s feedback, I decided to draw these in crayon, and stick physical papers into the final book.
Overall, the crit went well, but I had a lot to work on in terms of consistency. Here’s how the mid-crit pages ended up looking in the final book:


I rearranged a little, was more careful about readability across the fold for each spread, and tried tying my illustrations together better.
With a little more stylistic certainty, I took to creating pages for other characters. Here are some of the more interesting of the pages that I put together:


For the offices, I tried creating really simple lines, with small pops of color. This was to set up the environments of two of my characters that spend a lot of time in the places that they work: Irene, in the museum, and Olly, at the radio station.


Here, I used the same minimalist illustration style to evoke key visual elements from certain quotations in the book. I used Didot, my chosen serif font, to pull out interesting quotes, and used Avenir (as I had elsewhere) to create body copy. The point was to draw information and evoke emotion strategically. The “breath of fresh air” in the first spread got its own little bubble of space to evoke the fresh air. The body copy was really constrained around the telephone in the middle spread, to evoke the anxiety that Mere feels during this scene. In the final spread, I made sure to blow up the most important aspect of the quotation, and make sure the reader was looking into the same eyes that Gabby was.


Along with that illustration of Gabby staring at her fingers, I illustrated Mere and Olly during their early scenes in the book. I was really happy with these, and used pull quotes where I could, and consistent Avenir for the body copy. The point was to bring a little life to my main characters, and show them in environments and situations which really bring out their personalities.
Crafting
Creating the hardcover book was quite a task.

I used the chip-board off the back of an old legal pad to create the panels, and bought some forest green book cloth to cover my book. I chose forest green because it’s the eye color of my protagonist, Gabby.
I started by trimming each of the individual full color printed pages, along with some sturdy lime green paper, that I covered with cream paper. These hard pages would be used to glue the inner page signatures to the cover. You can see where this appeared in the book to the left.
Before I could actually put the book together, I folded and sewed together the individual signatures, and then used PVA glue to seal what would be the spine. This involved folding the signatures one at a time, sewing them via saddle-stitching, and then using a “kettle stitch” to bind them together as I went.
Here’s the amazing tutorial I followed to figure out how to sew everything together:
https://www.youtube.com/watch?v=9O4kFTOEh6k
The sewed signatures were then glued to the neon green sturdy paper. All the pages of this glued stack, called a text-block, then needed to be trimmed to the same width. I used the measurements of this text-block (both its faces and spine) to cut out chip-board panels to use for the hardcover.
While the text-block spine dried, I trimmed the book cloth and glued the panels to it. This involved folding the cloth over the edges of the chip-board, smoothing out the cloth, and pressing everything under weight to dry.
Once everything was dry, the text-block (the stitched and glued together signatures) was glued onto the hardcover, and left to dry. The final product was the hard cover book.


I wasn’t quite done yet, though. I still had to include all those hand-drawn elements that I had prepared separately.
Handmade Elements
Here’s how some of the pages looked digitally, and then hand-drawn, and stuck in:


From sketch, to digital, to another childish drawing, this was one of my favorite elements in the book. I tried to evoke Gabby’s hand-drawn past by holding a crayon oddly, and drawing very slowly. Having a real drawing definitely brought a little pop of authenticity into the book.


Irene gifts these brooches to her daughters, Mere and Carrie (Gabby’s mother), so I thought I’d make little gift tags to go along with them. I liked how I was able to tell a little story, without saying too much at all.


This was a “fan-favorite.” My character, Mere, has a rocky history with Gabby’s late father. Here I included a little letter from Gabby’s dad, and crumpled it up, to show the reader that they were looking at the same letter that Mere was holding in the illustration. The illustrations on this page turned out so well, and I was thrilled to find an envelope that fit exactly on the page.


My character Olly is a radio jockey, so I printed one of his scripts, and annotated it as I imagine he would. This gave a glimpse into his career and his mind at the same time.
The Silhouettes

I had to include this as a separate section, only because it was the reason I had to plan so much for this book. I had two signatures that would include silhouettes, and thus had to make sure that I had page numbers exactly right. What’s more, when I went to get everything printed, I learned that you cannot print double-sided on transparency paper. So, I had to put the images on the same page and flip one on each page so that they would overlay the colored images perfectly.
It was a bit of a headache, and I printed a lot of incorrect versions of what I wanted, but in the end I had what I needed, and I was ready to put the images in the book.


Thankfully the transparency paper trimmed well, and folded nicely, and the result was exactly what I had envisioned. Here’s an example of what it looked like in real life:

Glamor Shots and Final Thoughts

This project was so rewarding. As someone who dedicates A LOT of her time to books, it was amazing actually creating one by hand, especially with content that was so close to my heart.
I definitely want to try binding more books in the future. The time constraint was definitely the biggest challenge that I faced, as well as the fact that I had never bound a book before.
Some things I would change would probably be: using thinner thread to bind the book, trimming everything more carefully, making sure the pages printed exactly in-line with each other when I printed double-sided, and the overall flexibility of the individual pages. The handmade elements definitely made the book more rigid than anticipated, which was annoying given how small the final product was.
All that being said, I’m really proud of what I put together. It was tough, time-consuming, but so worth it. I can’t wait to bind the real thing when I finish my novel next semester!