Tutorial Part 2: AWS IoT + Rules + Lambda Function + DynamoDB
This article is part of a series. Check out the series: Part 1.
Introduction
In Part 1 we got started with the Internet of things(IoT) and Amazon Web Service, we set up an AWS IoT Core instance, and we created a Node.js program (running on a Raspberry Pi), that sends telemetry data to the cloud using an MQTT protocol, finally, we tested out the message communication between the device and the cloud instance.
In this video, you can see what we’re going to building on this Part 2.
Here, in the Part 2 series, we want to add pieces to the game to capture and store telemetry data in a database.
In the next diagram, you can see a full picture of the implementation:
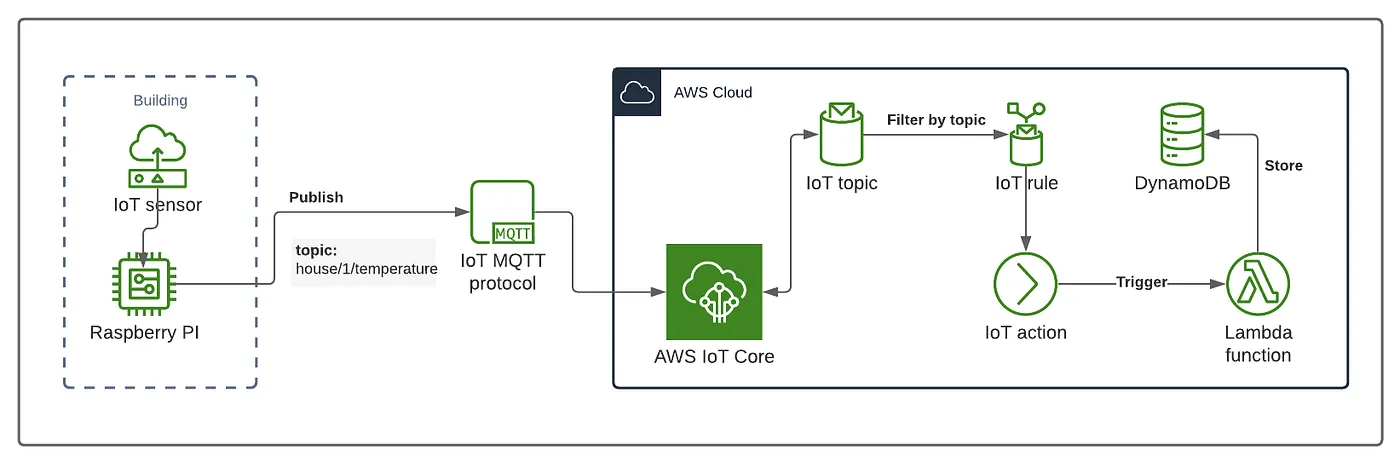
To make it possible we added 3 pieces
- DynamoDB collection (persisting data)
- Lambda function (handler function)
- AWS IoT Core Rules (message routing)
The Node JS code running on the Raspberry Pi device will send the data to the AWS IoT Core, the IoT Rules will redirect the telemetry messages (MQTT).
The AWS IoT Core Rules will redirect the telemetry messages (MQTT) to a Lambda function, and for last the Lambda function will receive the event data and store it in a DynamoDB collection.
Create the DynamoDB Collection
We chose DynamoDB to store the telemetry data, but what is DynamoDB?
Is a fast and flexible NoSQL database service provided by Amazon Web Services. Its flexible data model and reliable performance make DynamoDB a great fit for mobile, web, gaming, advertising technology, IoT, and other applications.
Let’s start creating a new table. First, access the DynamoDB service platform and click on Tables and then Create Table.

Enter a name for the table IoTCatalog and assign a Partition Key serialNumber and a SortKey timeStamp.
Partition Key: This is for partition data; data with the same Partition Key will be store in a group. We choose the IoT Device serial number, so this means all the data related to some specific device will be stored in the same partition.
SortKey: Determine the order of the data in the partition, we choose to use the timeStamp this one.
Primary Key: Partition Key + SortKey(optional)

Click on Create table and will be created the new table created and ready to use.

Create the Lambda function
When the incoming IoT message, the AWS IoT Core triggers the rule, the rule invokes your Lambda function asynchronously and passes data from the IoT message to the function. This lambda function will be responsible for receiving the message and storing the information in the previously created DynamoDB collection(IoTCatalog).
Steps:
1 — Open the Functions Page on the Lambda console.
2 — Choose Create Function.

3 — Under Basic Information, do the following:
- For Function Name, enter
IoTSaveEventData. - For Runtime, confirm that Node.js 14.x is selected.
4 — Choose to Create function.

5 — Add code to the lambda function
Lambda automatically creates default code for the function.

The code showed below, will receive data from our IoT device, routed by the AWS IoT rule, and the function will create a new item in the DynamoDB collection:
We update the code with the script given below. Click on deploy, and we will have the function ready to use.
Lambda function code
Configure the AWS IoT Rule to trigger the Lambda function
AWS IoT Rules Introduction
Rules give your devices the ability to interact with AWS services. Rules are analyzed and actions are performed based on the MQTT topic stream
You can create AWS IoT rules for devices to interact with AWS services. The AWS IoT Rules Engine provides an SQL-based language to select data from message payloads and send the data to other services, such as Amazon S3, Amazon DynamoDB, and AWS Lambda. Define a Rule to invoke a Lambda function when you want to invoke another AWS service or a third-party service.
Create the AWS IoT Rule to trigger a Lambda function:
In Part 1, we started sending AWS Core telemetry data to a specific topic: house/1/temperature.
It is now time to redirect the traffic of that topic to a destination; in this case, we will send the traffic out to an AWS Lambda function.
Here is where AWS IoT - Rules enter into action; let’s create this Rule.
1- Open the Rules hub of the AWS IoT console and choose to Create.

2- Locate the top part of Create a rule.
Enter the rule(my_rule_to_lambda) name and description(AWS IoT to lambda).
In the Rule query statement of Create a rule:
SELECT * FROM 'house/1/temperature'3- Locate Set one or more.
- Choose Add action.
- Choose to Send a message to a Lambda function.
- Click on configure the action.

4- Locate Configure action.
- In Function name, choose Select.
- Choose
IoTSaveEventTelemetryData. - Click on Add action.
- At the last click on Create rule.

Testing complete flow
In Part 1, we set up our Raspberry Pi, created our Node JS application, and sent telemetry data to the AWS IoT instance.
It is now time to test the complete flow, so let’s open our Node JS app and run it.
nodemon index.js
When an incoming IoT message triggers the rule, AWS IoT invokes the Lambda function asynchronously and passes data from the IoT message to the lambda function.

Wrapping up
At this point, the lambda function receives the data from the IoT device (Raspberry Pi) and saves it on the DybamoDB collection
Finally can see the information below on the screen the application starts to populate the DybamoDB collection with telemetry data sent out by the Node.js application.

Demo video
I hope you have enjoyed this article. Lastly, I left you this demo video where you can see in action the complete flow. For this case, I used a real temperature and humidity sensor (DHT-11), and the sensor data is store in the DynamoDB collection we have created.
I work at Sytac.io; We are a consulting company in the Netherlands, we employ around ~100 developers across the country at A-grade companies like KLM, ING, ABN-AMRO, TMG, Ahold Delhaize, and KPMG. Together with the community, we run DevJam, check it out and subscribe if you want to read more stories like this one. Alternatively, look at our job offers if you are seeking a great job!