Firebase Test Lab Integration for Android Flutter Integration Tests

In our previous blogs of this series, we were :
- Introduced to Flutter, approaches to testing Flutter applications
- Then we compared Appium and Flutter Integration tests on 9 key parameters that help choose the appropriate tool
- We wrote our first Flutter integration test using the Flutter Integration Test package
- We executed the test and generated the HTML report locally
Connecting the dots, the next logical step is to integrate our test with the build pipelines and leverage a device lab to execute tests.
In this blog, we will integrate our test with Firebase Test Lab. We will create a shell script to run our automated test case on Test Lab and analyze the reports generated.
Pre-requisite :
- Make sure that your team has set up a Firebase project. If not, please follow the official documentation to create a new project in Firebase.
- You must have the Google Cloud CLI set up on your system and have set up your project with the CLI. You can follow the instructions here: https://cloud.google.com/sdk/docs/install-sdk
This blog post will focus on executing the test against an Android device. In the later post, we will execute the same test on iOS devices.
Execute tests on Android
To proceed, we will use the official Flutter guide for integration testing on Android devices.
Step 1: Add required dependencies
Update your android/app/build.gradle file to make sure it uses androidx’s version of AndroidJUnitRunner and has androidx libraries as a dependency.
android {
  ...
  defaultConfig {
    ...
    testInstrumentationRunner "androidx.test.runner.AndroidJUnitRunner"
  }
}
dependencies {
testImplementation 'junit:junit:4.12'
// https://developer.android.com/jetpack/androidx/releases/test/#1.2.0
androidTestImplementation 'androidx.test:runner:1.2.0'
androidTestImplementation 'androidx.test.espresso:espresso-core:3.2.0'
}Step 2: Know your package name
You need to locate the name of your app package, which can be found in android/app/src/main/AndroidManifest.xml. The package name is located at the top of this manifest file. In case you are unsure, I would recommend seeking assistance from a developer. In our app’s case, the package name is com.example.todo_app.

Step 3: Create MainTestActivity
As per the documentation, we are required to create a file named MainActivityTest.java inside androidTest/java/<our_package>. Our app package name is com.example.todo_app, which means that our file path will be android/app/src/androidTest/java/com/example/todo_app/MainActivityTest.java.
package com.example.todo_app;

import androidx.test.rule.ActivityTestRule;
import dev.flutter.plugins.integration_test.FlutterTestRunner;
import org.junit.Rule;
import org.junit.runner.RunWith;

@RunWith(FlutterTestRunner.class)
public class MainActivityTest {
  @Rule
  public ActivityTestRule<MainActivity> rule = new ActivityTestRule<>(MainActivity.class, true, false);
}
Step 4: Running the test locally
Once we have added the dependency as specified in the documentation, we can run the tests locally using Gradle to ensure that the Android setup is running smoothly.
Please note: To run the Gradle command, you must be inside the android directory of your app. To do this, use the command cd android. Then, run the command:
flutter build apk --debug
./gradlew app:assembleDebugAndroidTest
./gradlew app:connectedDebugAndroidTest -Ptarget=integration_test/tests/create_todo_test.dart
If your setup is successful, the test cases will begin running on your local device.
Now, it’s time to proceed with running the tests on Firebase.
Step 5: Create an authentication key in Firebase
We will create an authentication key in Firebase. Firstly, we need to log in to our Google Cloud account and select the service account. Then, we will be presented with the option to perform actions on the firebase-adminsdk account.
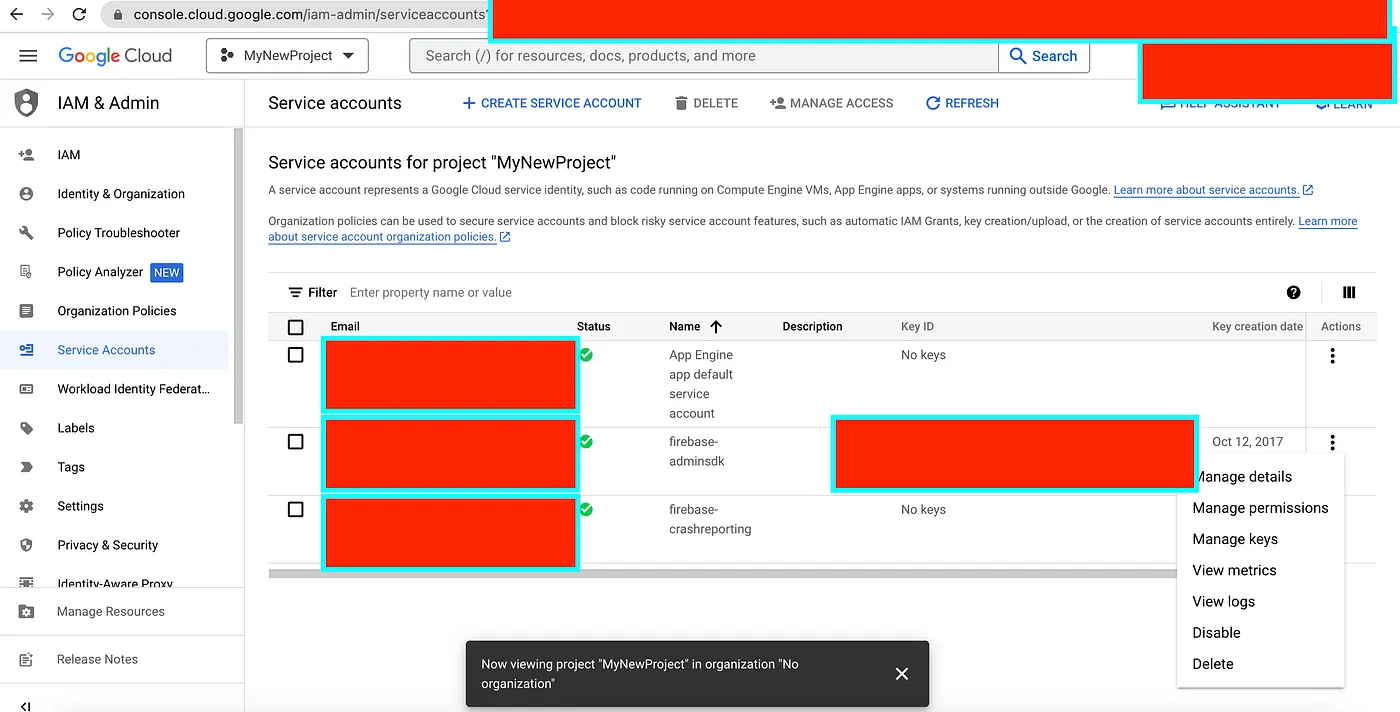
Select the Manage Key option and proceed to create a new key. You should store this key in your local system, and you will be given the option to save it in JSON format.

Step 6: Setting up Google Cloud, upload test and debug files to Firebase
In this step, we will set up Google Cloud and upload the test and debug APK to Firebase Test Lab. We will then write a script to authenticate gcloud and perform the upload process. Each step in this process will be explained in detail.
gcloud auth activate-service-account --key-file=gcloud_key_file.json
gcloud --quiet config set project <my_project_name>
gcloud firebase test android run --type instrumentation \
    --app build/app/outputs/flutter-apk/app-debug.apk \
    --test build/app/outputs/apk/androidTest/debug/app-debug-androidTest.apk \
    --timeout 45m
Let's understand the meaning of each step -
gcloud auth activate-service-account --key-file=<path of your json key file>This step will authenticate your system using the downloaded credential keys. I will explain how to store these keys when running on GitHub or Codemagic to ensure security in the upcoming blog post. For now, we will store the keys locally in this blog post.
gcloud --quiet config set project <my_project_name>In our local system, we might have authenticated multiple projects for the same gcloud accounts. The previous step will set the project at runtime for which you want to run the tests.
gcloud firebase test android run --type instrumentation \
    --app build/app/outputs/flutter-apk/app-debug.apk \
    --test build/app/outputs/apk/androidTest/debug/app-debug-androidTest.apk \
    --timeout 45m
This step will upload the test and debug app to Firebase Test Lab for instrumentation tests. We have set a maximum execution time of 45 minutes. When we navigate to Firebase Test Lab, it requests both the debug APK and test APK. We use the gcloud command line to achieve this.

Step 5: Runner.sh file
Now that we have combined all the steps, our runner file will look like the following, and it will be responsible for running tests on Firebase Test Lab.
flutter build apk --debug

pushd android
    ./gradlew app:assembleDebugAndroidTest
    ./gradlew app:assembleDebug -Ptarget=`pwd`/../integration_test/tests/create_todo_test.dart
    #./gradlew app:connectedDebugAndroidTest -Ptarget=integration_test/tests/create_todo_test.dart   #- To Run Test On Local For Verification
popd

gcloud auth activate-service-account --key-file=<path of your json key file>
gcloud --quiet config set project <my_project_name>

gcloud firebase test android run --type instrumentation \
    --app build/app/outputs/flutter-apk/app-debug.apk \
    --test build/app/outputs/apk/androidTest/debug/app-debug-androidTest.apk \
    --timeout 45m
After running the runner.sh file, it will upload the tests to Firebase Test Lab, and the results will be displayed on the test lab.
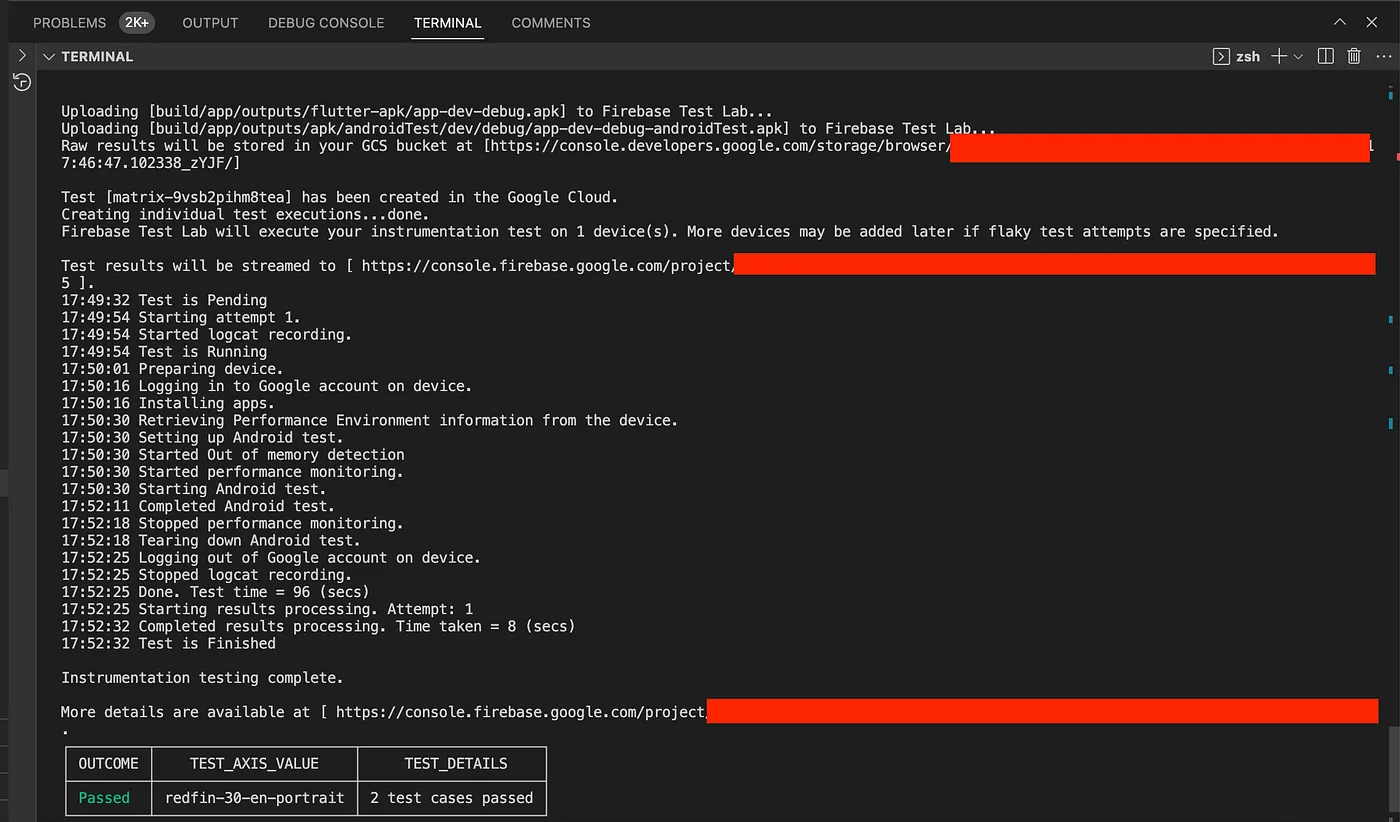
In the screenshot above, we can see that our test and debug APKs were uploaded, the tests were run, and a summary of the results was provided. If you click on the link provided at the bottom that says More details available at…, it will redirect you to the Firebase Test Lab results page.


Congratulations! You are all good to run tests on the Firebase test lab for Android.
Where to go from here?
Check out my next blog that shows how to execute these tests on iOS devices in the Firebase Test Lab: