Flying High With Design Pattern & Dependency Injection & State Management
Let’s find out what is Mvvm & MobX & GetIt

Hi fellows. It’s Samet. I hope your day is going well.
In this series, I’ll teach you how to create an easy and effective architectural structure from the base when starting a project, as well as how to manage the state using this structure.
We’ll look at each challenge, in turn, grasp the answers that fit our needs in relation to the problem, then work together to complete the processes until the solutions are coded.
I’ll try to address as many questions as possible in this series, which will be divided into four parts. Let’s get this party started.
Subtitles
- Part 1 — What is Design Pattern? How to Use MVVM?
- Part 2 — What is Dependency Injection? How to Use GetIt?
- Part 3 — What is State Management? How to Use MobX?
- Part 4 — Let’s Make an Example.
The Definition of the issue
When we begin a new project, we must be cautious to follow certain guidelines. These guidelines make the project more comprehensible, reusable, and sustainable.
The design pattern is utilized in the initial step. Using one of several different patterns covers all of the above and makes it easy for us while writing code.
It’s so important to use the application’s background performance effectively. It should be assured that when we call another class from within the classes, it does not create an object again and does not occupy memory until it is called. The dependency injection library is used for this.
We have a lot of widgets in Flutter that we show on our screen. Stateless (static) and Stateful (dynamic) are two types of widgets. It makes no sense to define each widget in the interface as stateful since it will rebuild the entire screen in each interaction with it. To achieve this balance and just make the necessary widget dynamic, we’ll need to use the state management library.
Furthermore, the solutions for these issues may differ from one another or can be solved without the requirements of libraries.
Part 1 — What is Design Pattern? How to Use MVVM?
Steps
- The Definition of Design Patterns
- The Definition of MVVM
- Event Flow of MVVM
The Definition of Design Patterns
Design Patterns allows programmers to tackle common issues while writing code. It helps you to examine how classes and objects interact with each other.
Design patterns are used to create code that is;
- more flexible
- reusable
- maintained
Design patterns have evolved for the resolution of the shared issue, not for project development. Instead of adopting the same pattern for every project, it should be picked and utilized for a specific purpose.

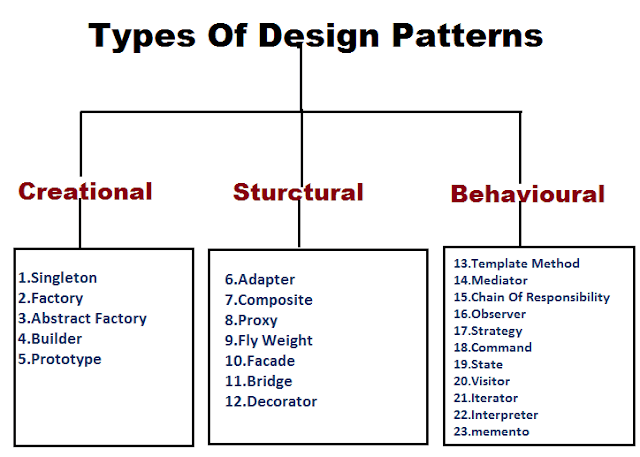
Design patterns are divided into three categories;
1 — Creational:
Inheritance for class abstraction and delegation for object creation is used. Factory Method, Abstract Factory, Builder, Singleton, Object Pool, and Prototype are just a few examples.
2 — Structural:
It is used to increase the size of the structure and add additional functions. Composite, Decorator, Facade, Flyweight, Private Class Data, and Proxy are some examples.
3 — Behavioral:
It basically depends on controlling and determining how things communicate with each other. Chain of Responsibility, Command, Interpreter, Iterator, Mediator, Memento, Null Object, Observer, State, Strategy, Template method, Visitorare a few examples.
The Definition of MVVM
MVVM (Model-View-View Model) is a behavioural design pattern that uses the View Model to help differ between interface items (view) and business logic (model).
The advantages of utilizing MVVM are as follows;
- It will be simple to test your code.
- Your code will become decoupled even more as a result of this (the biggest advantage).
- The project is simple to maintain.
- It encourages collaboration and enables the rapid addition of new features.

Model: This layer is in charge of defining data sources.
View: The view model and the model work together to access and save data. The view model is alerted to the user’s action with the help of the view. This layer has no business logic and only follows the view model.
View Model: It helps us to observe the view’s data events. It also serves as a connection between the model and the view.
Event Flow of MVVM
1 —An event happens in the view.
2 — The view model detects this event and writes to the model’s data.
3 — The view model reads the model.
4 —The view model sends data to the view.

Part 2 — What is Dependency Injection? How to Use GetIt?
Steps
- The Definition of Dependency Injection
- GetIt Library
- How to Use GetIt
The Definition of Dependency Injection
Functions and methods from other classes are frequently needed by classes. The most straightforward solution is to create a new object from that class. When we wish to retrieve the contents of a single class from many classes, the actual issue comes.
Dependency Injection is an approach to making an object’s dependencies accessible via another object. These dependencies are referred to as services. Services (such as MobX Store) store code blocks that contain a variety of functions that may be utilized in various parts of your project. In many cases, it is essential to import files to use classes or methods. We make a service dependent on a class to utilise the methods in it. The “service locator” logic provided by DI can be used to resolve these dependencies.
What Dependency Injection provides us;
- It isolates the codes in a way that makes them easier to maintain.
- Accessibility is improved.
- It facilitates testing.
- It makes adding new features a lot easier.
- Any adjustment reduces the chance of causing unintended changes in another object (loose coupling).
The most simple technique is to import services to a class through its constructor, although it is ineffective.
class MyClass {//Creating service object
MyService service;  //Importing this class to constructor with
  MyClass(this.service)
}
This technique may not appear to be harmful at first, and it isn’t, however importing objects deep into widgets becomes a big issue after a while.
GetIt Library
GetIt is a service locator that lets you access a service from any location. It allows defining as singleton, lazy singleton, or factory, as well as accessing the service from inside classes while saving the location of the service.
- Singleton: Creates the same instance of the service every time.
- Lazy Singleton: When called, a singleton returns the object in the first instance. Because it takes a long time to generate, lazy singletons create the service only when we need it.
- Factory: Each time the service is called, the factory creates a new instance of the service.
How to Use GetIt
To do so, we must first import the get it library into our project. Following this, the services must be registered by generating a new file in the format shown below.
import 'package:get_it/get_it.dart';//We create an instance object from it.
GetIt locator = GetIt.instance;//We define a method in which we register our services.
void setupLocator() {
  locator.registerFactory(() => ThemeService());
  locator.registerSingleton(() => FirebaseDatabaseService());
  locator.registerLazySingleton(() => ViewModel());
}
Before runApp starts, the setupLocator method that we created must be set up.
void main() {
  setupLocator();
  runApp(MyApp());
}
As seen below, we inject the service into the classes. We can now access the methods of our service both inside other services and inside views.
final ViewModel viewModel = locator<ViewModel>();Part 3 — What is State Management? How to Use MobX?
Steps
- The Definition of State Management
- Library of MobX
The Definition of State Management
The structure we use to inform the UI about occurrences that occur is called state management.
Flutter has a setState method of its own. When this method is run, it only makes changes that are dependent on the function that is included within it. This technique, which is only applicable to StatefulWidget, redraws the whole interface and presents it to us with the updated section. This is not a suggested approach.
We employ a design pattern called state management to synchronize the flow of the program across all of its components. We may change not only the page on the screen but also the value on a different page.
Library of MobX
MobX is a design pattern that makes it simple to connect reactive data to the interface (or any observer), while also providing observables and reactions. The observed UI elements begin to redraw when the observable data changes due to triggering actions. It is made up of three core components and one widget component.

The user’s reaction initiates the action, which modifies the observable data and responds with a notification to the interface. It is made up of three primary parts.
Observables: Structures are used to represent variables whose values will be observed.
@observable
int value = 0;
Computed Observables: Structures that have been calculated based on the derived state.
@computed
bool get isValueEven => value.isEven;
Actions: The methods through which we change observables.
@action
void increment() {
  value++;
}
It is required to run the build runner after adding these annotations. Build runner will generate a g.dart file for us automatically. This file contains the annotated values’ long codes. The build runner’s watching feature is activated by typing the following commands into the terminal. When you close the terminal, it will stop. (Using the VS code plugin, you may execute it as a shortcut.)
//For first run
flutter pub run build_runner watch//If you are getting an error
flutter pub run build_runner watch --delete-conflicting-outputs
It’s also required to show which widget in the interface has the observable values.
Observer Widget: To wrap widgets that have observable values.
Observer(builder: (_) {
  return Text('${counter.value}',);
})
Reactions: They are structs that are triggered when observable values change in StatefulWidget. After they are completed, they must be disposed of. It may also be utilized to react automatically in the initState method.
- autorun(Function(Reaction) fn):
It reacts to any change in fn’s observables.
String greeting = Observable('Hello');

final dispose = autorun((_){
  print(greeting.value);
});

greeting.value = 'Hello MobX';

//when autorun complete
dispose();// Prints:
// Hello
// Hello MobX
- reaction<T>(T Function(Reaction) fn, void Function(T) effect):
It monitors the observables used in fn and fires the effect when the watch function returns a different value. Only observables in fn can be monitored.
String greeting = Observable('Hello');

final dispose = reaction((_) => greeting.value, (msg) => print(msg));

greeting.value = 'Hello MobX'; // value change

//when reaction complete
dispose();


// Prints:
// Hello MobX- when<T>(bool Function(Reaction) predicate, void Function() effect):
It keeps watch of observables used in the predicate and fires the effect when it returns true. The effect disposes itself automatically when it has been run. It’s like a one-time reaction. It’s also possible to dispose of the when ahead of time.
String greeting = Observable('Hello');

final dispose = when((_) => greeting.value == 'Hello MobX', () => print('Someone is greeting MobX'));

greeting.value = 'Hello MobX'; // Value change, effect and disposes are running


// Prints:
// Someone is greeting MobX- asyncWhen(bool Function(Reaction) predicate):
asyncWhen is similar to when. There is also a Future that expects predicate to return true.
final completed = Observable(false);

void waitForCompletion() async {
  await asyncWhen(() => completed.value == true);

  print('Completed');
}
Part 4 — Let’s Make an Example.
Steps
- Required Downloads
- Project Description
- Set up
- Folding with MVVM
- Integration of Mobx’s Store Structure
- Creating a Locator with GetIt
- Separating Widgets with Library
- Writing of Atomic Widget
Required Downloads
Libraries
flutter_mobx : Provides the Observer widget.
mobx_codegen : Retrieves mobx annotations.
build_runner : It creates the required files of Mobx
VS Code Plugins (optional)
Create Flutter Widgets and Classes : It includes snippets that provide many acronyms, including MobX.
flutter_mobx : Brings the build runner shortcut button to the bottom right of the window for MobX.
Project Description
We’ll make a project that takes the user’s name and e-mail address and changes it by clicking a button on the page.
Set up
We begin by developing our project.
flutter create flyinghighwitharchitectureWe add dependencies for mobx, flutter mobx, mobx_codegen, and get_it to the pubspec.yaml file.
# MobX
 mobx: ^2.0.6+1
 flutter_mobx: ^2.0.4
 mobx_codegen: ^2.0.5+2# GetIt
 get_it: ^7.2.0
Under dev_dependecies, we add build_runner.
# Generator
 build_runner: ^2.1.7
(While authoring the post, I utilized the most recent packages.) Don’t forget to include the most recent one as well.)
We get our packages.
flutter pub getWe recommend downloading the Create Flutter Widgets and Classes and flutter_mobx plugins from the extension area if you’re using Visual Studio Code.
We launch our virtual device and run our project after the steps are completed.
flutter runFolding with MVVM
We create the home folder under the components folder since the design patterns are linked to the interface. By the below, we establish model, view, and view_model folders.
--lib
  |--components
     |--home
        |--model
        |--view_model
        |--view
We’ll utilize our model to keep a basic class running. In our view model, we’ll define the value as observable. We’ll use the notifications from the view to update the data in our model, which we’ll then reflect back to the view.
Under our model folder, we create a file called user_model.dart. In it, we create a UserModel class with two constructors called name and email.
Under the view folder, we make a home_screen.dart file. Inside the page, we create a StatelessWidget named HomeScreen and provide Scaffold to our build method.
Under our view_model folder, we create a home _view_model.dart file. Unlike previous view model implementations, we’ll transform this page to the mobx store page. At this stage, we’re using the Vs code plugins. When developing Mobx, we specify our store class by adding HomeViewModel so as to generate code automatically.

I’ll go through how to utilize the part below. Aside from that, the purpose of this code is to link the HomeViewModel to the g.dart file that will be generated automatically. We need to run the flutter_mobx plugin from the build_runner watch area at the bottom right of your window if you have downloaded it in vscode. Because this plugin isn’t very reliable, you can accomplish the same process in the terminal by entering the code below.

flutter pub run build_runner watchWe go to main.dart and alter the home under MaterialApp to make our page start from HomeScreen.
Integration of Mobx’s Store Structure
We’ve previously created the HomeViewModel as a mobx-compatible store class. Let’s now add the items that we’ll observe. By creating an object here, we will observe UserModel. We’ll need the Form and TextFormFields to update the contents of the Usermodel. As a result, GlobalKey and TextEditingController will be created. We use observable to annotate the objects we’ll generate so that the build_runner can identify them.
@observable
UserModel user = UserModel(
  name: "",
  email: "",
);@observable
GlobalKey<FormState> formKey = GlobalKey<FormState>();@observable
TextEditingController nameController = TextEditingController();@observable
TextEditingController emailController = TextEditingController();
A button is also required. This button will verify that our form is valid, and if there are no errors it will save the form. The last text in the saved form will be synced to the textEditingController. Then we’ll copy and paste this content into our user object. The action annotation must be added to this reactive method.
@action
submitButtonOnPressed() {bool? val = formKey.currentState?.validate();if (val == true) {
    formKey.currentState?.save();
    user = UserModel(
      name: nameController.text,
      email: emailController.text,
    );
  }}
Finally, the view model will look like this:
Creating a Locator with GetIt
We generate the locator.dart file in the lib folder to use GetIt. GetIt expects us to make an instance object of itself. The locator object is created.
GetIt locator = GetIt.instance;In the file, we add a void method named setupLocator. We finish the display process in our method by invoking the locator object’s registerLazySingleton function (recommended for view model use in GetIt’s own documentation) and by setting the HomeViewModel to the required T value.
void setupLocator() {
  locator.registerLazySingleton(() => HomeViewModel());
}
In this way, the HomeViewModel will only be produced when it is required, and it will always retrieve the first object created from now on.
Before we can use the app, we must first install the locator. We include the setupLocator() method from our locator file right before runApp in the main file.
void main() {
  setupLocator();
  runApp(const MyApp());
}
The locator is used to retrieve our HomeViewModel into HomeScreen.
final HomeViewModel _homeViewModel = locator<HomeViewModel>();Separating Widgets with Library
We’ll separate the widgets into sections to make our home page more legible and to ensure that they’re only accessible on the page where they’ll be used. To begin, we’ll make a widget folder beneath the view folder.
|--view
   |--widget
In the widget folder, we place two files named form_widget.dart and submit_button_widget.dart. First, we must connect these newly produced files to the home_screen.dart file. To do this, open home_screen.dart and add the following code to the top of all imports. As a result, our page will recognize that it is a library.
library home_screen;When it comes below imports, we use the part to give the path of our files that will be connected to this page.
part 'widget/form_widget.dart';
part 'widget/submit_button_widget.dart';
To let the widget know that we’ve connected it to this page, we append the part of to the two pages we’ve made beneath the widget folder.
part of home_screen;At the end of this procedure, we build a StatelessWidget named SubmitButtonWidget in submit_button _widget.dart.
We use the locator to get the view model, exactly as we do at home.
We’ll utilize the View model by passing it to the ElevatedButton’s onPressed method in the build. The method in the view model will be invoked when the button is pressed.
On the form_widget.dart page, we’ll implement something similar now. We return to this page and construct a FormWidget as StatelessWidget in the same manner. In the same way, we get the view model from the locator. The Form is then added to the construct method, and the key value is obtained from the view model. Finally, we build an empty Column.
Writing of Atomic Widget
Now we’ll retrieve the user’s name and email address. For this, we’ll need two distinct TextFormFields. Why don’t we develop a single main widget and import only the necessary values instead of writing two widgets with the same function? That is why atomic widgets are created.
First, we make a folder beneath the atomic_widget under the component.
--lib
  |--components
     |--atomic_widget
Under the folder we established, we create a file called custom_text_form_field.dart. We first construct a StatefulWidget called CustomTextFormField since the input value in the TextFormField we’ll use is static. Now we’ll build an object and use the constructor to inject it. We declare the hintText and controller of the TextFormField as final values and add them as required to our constructor since they will be exported.
final String hintText;
final TextEditingController controller;const CustomTextFormField({
  Key? key,
  required this.hintText,
  required this.controller,
}) : super(key: key);
We add the TextFormField to the build section and write the controller and hintText from the widget here.
We write the following code outside of the build and add it to the validator to verify if the TextFormField is empty.
String? validatorMethod(String? value) {
  if (value == null || value.isEmpty) {
    return "Please enter a value";
  }
  return null;
}
The controller is disposed of within dispose.
Two CustomTextFormFields must be added to the Column under the FormWidget. We use them to write our hintTexts and to bring controllers from the view model.
CustomTextFormField(
  hintText: "User Name",
  controller: homeViewModel.nameController,
),const SizedBox(height: 10),CustomTextFormField(
  hintText: "User E-mail",
  controller: homeViewModel.emailController,
),
After we’ve added it, we’ll need to observe the formKey and controller values to see whether they’ve changed. The Observer widget is used to wrap our form in this case.
We need to call our widgets on the HomeScreen page after we’ve edited them. Here, we’re utilizing the SubmitButtonWidget and FormWidget. We write the user’s name and email of our view model in the Text that we wrap with the Observer widget.
And it’s done.
In The End
Thank you so much for reading all the way to the end. I hope you found it interesting. Remember to connect to and follow me on the channels listed below.
Twitter: https://twitter.com/sametcilingirrr
Linkedin: https://www.linkedin.com/in/sametcilingir/
And also…
When you help someone, you help everyone.
Resources
Project Link
https://github.com/sametcilingir/flyinghighwitharchitecture
Image Resources
https://giphy.com/gifs/spider-man-peter-parker-tobey-maguire-jkmycFPVKYdI4
https://giphy.com/gifs/disneyplus-the-mandalorian-mando-themandalorian-AcfTF7tyikWyroP0x7
https://miro.medium.com/max/1280/0*LDnwNiY6CBEs275n.png
https://media.geeksforgeeks.org/wp-content/uploads/20201002215007/MVVMSchema.png
https://mobx.netlify.app/assets/images/mobx-triad-1024e4f4e0ff0ce3e27a2da8e36ab3a4.png
Content Resources
https://www.geeksforgeeks.org/mvvm-model-view-viewmodel-architecture-pattern-in-android/?ref=gcse
https://dev.to/noureldinshobier/intro-to-mvvm-architecture-in-flutter-using-pmvvm-package-420a
https://levelup.gitconnected.com/dependency-injection-in-dart-flutter-apps-3332f1a61041
https://medium.com/flutter-community/flutters-dependency-injection-c4f053e4408
https://pub.dev/packages/get_it
https://docs.flutter.dev/development/data-and-backend/state-mgmt/declarative
https://dev.to/abdurrkhalid333/what-is-state-management-and-why-you-should-learn-it-3kai
