Performance Optimizing a React Single Page App — Part 1

Note, this is part one in a two-part series about React performance optimization. Part 2 can be found here.
This is a brief story of how I took a React application from a 15 second total loading time to less than 2 second total rendering time.
I like to use my portfolio website as my testing bed for new libraries and methodologies. Several months ago, I rewrote it using React, Redux and Node. Along the way, I learned many of the secrets to performance optimizing React Single Page Applications. I’d like to tell you about some of the strategies I took and the drastic performance improvements I saw both in this app and others.
Server Rendering
Performance is more about psychology than anything, in my experience. There are many UX tricks that can be used to make waiting more bearable to the user. One of those is to use optimistic UI, whereby you render a part of your UI before the rest of it is ready.
With React, the only time your user generally will be waiting is before React is loaded. Once it is loaded, as we all know, it is extremely fast. So fast, in fact, that sometimes I even need to fake server latency to allow the loading indicator a chance to appear for a second or two.
The big problem, however, is that a large application like my portfolio, which includes dozens of complex routes, produces a gigantic JavaScript file that takes a very long time to get from the server to the client. We will go into how to handle this later, but for now what I would like to describe is how we can go about making it seem like we are loading things faster than we actually are.
We have an opportunity to send a very small and simple HTML file that will be loaded while the rest of our bundle loads. This is a tactic that is used in both web and mobile. For example, with iOS apps Apple will load a single non-interactive view as the rest of your app loads. This makes the perceived loading time much more bearable.
One option would be to send a pre-loader, which is something I have done in the past on numerous websites. This is a great option, but I wanted to try something new. I chose to use server rendering to take care of sending a bit of UI that we can look at while the rest of the page loads. To do so, I had to do some complex React Router setup. I will outline the steps I took below and leave it to you to dig through the repository if you are interested in more detailed implementation details.
// /routes/index.js
import express from 'express';// Note, the creatTemplate helper takes html and renders it into
// your index.html template file, sending off a pre-rendered representation
// of the part of the application your user is requesting.
// See here: https://github.com/RyanCCollins/ryancollins.io/blob/master/routes/utils/createTemplate.js
import createTemplate from './utils/createTemplate';import React from 'react';
import { renderToString } from 'react-dom/server';
import { match, RouterContext } from 'react-router';
import { Provider } from 'react-redux';
import store from '../app/src/store/store.js';
import { routes } from '../app/src/utils/routes.jsx';// Other server stuff here removed for brevity
exports = module.exports = function (app) {
  app.all('/api*', keystone.middleware.api);
  // More server api routes here.app.use(express.static('./public'));  // The important bits.  More info here:
  // https://github.com/ReactTraining/react-router/blob/master/docs/guides/ServerRendering.md
  app.use((req, res) => {
    match({ routes, location: req.url },
      (error, redirectLocation, renderProps) => {
        if (error) {
          res.status(500).send(error.message);
        } else if (redirectLocation) {
          res.redirect(
            302,
            redirectLocation.pathname + redirectLocation.search
          );
        } else if (renderProps) {
          const body = renderToString(
            <Provider store={store}>
              <RouterContext {...renderProps} />
            </Provider>
          );
          res.status(200)
            .send(createTemplate(body, store.getState()));
        } else {
          res.status(400).send('Not Found 🤔');
        }
      });
  });
};
Next, we need to also wrap our client-side render function with the React Router Match function. This part needs to be done with care, less we end up with obscure error messages.
// /app/src/index.js
import React from 'react';
import { render } from 'react-dom';
import RouterApp from './utils/routes';
import { history } from './store/store';
import { routes } from './utils/routes';
import { match } from 'react-router';
import '../styles/styles.scss';match({ history, routes },
  (error, redirectLocation, renderProps) => {
    if (error) {
      return console.error('Require.ensure error'); // eslint-disable-line
    }
    render(<RouterApp {...renderProps} />, document.getElementById('app'));
  });
Notice how in both cases, I need to import my routes. I will go into the routing bit in a later section, but take a look at the repo if you’re impatient.
At this point, we have the basic server rendering working. It’s sending down a rendered representation that looks pretty awful, to be honest, but our performance has already been increased from the perspective of our end-users. Let’s see what else we can do!
Code Chunking
Webpack is a powerful beast of a platform for building complex web applications. One of its more advanced features is the ability to break down your bundle into multiple pieces, called Chunks and to only load the chunks that you need at any given time.
This feature works fantastically with React Router and server rendering. We can essentially tell React Router to lazy load these chunks only when they are requested by a Route in our application.
Webpack Chunking is extremely complex so that you can control the process. For example, I have seen people setup Webpack to load the “above the fold” content of their website, including the assets, first and then send down the rest of the content afterwards. I did not choose this approach, however and will need to dig deeper into advanced Webpack configuration to figure out how to do so.
Some people recommend breaking your Webpack configuration into multiple files, but I chose to leave the production and development configuration in one file. I enabled the chunking plugin for the production environment, as shown below.
plugins: process.env.NODE_ENV === 'production' ?
  [
    new webpack.optimize.CommonsChunkPlugin({
      name: 'vendor',
      children: true,
      minChunks: 2,
      async: true,
    }),
...
];
The next time I ran `npm run production`, my public folder ended up looking like the image below. Nice!
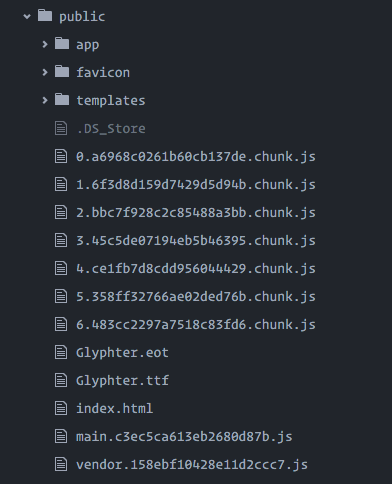
Along with using require.ensure within my React Router configuration, our performance is looking a whole heck of a lot better.
In the file where my routes were defined, I use a Shim to use the require.ensure syntax in node.
if (typeof module !== 'undefined' && module.require) {
  if (typeof require.ensure === 'undefined') {
    require.ensure = require('node-ensure');
  }
}
And then, when a route is referenced, I require the component asynchronously
export const routes = {
  component: App,
  path: '/',
  indexRoute: {
    getComponent(location, callback) {
      require.ensure([], () => {
        const LandingPage = require('../containers/LandingPage/LandingPage').default;
        callback(null, LandingPage);
      });
    }
  },
  childRoutes: [
    {
      path: 'portfolio',
      getComponent(location, callback) {
        require.ensure([], () => {
          const Portfolio = require('../containers/Portfolio/Portfolio').default;
          callback(null, Portfolio);
        });
      }
    },
    ... other routes go here
  ];
}
Wow, so our performance now is so much better! Not only that, one embarrassing problem that I had before setting this all up was that when a user refreshed the page manually, the Express server would fail with a 500. Now, it will send down server rendered HTML that represents the requested page’s content and will continue to incrementally load up the rest of the JavaScript and remaining assets. The time to first byte now is just a few seconds, rather than half a minute.
Our UX just went up a whole lot, but we still have one small problem. Our CSS seems to be the last thing to load, providing a flash of un-styled content that is a bit ugly. We can fix this, however, with a nifty Webpack plugin called the ExtractTextPlugin.
Typically when using CSS modules, Webpack will put your css right into Style tags in the generated bundle. This works well in Development, especially with Hot Module Reloading, but we can use the ExtractTextPlugin to generate css files for us so that we can have more control over how we load the styles in our Production bundle.
We add the plugin to our Webpack configuration like so:
    {
      test: /\.scss$/,
      loader: ExtractTextPlugin.extract({
        loader: 'style-loader!css-loader!postcss-loader!sass-loader'
      })
    },
Asset Optimization
The final part I will touch on is optimizing your assets. This is something that I always do, no matter if I am developing a single page app or not, but it still deserves a place in this article.
Performance, beyond the psychological part, really comes down to how much work the browser needs to do to get a webpage in front of the end-user. Typically, this can be very easily quantified using the tools in your browser.
In the case of my portfolio, I am loading a ton of images over the network. In this case, I don’t have control over optimizing the image during the build process, so it is so very important that your backend take care of optimization. In other words, you need to ensure that not only are you optimizing your assets at your build step, with a tool like Webpack Image Loader, but you also need to talk to your Back End team and see that they take asset optimization seriously.
Let me show you an example of what happens when you do not optimize the assets that you request from the server.

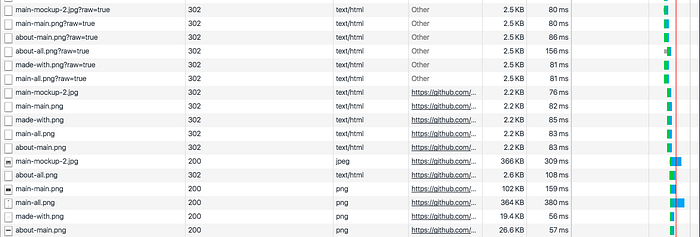
As you can see above, everything is going very well with the loading until we get to 3/4 of the way down (about-all.png). We are requesting three images that are not compressed and they are taking a ton of time and resources to load. Can you spot them? Here, let me zoom in.

Looking at the statistics, it is just staggering. Our biggest chunk took less than 500 MS to load and just ONE of these images took 1.3 seconds. So how do we fix this?
Using Optimizilla, an online service that runs the same compression algorithms as the tools we use during our build process, we have the ability to greatly increase our performance while maintaining most of the clarity of our PNG and JPG images. When possible, using SVG is the right choice for icons and other small pictorials.
Using Optimizilla, we were able to take our biggest file, 1.9 MB, and chop it down to ~400KB without losing any clarity to our end-users. Let’s take a look at what this looks like now.
Nice! We are doing a whole lot better. Let’s zoom in on the biggest offenders from earlier.

As we can see, we have cut down the loading of those images by more than a factor of 10. Awesome!
Summing it up
What I hope to have shown you from this article is that performance isn’t a big mystery. Just like testing, it is something that all of us need to pay attention to. I hope that this article offered some insight into my performance optimization process. That said, there are a ton of great resources that you should check out to become a web performance ninja.
There are a ton of awesome techniques that this article did not touch on, such as utilizing Immutable data structures with the Pure Render option in React, implementing DLLs with Webpack, and much more. Please take a look at the resources below and remember, with great power comes great responsibility!
More Resources
- Kyle Simpson’s Web Performance Course
- Optimizing Webpack with DLLs
- React Server Rendering: Here, here and here.
- Advanced React Performance
- Joe Eame’s Webpack Course
- Pluralsight Course on Web Performance

