4 Steps to Visual Regression Testing
Update: I wrote a new and improved version of this blog post here: Be Fearless with Screenshot Testing and routine-design
Do you review pull requests (PR) with HTML/JSX/React and CSS/Sass code? Do you find yourself relying on the PR author to test that the HTML/CSS actually works? Is it stressful when the PR author makes a mistake?
What if you had a safety net, so it was impossible to submit HTML/CSS code that does not work?

You can set up visual regression testing of your HTML/CSS in four easy steps. First, I’ll show you how to capture screenshot images on a Docker image. This makes it easier to compare screenshots from a local developer environment to a Continuous Integration (CI) environment. Next, I’ll show you how to write Mocha tests, which verify HTML/CSS code matches your captured screenshot images. Next, I’ll show you how to set up TravisCI, which is the safety net for all PRs. And finally, I’ll show you how to review changes to screenshots, so your Web app can keep evolving.
Capture on Docker
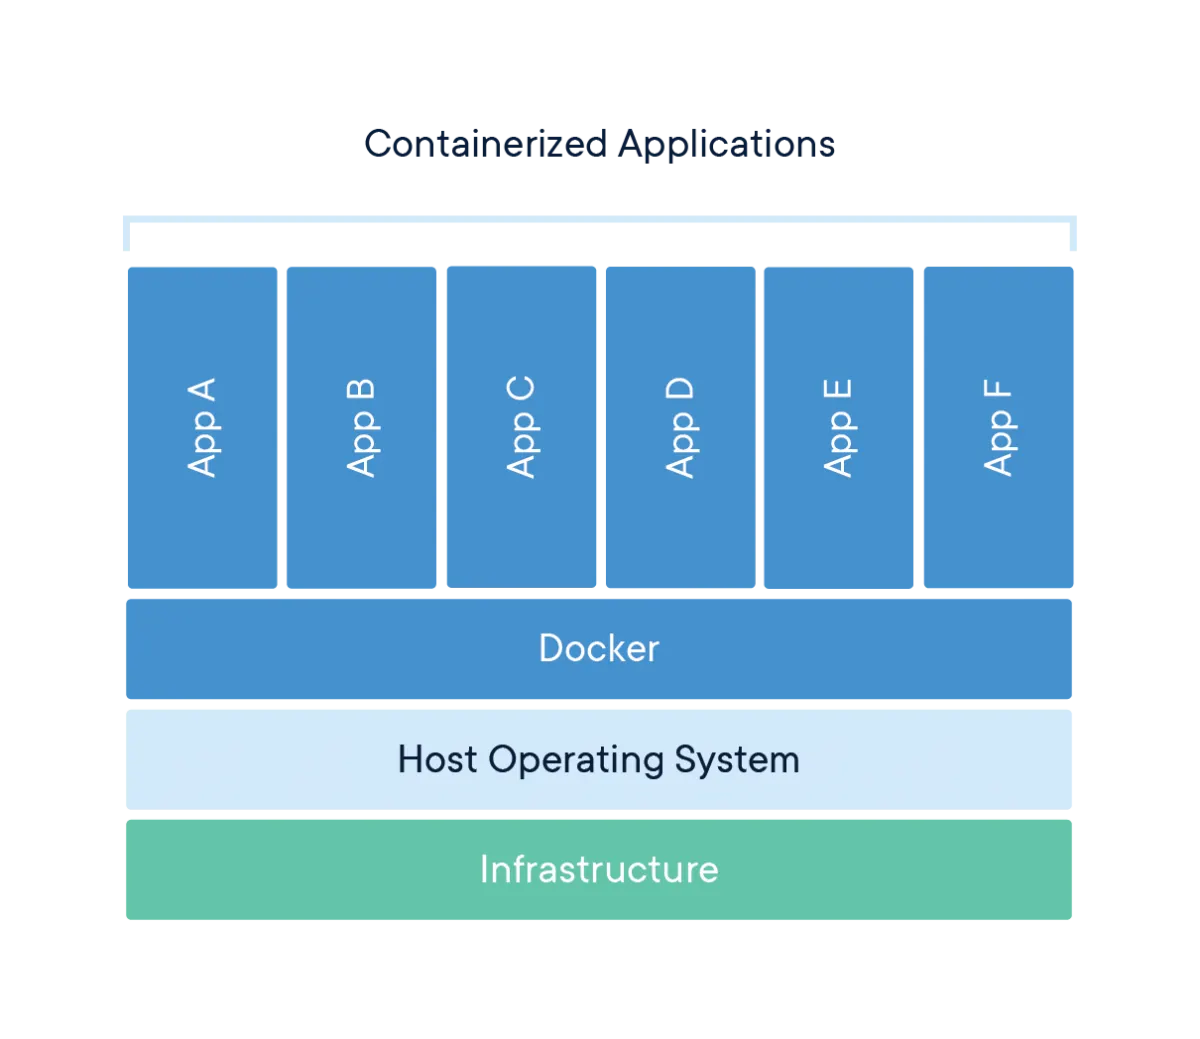
Docker is a way to run containers, built from images. I’ve created a routine-design Docker image, which packages up code needed to capture a screenshot with routine-design. This containerized software will always run the same, regardless of the infrastructure. Screenshot images captured on a local Mac will be the same as screenshot images captured on a remote Linux environment, like TravisCI.
But first, Read and follow the instructions from my two previous blog posts:
By the end you will have an automated way of taking a screenshot of individual components.
Next, install Docker Desktop on you local developer environment. You will be compiling Sass code on this docker image, so build a compatible binding for node-sass. There’s a handy routine-design command for that. Update your package.json with this new postinstall command
"scripts": { "postinstall": "docker pull lynnmercier/routine-design && routine-design docker build-node-sass", // other scripts like // "start": "react-scripts start"},
Run npm i to pull the docker image and build node-sass. That one-line command is all you need to use routine-design in both your developer and CI environments.
Routine-design provides APIs for managing routine-design docker containers. It also provides an API, ComponentTree, to easily scrape over test/render directory. So create a new capture.js file and import routine-design
const RoutineDesign = require('routine-design');class Capturer {

  async run() {    const routineDesign = new RoutineDesign();    //TODO fill me in with code

  }}new Capturer().run();
Using RoutineDesignContainer, start a Web server that renders individual components in the test/render directory. You’re basically running npm run render on the docker container. This command runs in detached mode, meaning you can send other commands to RoutineDesignContainer while the Web server is running. Next, for each directory, tell RoutineDesignContainer to capture a screenshot. You can do this with a single routine-design CLI command.
const routineDesignContainer = routineDesign.getLocalStorage().createRoutineDesignContainer();await routineDesignContainer.start();await routineDesignContainer.run('routine-design render ./test/render', true);const directories = routineDesign.createRoutineDesignTree('./test/render').getComponentTree().getDirectories();for (let entry of directories) {

  const componentDirectoryId = entry[0];

  await routineDesignContainer.run('routine-design directory capture project-id my-app-screenshots ./test/render --component-directory='+componentDirectoryId);}await routineDesignContainer.cleanup();
Update your package.json with a new capture command
"scripts": { "capture": "node ./capture.js", // other scripts},
Before you can run capture.js, you need to set up your Google Cloud authentication environment variables. The ROUTINE_DESIGN_GOOGLE_CREDS variable will work for both your developer and CI environments. Assuming you already have GOOGLE_APPLICATION_CREDENTIALS set, just run this command
export ROUTINE_DESIGN_GOOGLE_CREDS=$(cat $GOOGLE_APPLICATION_CREDENTIALS)Now run npm run capture. This process can take 45 seconds, so be patient. Once it is finished, run git status to see which files have changed. You should see modifications to test/render/image.json and test/render/logo/image.json. The docker container actually mounts your local directory, so when it runs routine-design directory capture any changes to image.json are also modifications to your local directory.
Open the image URLs in the image.json files to see the new versions of the screenshot images. Congratulations, you’ve captured containerized versions of screenshot images! Now with a one-line command you can capture screenshot images of all components in test/render.
If you have any problems with routine-design, be sure to file bugs in the GitHub repository.
Testing Screenshots
You can use the Mocha test framework to write individual tests for each component directory. Install mocha as a developer dependency
npm install --save-dev mochaCreate a new test/render.test.js file, where you will write your Mocha tests.
const RoutineDesign = require('routine-design');const assert = require('assert');describe('render', function() {

  const routineDesign = new RoutineDesign();

  //TODO fill me in with code});
Mocha lets you run specify code to run before all tests have run. Tell Mocha that you want create a RoutineDesignContainer. Also tell RoutineDesignContainer to start a Web server that renders individual components in the test/render directory. This way, the Web server will already be running on the docker container before you take any screenshots.
let routineDesignContainer;before(async function() { const localStorage = routineDesign.getLocalStorage(); routineDesignContainer = await localStorage.createRoutineDesignContainer(); await routineDesignContainer.start(); await routineDesignContainer.run('routine-design render ./test/render', true);});
Mocha also lets you specify code to run after all tests have run, so make sure you clean up the docker container.
after(async function() {

  await routineDesignContainer.cleanup();});
Use the ComponentTree API to easily scrape over test/render directory. For each directory, tell RoutineDesignContainer to pixel validate the directory. This is a routine-design CLI command for diffing local React/Sass code against screenshots captured in image.json. The CLI command returns a JSON object, with allPass and debugId. AllPass is true when all the local screenshots match their image in image.json. DebugId represents a Google Cloud directory with debug images. Assert that allPass, and include an error message with a URL to the Google Cloud directory.
const directories = routineDesign.createRoutineDesignTree('./test/render').getComponentTree().getDirectories();for (let entry of directories) {

  const componentDirectoryId = entry[0];

  it(componentDirectoryId, async function() {

    const dockerCommand = 'routine-design directory pixel-validate project-id my-app-screenshots ./test/render --component-directory='+componentDirectoryId;

    const jsonStr = await routineDesignContainer.run(dockerCommand);

    const json = JSON.parse(jsonStr);

    let gcpUrl = "https://console.cloud.google.com/storage/browser/my-app-screenshots/";

    if (componentDirectoryId != '') {

      gcpUrl += componentDirectoryId+"/";

    }

    gcpUrl += json.debugId+"/?project=project-id";

    assert(json.allPass, gcpUrl);

  });}
Update your package.json with a new test command
"scripts": { "test": "mocha --timeout 60000 test/render.test.js", // other scripts},
Now run npm test. You should see the Mocha logging to the console that all your tests passed. Congratulations! You’ve just written a test suite for asserting local React/Sass code matches the images captured in image.json! Now with a one-line command you can test screenshot images of all components in test/render.
Continuous Integration
Take a moment to push your code to a GitHub repository. Next you’re going to be working with TravisCI, which is a Continuous Integration service that easily syncs with GitHub. TravisCI can run docker. Sign up for TravisCI (it is free). Go to https://travis-ci.org/account/repositories and make sure your GitHub repository is enabled in TravisCI.
Go to your repository in Travis CI. Click More options > Settings. Add a ROUTINE_DESIGN_GOOGLE_CREDS Environment Variable. You can use this command echo $ROUTINE_DESIGN_GOOGLE_CREDS to print out the value. Copy that value into the TravisCI form, quoting it with single quotes.

Return to your developer environment and make sure you have the master branch checked out. Do a git pull to pull the latest code. Create a new branch called infra/travis-ci
git checkout -b infra/travis-ciYou only need to create a single file to set up TravisCI. Create a new .travis.yml file that specifies your project is a NodeJs project. It also enable the docker service
language: node_js
node_js:
  - "11"
services:
  - docker
git add . then
git commit -m “infra: set up TravisCI”git push --set-upstream origin infra/travis-ci
This will push a new Git branch to GitHub. From GitHub, you should see a notification to create a new PR from the infra/travis-ci branch. Create that PR. From TravisCI, you should see a build kicked off for the infra/travis-ci commit. Follow along in the logs to see TravisCI run the same npm install and npm test commands you ran locally. You should see the Mocha tests successfully pass, along with the TravisCI job.
In GitHub, navigate to the Branches page, under Settings, for your repository. Add a branch protection rule for the master branch. The rule should require that the branch is up to date and status checks pass. Check the continuous-integration/travis-ci status check.

Back in the PR you created, you should see that all checks have passed!

Now you can confidently “Squash and merge” this PR into the master branch. Now all future PRs will make sure npm test passes, before giving the PR reviewer the green light.
Lets test that CI can actually fail. Return to your developer environment and checkout the latest version of master. Create a new branch called experimental/black-logo
git checkout -b experimental/black-logoOpen src/logo/logo.svg and change the #61DAFB color to #000000. If you run npm start you will see a black logo. If you run npm run render and open localhost:8080/#/logo you will also see a black logo.
git add . and then
git commit -m “experimental: black logo”git push --set-upstream origin experimental/black-logo
Again, from GitHub, you should see a notification to create a new PR from the experimental/black-logo branch. Create that PR. Inside the PR you will find a notification of the running TravisCI job. Click on “Details”

Follow along in the logs of that job. You should see the tests fail. The tests fail because the local React/Sass code does not match the images stored in image.json.
Mocha logs error messages for every failed test. The error messages should contain a URL to a Google Cloud directory.

Open the Google Cloud URL. You should see subdirectories for each screenshot image that failed within the directory. Each subdirectory has a new.png and a diff.png. New.png is the screenshot of the React/Sass code in the PR. Diff.png is the diff between new.png and the image saved in image.json. Congratulations! You’ve collected debug information from a failed CI job. There’s one convenient Google Cloud URL for each failed test.
If you return back to the GitHub PR, you should see the status checks fail. So more congratulations! You’ve given your PR reviewer a safety net against visual regressions.

Screenshot Review
Lets say we actually want to merge this black logo PR. Return to your developer environment, on the experimental/black-logo branch. Run npm run capture. Remember, this process can take 45 seconds, so be patient.
Once it is finished, run git status to see which files have changed. You should see modifications to test/render/image.json and test/render/logo/image.json. Remember you can open the image URLs in the image.json files to see the new versions of the screenshot images. You should see images with black logos.
git add . and then
git commit -m “capture screenshot images”Then git push. From GitHub PR you should see a link to a new running TravisCI job. Follow along in the logs of that job. You should see the tests pass!
If you return back to the GitHub PR, you should see the status checks pass. Before you merge this PR, lets review it. Click on the “Files changed” tab. This tab shows diffs between the files on the master branch, and the files on the experimental/black-logo branch. You should see the diffs for both test/render/image.json and test/render/logo/image.json. Image.json has URLs you can easily open to look at the differences between master and experimental/black-logo.

Look at you! You’re reviewing visual diffs before approving a PR. If the images on experimental/black-logo branch look good compared to the images on the master branch, then merge the PR!