Managing State in Vue.js
By Hassan Djirdeh (@djirdehh)

The code and content in this article was updated to Vue 3.0 on January 2021 ✨.
I’ve given a few talks on the multiple different ways one can manage application level state in a Vue.js application. Realizing a lot of the content I’ve shared might be useful if in a written format, I’ve prepared this article to summarize the majority of ways we can think about managing state (i.e. data) in a Vue application.
State Management
Vue components are the building blocks of Vue apps by allowing us to couple markup (HTML), logic (JS), and styles (CSS) within them.
Here’s an example of a Single-File component that displays a series of numbers from a data property:
Each Vue component contains a data() function that prepares the component to be reactive. If a data() property value that’s being used in the template changes, the component view will re-render to show the change.
In the example above, numbers is the array stored within the data() function. What if numbers was a data value that needed to be accessed from another component? For example, we may need a component to be responsible in displaying numbers (like above) and another to manipulate the value of numbers.
If we want to share numbers between multiple components, numbers doesn’t only become component level data but also application level data. This brings us to the topic of State Management - the management of application level data.
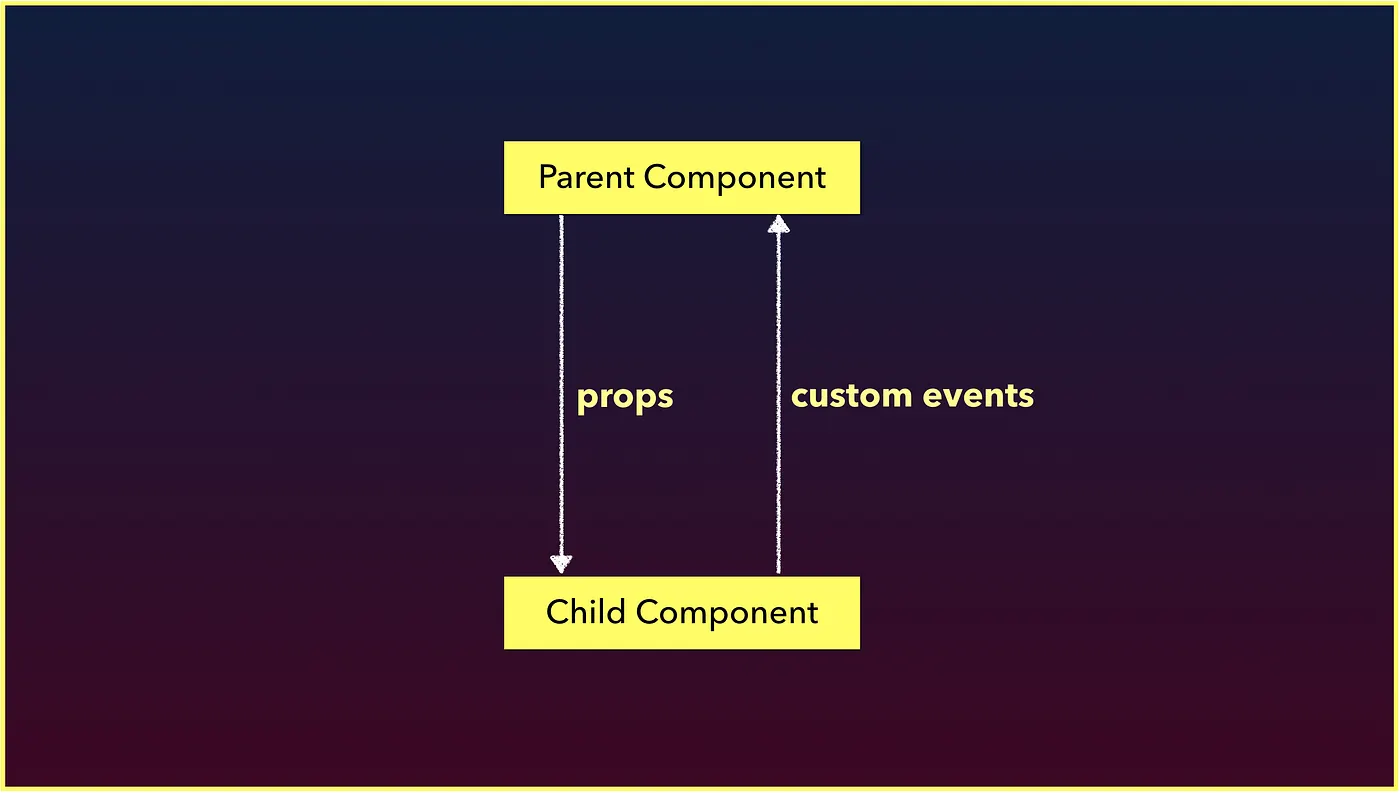
Before we address how we can manage state in an application, we’ll begin by looking at how props and custom events can share data between parent and child components.
Props and Custom Events
Assume we have a hypothetical application, that at first only contains a parent component and a child component. Like other front-end frameworks that exist, Vue gives us the ability to use props to pass data from the parent down to the child.

Using props is fairly simple. All we essentially need to do is bind a value to the prop attribute where the child component is being rendered. Here’s an example of using props to pass an array of values down with the help of the v-bind directive:
The ParentComponent passes the numbers array as props of the same name down to ChildComponent. ChildComponent simply binds the value of numbers on to its template with the help of the Mustache syntax.
Here’s a CodeSandbox example of the above:
Note: All running code examples in this article are provided within a webpack bundled project based on the vue-cli template. The code that we’ll be writing will only fit within the src/ folder of the projects.
#1: props can be used to pass data from parent components down to child components.
What if we needed to find a way to communicate information in the opposite direction? An example of this could be allowing the user to introduce a new number to the array presented in the example above from the child component.
We can’t use props since props can only be used to pass data in a uni-directional format (from parent down to child down to grandchild…). To facilitate having the child component notify the parent about something, we can use Vue custom events.
Custom events in Vue behave very similar to native JavaScript custom events but with one key distinction - Vue custom events are used primarily for communication between components as opposed to communication between DOM nodes.
Here’s an example of using custom events to have a ChildComponent be able to facilitate a change to aParentComponent's numbers data property:
The ChildComponent has an input that captures a number value and a button that emits a number-added custom event with the captured number value.
On the ParentComponent, a custom event listener denoted by @number-added, is specified where the child component is being rendered. When this event is emitted in the child, it pushes the number value from the event to ParentComponent's numbers array.
Here’s a live example of this:
For some strange reason, the example app below doesn’t seem to work through CodeSandbox. If you’re interested in seeing the app function as intended below, open the sandbox, select the File tab and export as ZIP, and run the project in your local development environment.
#2: Custom events can be used to create communication from child to parent components.
We can use props to pass data downwards and custom events to send messages upwards. How would we be able to either pass data or facilitate communication between two different sibling components?

We can’t use custom events the way we have above because those events are emitted within the interface of a particular component, and as a result the custom event listener needs to be declared on where the component is being rendered. In two isolated components, one component isn’t being rendered within the other.
There are roughly 3 main ways we can begin to manage information between sibling components and as a result start to handle application wide state management:
- Use a global EventBus
- Use a simple global store
- Use the flux-like library Vuex
EventBus
An EventBus is an instance that is used to enable isolated components to subscribe and publish custom events between one another.
Wait… didn’t we just say isolated components can’t trigger and listen to custom events between one another? They normally can’t, but an EventBus helps us achieve this by being made global for this purpose.
As of Vue version 3.0, the Vue documentation recommends us to use an external library to implement an event emitter interface within our app (i.e. implement an Event Bus). The external library we’ll use is the mitt event emitter library.
Here’s an example of creating an instance of the Event Bus emitter within an event-bus.js file.
We can now use the interface of the EventBus to emit events. Let’s assume we have a NumberSubmit component that’s responsible in sending a custom event when a button is clicked. This custom event, number-added, will pass a value of what the user types in an input:
Now we can have a completely isolated component, NumberDisplay, that’ll display a list of number values and listen to if a new number is being entered in NumberSubmit:
We’re attaching a listener, emitter.on, on the created() lifecycle hook of the NumberDisplay component. When NumberSubmit emits the event, it will pass a number value within the event object. NumberDisplay listens and pushes that new number to its numbers data array.
Here’s a CodeSandbox of the example:
This answers the question we had in mind - An EventBus can be used to facilitate communication between sibling components:

Notice how easy it was to set up and use an EventBus? Unfortunately, an EventBus also brings along a clear disadvantage. Imagine our hypothetical application looked more like this:

Assume all the white lines are props that’s being passed from the parent down to all the children, and the yellow dashed lines are events being emitted and listened from and to a component. Each of these events aren’t being tracked and can be fired from anywhere in our application. This makes things hard to maintain really quickly which can make code frustrating to work with and can become a source of bugs.
This is the one of the main reasons as to why the Vue style-guide states that an EventBus is not the recommended approach to application wide data management.
#3: An EventBus is an easy way to start having all components communicate with one another but doesn’t always scale well for medium to large applications.
Plug for Fullstack Vue 🦌
Interested in learning Vue? With Fullstack Vue, you don’t have to read fifty different blog posts for hours on end. Instead, with this book, you’ll learn every step required to build complete Vue apps and fit all the pieces together.
Simple Global Store
Let’s look to another way we can handle application data.
Simple state management can be performed by creating a store pattern that involves sharing a data store between components. The store can manage the state of our application as well as the methods that are responsible in changing the state.
For example, we can have a simple store like the following:
The store contains a numbers array within its state, and an addNumber method that accepts a payload and directly updates the state.numbers value.
Notice the use of a reactive function to define the state object? With Vue 3.x, we’re able to import and use the reactive function to declare reactive state from a JavaScript object. When this reactive state gets changed with the addNumber method, any component that uses this reactive state will automatically update!
We can have one component that’s responsible in displaying the numbers array from the store that we’ll call NumberDisplay:
We can now have another component, called NumberSubmit, that will allow the user to add a new number to our data array:
The NumberSubmit component has an addNumber() method that calls the store.addNumber() mutation and passes the expected payload.
The store method receives the payload and directly mutates the store.numbers array. Thanks to Vue’s reactivity, whenever the numbers array in store state gets changed, the relevant DOM that depends on this value (<template> of NumberDisplay) automatically updates.
When we say components interact with one another here, we’re using the term ‘interact’ loosely. The components aren’t going to do anything to each other but instead invoke changes to one another through the store.

Here’s a CodeSandbox of the example we’ve laid out above:
If we take a closer look at all the pieces that directly interact with the store, we can establish a pattern:
- The method in
NumberSubmithas the responsibility to directly act on the store method, so we can label it as a store action. - The store method has a certain responsibility as well - to directly mutate the store state. So we’ll say it’s a store mutation.
NumberDisplaydoesn’t really care about what type of methods exist in the store or inNumberSubmit, and is only concerned with getting information from the store. So we’ll say Component A is a store getter of sorts.
An action commits to a mutation. The mutation mutates state which then affects the view/components. View/components retrieve store data with getters. We’re starting to get very close to the Flux-like architecture of managing state.
#4: A simple store can be a more manageable way to manage application state by allowing components to depend on an external store.
Vuex
Vuex is a Flux-like, state management library built solely for use with Vue.
For those who are unfamiliar - Flux is a design pattern created by Facebook. The Flux pattern is composed of 4 parts organized as a one-way data pipeline:

Vuex was inspired largely by Flux but also takes inspiration from the Elm Architecture. The heart of a Vuex integration is the Vuex Store:
The Vuex Store is made complete with 4 objects - state, mutations, actions, and getters.
State is simply an object that contains the properties that need to be shared within the application:
This state object only has a numbers array.
Mutations are functions responsible in directly mutating store state. In Vuex, mutations always have access to state as the first argument. In addition, Actions may or may not pass in a payload as the second argument:
In Flux architectures, mutation functions are often characterized in capital letters to distinguish them from other functions and for tooling/linting purposes. Above we have an ADD_NUMBER mutation that expects a payload and pushes that payload to the state.numbers array.
Actions exist to call mutations. Actions are also responsible in performing any or all asynchronous calls prior to committing to mutations. Actions have access to a context object that provides access to state (with context.state), to getters (with context.getters), and to the commit function (with context.commit).
Here’s an example of an action that simply directly commits to a mutation while passing in the expected payload:
Getters are to a Vuex store what computed properties are to a Vue component. Getters are primarily used to perform some calculation/manipulation to store state before having that information accessible to components.
Like mutations, getters have access to state as the first argument. Here’s a getter called getNumbers that simply returns the state.numbers array:
For such a simple implementation like this, a Vuex store may not really be necessary. The examples above were provided to show the direct difference in implementation between using Vuex and a simple global store.
When a Vuex store is prepared, it’s made available to a Vue application by installing the store as a plugin in the Vue instance.
With a well built Vuex store, components often do one of two things. They either:
- GET state information (by accessing store state or getters) or
- DISPATCH actions.
Here’s a NumberDisplay component that directly displays the state.numbers array by mapping the getNumbers store getter on to the components getNumbers computed property.
A NumberSubmit component can hold the responsibility to allow the user to add numbers to state.numbers by mapping an addNumber component method to the store action of the same name:
Here’s the above Vuex example in CodeSandbox:
We can see that Vuex extends the simple store method by introducing explicitly defined actions, mutations, and getters. This is where the initial boilerplate as well as the main advantage comes in to using Vuex. In addition, Vuex integrates with the vue-devtools to provide time-travel debugging.
Here’s a quick gif on how the vue-devtools helps us observe store information as mutations occur, as well as being able to time-travel the UI to the moment a particular mutation has occurred.

Note: The app in the gif above is the TodoMVC example implementation.
Though Vuex does require us to establish some boilerplate, since Vuex is tailored to be used only for Vue applications - we can see how fairly easy it to integrate with on to a Vue application.
#5: Vuex extends a simple store method by introducing robust steps to having our application manage state.
What’s the correct way?
Often times you may find people try to understand what the best approach is. I don’t necessarily believe there is a correct or wrong approach since each of these methods come with their advantages and disadvantages.
EventBus
- Pro: Incredibly easy to set-up.
- Con: Unable to properly track changes as they occur.
Simple Store
- Pro: Relatively easy to establish.
- Con: State and possible state changes aren’t explicitly defined.
Vuex
- Pro: The most robust way to manage application level state and integrates with Vue dev-tools.
- Con: Additional boilerplate and requires Flux-like understanding.
At the end of the day, it’s up to us to understand what’s needed in our application and what the best approach may be.
I hope this was helpful and/or made you learn something new!
If you want to watch a slightly more detailed talk on this topic - here’s a video as well!
And finally, if you’ve never used Vue before and are interested in building Vue applications, feel free to check out Fullstack Vue. Since launch in 2018, Fullstack Vue has helped thousands of readers learn Vue. In early 2021, we’ve just updated the entire book to Vue version 3.0 🎉.


Hi! I’m Hassan. I’m the author of Fullstack Vue, instructor/creator of TinyHouse, and a Senior Front End Engineer at Shopify.
If you have any questions, you can always connect with me at @djirdehh. If you enjoyed this article, give it a shoutout on Twitter!
