How to Make a Mirror TV
A Mirror TV adds luxury into any room.

Have you ever wondered if you can create a Mirror TV to add the luxury feeling into your home without the high cost?
Well, now you can! Creating a Hidden Television is actually easier than it sounds. All you need is a frame, glass, TV, wall mount, and Z-Bars!
Today, I’m going to show you how to make a Mirror TV (Step-by-step).
In fact, most mirror tv companies would NOT want me telling you this.
It’s unbelievably simple to create your own hidden TV.
Touch Technology
A lot of people ask, “how can I add touch technology” and “why not just use a shadowbox frame?” It’s actually not difficult, so here is a short video showing how you can do both:
Video Tutorial
Here is a complete tutorial on how to make a Mirror TV!
How It works:

Creating a mirror TV is easy! All you need are three components: a display, frame, and a dielectric mirror.
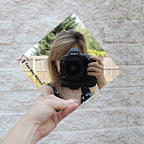
A dielectric mirror is a type of glass that has a high transparency effect. You can see right through the glass with no color distortion. When you place the TV behind the glass, you can see the image with no issues.
Creating a Mirror TV is the perfect DIY project if you want to learn how to do wood working. In the end, you will get a high tech home décor piece that is stunning.
It is a centerpiece for your home that is also functional art. Get rid of that bulky TV black hole that is cluttering up your living room!
Enjoy your favorite shows and movies with your guests with no color distortion!
Parts and Tools List
- Dielectric Mirror
- Frame Sticks
- Flat Screen TV
- IR Repeater
- Router Table
- Table Saw
- Chop Saw
- #6 1/2″ Screws
- Rubber Shims
- Z-BAR Hanger
- Wood Glue
- Isopropyl Alcohol
- Long Clamps
Pro Tip #1: Choosing the Best TV
When you’re checking out the latest and greatest TV models, the most important part is the thickness of the TV. You should choose a TV that’s thin, so that it doesn’t stick way out from the wall.
The latest Samsung is the QLED TV. They are ultra bright and thin which makes the whole process easier!
For example, here are the TV dimensions for the Q90T series that is used for this tutorial:
- 43″ Samsung Q60T — 38.2″ x 22.2″ x 2.3″
- 49″ Samsung Q80T — 44.3″ x 25.6″ x 2.3″
- 55″ Samsung Q90T — 48.7″ x 28.1″ x 1.4″
- 58″ Samsung Q90T — 51.2″ x 29.8″ x 1.4″
- 65″ Samsung Q90T — 57.4″ x 33″ x 1.4″
- 75″ Samsung Q90T — 66.3″ x 38″ x 1.4″
Pro Tip #2: Select the Right Mirror
The mirror is the most important part! You cannot have just any standard mirror, or else the project will not turn out right. For creating a Hidden TV you will need a Dielectric beamsplitter mirror.
This mirror gives you the vanishing effect, so when the TV is turned OFF it is hidden behind the glass and looks just like a standard mirror on a wall. When the TV is turned ON, you can see straight through it with no color distortion! There is exceptional visual clarity!
Many people make the mistake of going “cheap” and attempting to build a TV using window film or a two way mirror.
Only later do they realize it’s next to impossible to actually see their television.
I used the Dielectric Mirror for this project because it will give me the best display quality.

Recommended Mirror Size
To follow this guide, you will want to get the overall size of the TV. Order the mirror to be the same size. For example, on the 40″ Samsung UN40NU7100 series, the TV Size is 36″ x 20.9″ x 2.3″, so you would order the Dielectric Mirror to be 36″ x 20.9″ in 1/8″ thickness in this case.
Pro Tip #3: Choosing Your Frame
To follow along in this tutorial, you will want to use a Frame Moulding that is 2.5″ in width or larger, and has enough height that you can add the additional rabbet to create space to hide the bezel of the TV.
Here is an example of a frame molding profile that works with this tutorial and what it looks like after it has been routed out.

Step #1: Creating the Front of the Frame
The first step is to cut the frame molding you have and route it out so that the bezel of the TV will be covered by the frame and there is still a place for the glass.
To do this, you need the tv bezel measurements for all four sides of the TV, as well as the overall size your Framed Mirror TV will be when it is complete.
Do not worry! I have plenty of pictures, GIFs and explainer sections to get you started.
Step #1.1: Bezel Measurements
Measure the bezel of the TV. It is helpful to create a diagram like the one below to make sure you have them all before cutting the frame material and routing it out.

Routing out the frame will allow you to use the Dielectric Mirror. For larger mirror installations where the frame does not cover the bezel of the TV (or if you prefer to skip this step), you will want to switch to the Glass Smart Mirror to hide the bezel completely behind the mirror.

Step #1.2: Overall TV Size Measurements
Measure and cut the frame sticks approximately four inches larger than the overall size of the Framed Mirror TV.
To find the overall size of the Framed Mirror TV before it has been built, you can use the Display Wars tool, or simply measure the screen without the bezel.
Take the actual Screen Size (27.5″ measured diagonally for this TV model) and plug it in. That gives me 23.97″ x 13.48″. Then add the frame width (times 2) to both dimensions.
The Yakisugi frame is 2.5″ in width, so the overall size with the frame should be 28.97″W x 18.48″H.
In my example, I cut the frame sticks to be 32.97″ (qty 4), and 22.48″ (qty 4).
Mini Pro Tip: Cut double the frame material, you will need the other four pieces for the back build.
Step #1.3: Routing Out the Frame
After the frame sticks are cut, grab two of the long sticks and two of the short sticks, this is the front of your Framed Mirror TV.
You will want to cut the inside of your frame on the table saw to fit over the bezel of the TV. That is where the TV bezel measurements come in handy. I recommend utilizing Step 1.1 to get all four sides measured. Some TV models do not have the same bezel thickness on every side.
Do not forget to factor in a little space for the glass to sit in front.

You want to hide the bezel of the TV. You can route the frame to the measurements.

Step #1.4: Cut 45 Degree Angles
Cut your 45 degree angles to prepare for putting the frame together.
Pro Tip: Get a fine tooth saw blade (100 tooth, 12″) for the best result on the 45 degree cuts.
Step #1.5 Gluing the Front of the Frame
Start off by gluing one long stick and one short stick together. Use the long clamps to hold the two frame sticks together while it is glue is drying.
Once you have both corners made, put them together and hold with the longer clamps.

Step #2: Frame Back-Build
Once the front of the frame is finished, it is time to create the back build.
This will allow you to hide the TV completely from the side.
If you used a flat frame profile, you could sit this on a desk, or you can use a standard TV wall mount to put it on the wall. The amazing part is that the TV is completely hidden from the side after this step! Take a look.

Step #2.1: Measure TV Excess
To create a back build for your Mirror TV, you will want to place your TV inside the frame. See how thick the TV is — how much of it is sticking out? This will give you a basis of how thick you need your back build to be to cover the side of the TV.
For my build, you can see it sticks out approximately 1–7/8″ out of the back, so I made my back build 2″ thick.

Step #2.2: Trim Frame Material for Back Build
From here I have two options for how to style the back build. I chose to face the front of the frame on the side for this tutorial so you can see the burnt wood style along the side of the frame.
You could also stack the frame so they are back to back. This would mean that the burnt wood is facing the back and the sides match with more of a wood finish and less texture on the side. If I did it that way, the frame height is 1.5″ so I would just need to trim 1″ off that way.
Since the frame moulding is 2.5″ in width, I trimmed off 0.5″ from the rabbet side and kept the flat side so in the end I had the 2″ thick back build I wanted with the “front” of the frame now sideways to have the charcoal type look along the side of the frame.

Use the same measurements from Step #1 frame sticks and cut 4 more pieces of the same length (you may have already done this in step 1). Then cut them to the back build thickness you are wanting & begin gluing them to the back of the frame.

Step #2.3: Glue the Back Build
Glue the Back Build pieces. Use the clamps to hold the frame in place for a solid bond.

Step #3: Attach the TV
Place the TV back into the frame. To hold the TV in place, I used Z-BAR Hangers. This is nice because you do not have to cut into the TV so the standard warranty is still in tact.
Step #3.1: Attach With Aluminum Z-Bars
I recommend ordering the Z-Bars such that they are almost the entire length of the TV on all four sides for the best fit. You can also use smaller ones in a higher quantity along each side if needed.
In this tutorial I actually used corner braces instead of Z-bars because the TV was on the thicker side. It varies from build to build.
You can add additional corner support to strengthen the integrity of your build. If you add all of the recommended items below in this list, it will never fall apart on you!

Step #4: IR System
Connect the IR system to the TV and place the eye below the frame once it has been mounted. This allows the remote to work with the TV, even though the sensor has been covered by the frame. For more detailed information on IR Repeaters, check out our IR Repeater guide.
Step #5: Turn TV On & Adjust Settings
Power up your TV by plugging it in to see how it looks! You may need to make some minor adjustments with the Z-BAR hangers to make sure the TV is centered behind the mirror.
After you turn on the TV to check your work, you may as well go in and maximize your settings. Turn off “Eco Mode” and make sure the TV Brightness and Backlight is turned up all the way for the best result.
-Max Out the Brightness
-Max Out the Backlight
-Turn off Eco Mode

Bonus Step: Mounting the Mirror TV
You can mount your TV with a standard TV wall mount. This could be an ultra flat mount, tilting, articulating, whatever strikes your fancy! For the most seamless look, I recommend getting a thin wall mount so it does not stick out from the wall too much.
Here are the wall mounts I recommend using:
- For 10″ to 24″ TV Sets (Flat)
- For 40″ to 80″ TV Sets (Flat Ultra Slim)
- For 32″ to 50″ TV Sets (Tilting)
- For 40″ to 70″ TV Sets (Tilting)

Revised from original post on Twowaymirrors.com.