REACTJS SERIES
React State Management — using Zustand

Do you think state and state management are integral parts of your React application? Have you ever struggled with state management and wondered where to look for a simple state management library? Then this article is for you — it will show you how to handle React state using a simple external library called Zustand.
Indeed! State and state management have always been important aspects of a React application, which re-renders only when the state changes. A state can contain data or information about a component. As your application grows, managing the state and data flow across components is critical.
React State Management
You can manage the state of a React application in several ways.
- React Native State Management. Hooks like useState, useReducer, useRef, useContext, and custom hooks support native state management.
- Indirect State Managers. These are external libraries such as React Router and React Query. They are not primarily used to manage the state. Yet, when combined with a native hook, they can handle the state well.
- Direct State Managers. There are also third-party libraries that are utilized only for state management. Redux, Zustand, Jotai, and Valtio fall into this genre.
What is Zustand?
Zustand is a state management library. It is compact, fast, and scalable. It is a fairly simple system with little boilerplate code. You can use it with less code than Redux and similar libraries for managing React states. It doesn’t rely on a provider. As a result, you don’t have to code as much React logic, which may lessen the things we tend to forget. It works based on simplified flux principles and primarily makes use of hooks.
Why Zustand?
- It is faster than context. It gives you the option to choose a specific state.
- It does state merging by default. Consider updating a single property of an object state,
{x:1, y:2}. You can directly set{y:3}. Zustand will merge the data for you. You don’t have to distribute the old state and update properties like{…state, y:3}. - It is extendable by default. Thus, you can use a variety of middleware types.
- It is less opinionated. You don’t have to stick to one way of doing things. Even though there is a recommended approach, you are not required to adopt it.
Zustand vs. Redux
As you may know, Redux is the classic state management library that works with React. It is considered the most popular library for managing React states. Hence, comparing their architectural designs is a fitting component of this article. Look at the architecture below to see how Redux works.

First, you have the front-end user interface, as seen in the architecture above. Action creators ensure that the correct action is triggered for every user request. You can think of an action as an event that describes what happened in the application. It can be like clicking a button or performing a search. Dispatchers will assist in sending those actions to the store. Later on, the reducers will decide how to handle the state. The reducer function changes the state by taking the current state and action object. It will return the new state if required, and the updated state modifications will render the UI.
Now comes the exciting part! Take a look at how Zustand works with the architecture given below. You might get excited by its simplified diagram.

You also have the UI component here. When a change request comes in, it is routed to the store. The store will decide how the state should be changed. The UI will be rendered with the updated changes once the store returns a new state. You don’t see any action creators, dispatchers, or reducers here. Instead, Zustand has a feature that lets you subscribe to state changes. This helps keep your UI in sync with your data.
For developers looking for a simple and lightweight state management solution without the complexity of a larger toolkit like Redux, Zustand is a perfect option.
End of theory. Get your hands dirty now!
How to use Zustand with ReactJs?
Let’s create a React project to show how to manage the states using Zustand. Consider a Library Store application that keeps track of book issues and returns. The steps are listed below.
1. Create a React application
Create your React application using the below command.
npx create-react-app project_name2. Install Zustand Dependency
Go to the project’s directory and install the zustand dependency to manage the React state.
npm i zustand3. Create a store
Create a bookstore. You can refer to the below code to create bookStore.js file.
import { create } from "zustand";

const bookStore = (set, get) => ({
  books: [],
  noOfAvailable: 0,
  noOfIssued: 0,
  addBook: (book) => {
    set((state) => ({
      books: [...state.books, { ...book, status: "available" }],
      noOfAvailable: state.noOfAvailable + 1,
    }));
  },
  issueBook: (id) => {
    const books = get().books;
    const updatedBooks = books?.map((book) => {
      if (book.id === id) {
        return {
          ...book,
          status: "issued",
        };
      } else {
        return book;
      }
    });
    set((state) => ({
      books: updatedBooks,
      noOfAvailable: state.noOfAvailable - 1,
      noOfIssued: state.noOfIssued + 1,
    }));
  },
  returnBook: (id) => {
    const books = get().books;
    const updatedBooks = books?.map((book) => {
      if (book.id === id) {
        return {
          ...book,
          status: "available",
        };
      } else {
        return book;
      }
    });
    set((state) => ({
      books: updatedBooks,
      noOfAvailable: state.noOfAvailable + 1,
      noOfIssued: state.noOfIssued - 1,
    }));
  },
  reset: () => {
    set({
      books: [],
      noOfAvailable: 0,
      noOfIssued: 0,
    });
  },
});

const useBookStore = create(bookStore);

export default useBookStore;
Zustand store is a hook, which is why useBookStore is the component name. create is the method used to create the store. The store is the sole source of truth that each component shares. The function set is used to modify the state of a variable or object. The function get is used to access the state inside actions.
The state object of the library store in the example contains three fields: books, which contains an array of book details such as id, name, and author. The overall number of books in the library is stored in noOfAvailable, while the total number of books that have been issued to users is stored in noOfIssued. The library store offers four methods: The addBook function will add a new book to the array of books, increasing the number of books that are currently available and setting the state of every newly added book to available. The issueBook function will issue a book to the user. The associated book will now have the status issued. There will be an increase in the count of issues and a drop in the count of available. The returnBook function is used to return the issued book to the library. The status of the returned book will change to available, and the count of issued books will drop while the count of available books will increase. Finally, the reset method clears all of the state fields.
4. Bind the component with your store
Let’s first create entry point App.js file. Refer to the below code.
//App.js

import { useEffect } from "react";
import BookForm from "./components/BookForm";
import BookList from "./components/BookList";
import useBookStore from "./bookStore";
import "./App.css";

function App() {
  const reset = useBookStore((state) => state.reset);

  useEffect(() => {
    reset();
  }, [reset]);

  return (
    <div className="App">
      <h2>My Library Store</h2>
      <BookForm />
      <BookList />
    </div>
  );
}

export default App;
There are two components in the App.js file: the BookForm and the BookList. Every time the App component mounts, we also use the reset function to remove any state data.
Create BookForm.js component. Refer to the below code.
//BookForm.js

import { useState } from "react";
import useBookStore from "../bookStore";

function BookFom() {
  const addBook = useBookStore((state) => state.addBook);
  const [bookDetails, setBookDetails] = useState({});

  const handleOnChange = (event) => {
    const { name, value } = event.target;
    setBookDetails({ ...bookDetails, [name]: value });
  };

  const handleAddBook = () => {
    if (!Object.keys(bookDetails).length)
      return alert("Please enter book details!");
    addBook(bookDetails);
  };

  return (
    <div className="input-div">
      <div className="input-grp">
        <label>Book ID</label>
        <input type="text" name="id" size={50} onChange={handleOnChange} />
      </div>
      <div className="input-grp">
        <label>Book Name</label>
        <input type="text" name="name" size={50} onChange={handleOnChange} />
      </div>
      <div className="input-grp">
        <label>Author</label>
        <input type="text" name="author" size={50} onChange={handleOnChange} />
      </div>
      <button onClick={handleAddBook} className="add-btn">
        {" "}
        Add{" "}
      </button>
    </div>
  );
}

export default BookFom;
The BookForm component has form fields for entering book details, such as id, name, and author. Additionally, it has an Add button that uses the bookstore’s addBook method to input these book details. The UI with sample book details is shown below.

Create BookList.js component. Refer to the below code.
//BookList.js

import { Fragment } from "react";
import useBookStore from "../bookStore";

function BookList() {
  const { books, noOfAvailable, noOfIssued, issueBook, returnBook } =
    useBookStore((state) => ({
      books: state.books,
      noOfAvailable: state.noOfAvailable,
      noOfIssued: state.noOfIssued,
      issueBook: state.issueBook,
      returnBook: state.returnBook,
    }));

  return (
    <ul className="book-list">
      {!!books?.length && (
        <span className="books-count">
          <h4>Available: {noOfAvailable}</h4>
          <h4>Issued: {noOfIssued}</h4>
        </span>
      )}
      {books?.map((book) => {
        return (
          <Fragment key={book.id}>
            <li className="list-item">
              <span className="list-item-book">
                <span>{book.id}</span>
                <span>{book.name}</span>
                <span>{book.author}</span>
              </span>
              <div className="btn-grp">
                <button
                  onClick={() => issueBook(book.id)}
                  className={`issue-btn ${
                    book.status === "issued" ? "disabled" : ""
                  }`}
                  disabled={book.status === "issued"}
                >
                  {" "}
                  Issue{" "}
                </button>
                <button
                  onClick={() => returnBook(book.id)}
                  className={`return-btn ${
                    book.status === "available" ? "disabled" : ""
                  }`}
                  disabled={book.status === "available"}
                >
                  {" "}
                  Return{" "}
                </button>
              </div>
            </li>
          </Fragment>
        );
      })}
    </ul>
  );
}

export default BookList;
The BookList component will display all newly added books to the library. It also shows the number of Available and Issued books. Each book record in the list has two buttons: Issue and Return. The UI looks like below.

There are two books available in the UI above, and Issue button is enabled for each book record. Return buttons are disabled and will enable only for issued books.
When you click the Issue button, the store’s issueBook method is called. The corresponding book ID will be passed and the matching book’s status will set to issued. Then, the associated Issue button is disabled, while the Return button is enabled. You can also see a decrease in the number of Available and an increase in the number of Issued. Please see the screenshot below.

When you click the Return button, the store’s returnBook method is called. The corresponding book ID will be passed and the matching book’s status will set back to available. The associated Return button is disabled, while the Issue button is enabled back. You can also see an increase in the number of Available and a decrease in the number of Issued. Please see the screenshot prior to the above.
Since the Zustand store is a hook, you can use it anywhere. In contrast to Redux or Redux Toolkit, no context provider is required. Simply select your state, and the component will re-render when the state changes. We must give a selector to the
useBookStoreto get only the desired slice.
We are not done yet! Zustand has a big advantage: Middlewares.
Zustand Middlewares
Zustand can be used with middleware to add more features to your application. The most widely used Zustand middlewares are listed below.
1. Redux DevTools
Redux DevTools are used to debug state changes in the application. It can be used with Zustand as well. Make sure you have Redux DevTools installed as a Chrome extension. Use the below code to integrate it.
import { create } from "zustand";
import { devtools } from "zustand/middleware";

const bookStore = (set, get) => ({
  books: [],
  noOfAvailable: 0,
  noOfIssued: 0,
  addBook: (book) => {
    set((state) => ({
      books: [...state.books, { ...book, status: "available" }],
      noOfAvailable: state.noOfAvailable + 1,
    }));
  }
});

const useBookStore = create(devtools(bookStore));

export default useBookStore;
To use devtools, import it from zustand/middleware. Then, wrap your store with devtools using the create method.
Open the Redux DevTools in the web browser and inspect the state, as seen in the screenshot below.
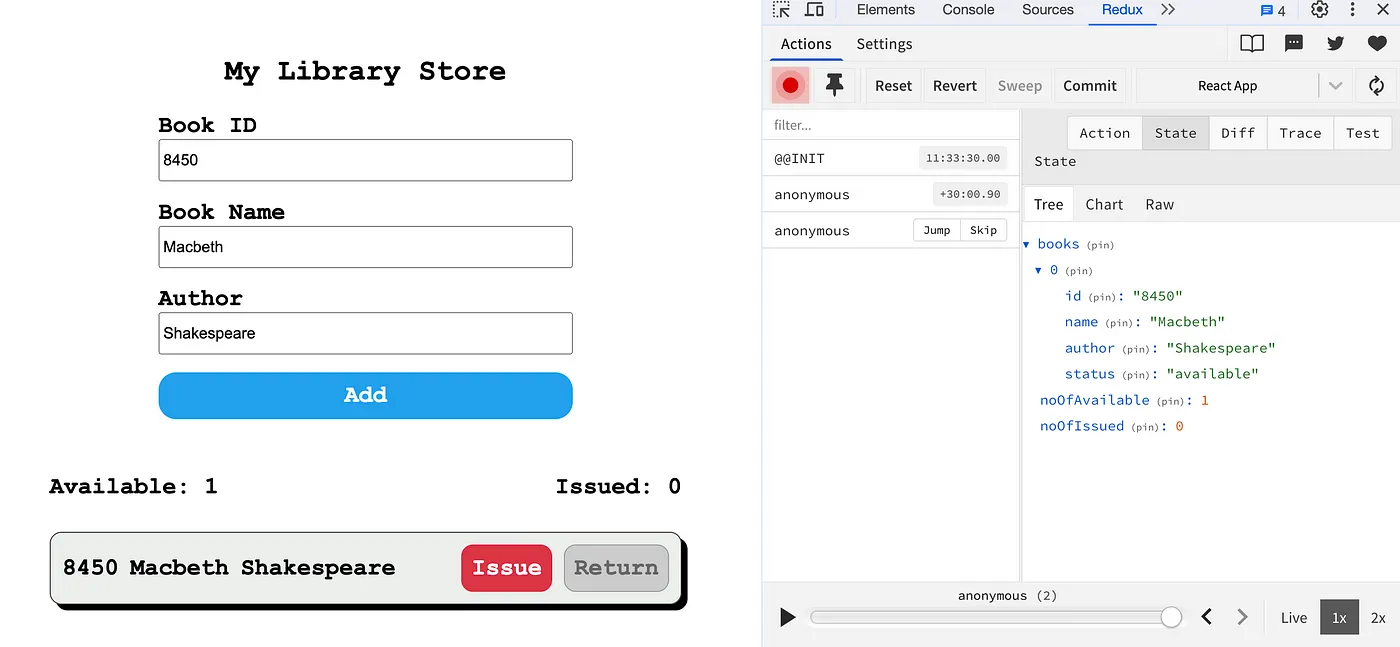
2. Persist Middleware
Persist middleware enables you to persist state using any type of client storage. The store’s data will remain in storage even if you reload the application. Refer to the below code to add this middleware.
import { create } from "zustand";
import { persist, createJSONStorage } from "zustand/middleware";

const bookStore = (set, get) => ({
  books: [],
  noOfAvailable: 0,
  noOfIssued: 0,
  addBook: (book) => {
    set((state) => ({
      books: [...state.books, { ...book, status: "available" }],
      noOfAvailable: state.noOfAvailable + 1,
    }));
  }
});

const useBookStore = create(
  persist(bookStore, {
    name: "books",
    storage: createJSONStorage(() => sessionStorage),
  })
);

export default useBookStore;
Import persist from zustand/middleware. Wrap the store with persist inside the create method. The item in the storage can have a name, but it needs to be unique. Additionally, the type of storage can be specified. sessionStorage is referenced in this code. If nothing is specified, localStorage is the default option.
Open the web browser and look at the session storage to see the saved state, shown in the screenshot.

Summary
As we mentioned in this article, state management is critical in React applications. As your application grows, you will have to pick a strong way to manage its state. The Zustand library is an ideal remedy for managing your React state. It is much simpler and has less boilerplate than Redux. You can also explore different state management libraries to find the right one for your application.