Making my Avatar with Gravit Designer

I wanted to change my Twitter avatar from what it had been for the past few months. I decided I wanted my own flat avatar, plus I think they’re just super cool 😎😎. This post shows how I created my own avatar using Gravit Designer.
My experience with Gravit Designer started when decided I that I need a new program for my design projects. I took my search to the internet (read: Google, Twitter) looking for design programs that would meet my needs and also fit within my budget.
I learnt about Gravit Designer on alternativeto.net. A program that looked like it suited my designed needs, had rave reviews (thank you Twitter) and was free. This discovery coincided with my new avatar project, so I decided to take Gravit Designer for a spin.
Starting up
Gravit Designer’s welcome screen gives you the option to input the width and height for your document or select any one of its predefined dimensions (social, print, website, presentations or whatever … you’re covered). I left the width and height fields empty and just clicked the “Create” button to set up a document with an infinite canvas.
I got a high quality photo of myself that clearly showed my face and and all other facial features and imported it into Gravit Designer; File > Import > Place Image. You can also drag it in or copy/paste it, by the way. I’ve used the Recolor effect to achieve a black/white look on the picture to make the design process less distracting.

Drawing the Avatar

Using the Pen tool, I traced the Outline of the head (the Bezigon tool should work fine for this as well) and used the Subselect tool to get the right curves that fit the shape of the head. To make your work easier and less confusing, make sure to group related paths and give a name to each shape as you trace e.g. the head, eyes, lips.

If you want to avoid tracing the full shape of the head, you can trace one-half, duplicate this path (Ctrl/Cmd + D), select and place both paths side by side, and then merge (Ctrl/Cmd + M).
For the eyes I used the same pen tool to trace the eyeballs, then the Ellipse tool (E) to draw a circle for the iris. I drew a smaller circle inside the iris shape to serve as the pupil and another tiny circle on the border of the pupil for the light reflection on the eye.

I then selected both the iris and eyeball shape and clipped them with the clip tool (Shift + Ctrl/Cmd + G). Once I created one eye I repeat the same process for the second eye (a faster method is to group all the elements and duplicate).

The nose and lips also affect how accurate the avatar would be, so I drew them next. I initially made the mistake of drawing the lips as one shape instead of two and couldn't figure out how to apply different colours for the upper and lower lip, so I separated them.

Still with the pen tool, I drew shapes for the eye brows, hair and beard.

Shading
I had a basic outline of my face now, but before adding colours I added some shading on the face, specifically around the eyes and nose, and to highlight the chin. This helps to give the avatar a more realistic look. There are many more opportunities where you could add layers, especially on the sides of the face (cheek and sideburns) but I decided having a simple structure would do for now.

Adding Colours
I used Gravit’s colour picker tool on different parts of my face and checked for different shades in the colour dialog. For the shading, I used a slightly darker colour and set the opacity at 60%.
If you want to learn more or see other ways you can use Gravit Designer to apply shading etc. on vector illustrations, be sure to check this article.

Final Steps
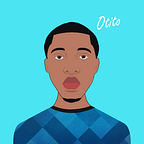
With the face done, I drew the neck and upper body and torso. I found a nice texture image that could serve as the t-shirt, imported it (File > Import > Place Image/Link Image) and clipped it to the torso shape as my t-shirt. After touching up everything else I needed to address, this was my final result.

My Thoughts
Congrats, you got to the end of this article, so now it’s your turn to create your own avatar with Gravit Designer. Please share it in the comments or the social media of your choice.
I think, Gravit Designer is a really great tool and the designs you can create with it are limitless. Plus, the fact that it’s free makes it a hell of a bargain. Haven’t tried it yet? Head over to the site and download it now or use it online and you’ll be amazed by the endless possibilities.
New to design? These tutorial videos are just what you need to get started. Watch them, apply what you learn, let your creative juices flow and see yourself go from zero to greatness real quick.
I am Otito on Twitter.
I’d be happy to know your thoughts concerning this project, so please feel free to comment with your tips, questions and critical feedback. If you enjoyed reading, please applaud the article so others can find out about Gravit Designer’s awesomeness, and also about me. Thanks!