How I hacked Google Daydream controller (Part V)
Ghetto positional tracking.
Previous chapters of “How I hacked Google Daydream controller”:
(Part I) Reversing and making it compatible with Apple iOS devices.
(Part II) Developing compatibility across multiple platforms.
(Part III) What about using two controllers at same time?
(Part IV) Doing things even more serious.
FOREWORD
Ever since I was a kid I’ve always loved to disassemble toys. I enjoyed browsing what was hidden by the plastic, to the discover the magic that gave life to everything. When I found circuits instead of gears, I was marveled: it was how I met the electronics for the first time.
Soon, I found myself surrounded by a lot of disassembled toys. Back then, I realised that I had to do something to save them, otherwise someone would have thrown them all. I started early practicing the art of “tinkering” to create some compositions. I wanted to create better toys, with some extra-functions: something unique to show to my friends.
Time has passed, but my attitude has not changed, rather, I have just changed my toys: this is what happened when I discovered the Google Daydream controller.
What could I ever craft just with a ping-pong ball and some hardware tools? A DIY positional tracking.

HARDWARE
I started with a robust guitar pick to separate the two bodies of the Daydream controller passing it into the gap around the outer edges. The upper part (the one hosting the touchpad) is attached to the bottom shell with two clips; the lower halves of both parts are glued: I had to slightly force the hand to get them detached.
I had to be careful not to tear the white flat that connects the body parts electrically. Later, I unscrewed the 5 screws that hold the main PCB in place and then I disconnected the battery.

I picked a ping-pong ball, I pierced it with a hand-drill and I glued a white LED inside it.

Following, I drilled both the lower shell of the Daydream controller (to allow the housing of a off-the-shelf button) and the upper part (to allow the pins of the LED to access the inside circuit).

Once the tip of the soldering iron was hot, I soaked a bit of tin in the flux, then I welded two wires to the poles of power socket (+ and -): from here I took the power to light up the LED.

I shoved the LED pins into the slots I made on top and I soldered the connectors with the wires, according to their polarity.

Test number one: it works.
Sprucing up the tiny wires with some electric tape.

After carefully reassembled it all, the result is the following: front and back views.

SOFTWARE
The positional tracking can be quite tricky to deal with, but… I nimbly solved the problem “inside the browser”. I found tracking.js, an amazing and opensource JavaScript library that I had previously used to track objects via my laptop’s webcam. The implementation was quite easy: to make it up and running, it took just a brief code setup after a quick read in the documentation.

The tracked area around the light changes according to its distance from the webcam (I interpreted it as the z-coordinate for forward-backward movements). The tracked area projected in the webcam FOV, is identified by a x,y coordinate system that allowed me to shift the controller along the axes.
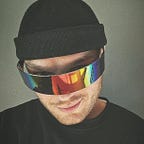
As a middleware, I used tracking.js to serve the Daydream controller position and distance to my Nightmare.js driver. This uses the A-Frame framework as output: for those who don’t know what we are talking about, check out the previous chapters.

Represented below, the whole architecture that allows me to use the Daydream controller on all the desktop operating systems.

Et voilà, ladies and gentleman, my ghetto positional tracking:
Do you think you have missed something along the way? Reading previous chapters of “How I hacked Google Daydream controller” may will help you to understand how things began:
(Part I) Reversing and making it compatible with Apple iOS devices.
(Part II) Developing compatibility across multiple platforms.
(Part III) What about using two controllers at same time?
(Part IV) Doing things even more serious.
New chapter available!
(Part VI) Building a better typing system for VR/AR using AI.


Hacker Noon is how hackers start their afternoons. We’re a part of the @AMI family. We are now accepting submissions and happy to discuss advertising & sponsorship opportunities.
If you enjoyed this story, we recommend reading our latest tech stories and trending tech stories. Until next time, don’t take the realities of the world for granted!