You know that feeling, when you are trying to figure out a new thing, but are certain that you are using it wrong, since nothing you try goes smoothly. Whether you pronounce it Gif or Jiff, sometimes it seems like we are all collectively using it wrong, and the more i researched the topic, the more i was sure of it.
I invented nothing new, this is just a compilation of what i have learned from a couple of very skilled people’s blogposts, in order to make it easier for you, the reader, to parse this information and create something great. Year and a half ago i had two projects concerning Gifs, and while they were different, i must admit i learned a lot in the direction of how to use C-level programs with PHP and shell, which seemed like a mystery up until then.
Tldr tip: This is a long-haul article, so skip over to the ending if you are only interested in the solutions.
Dynamic Captions
The client (a large regional company) asked for a viral website with kids games, colouring books etc — which would also be able to generate predefined animated gifs, with custom captions that users would write on the fly. In other words, they were hoping for the website to become viral because kids could make their own Gifs and will hopefully share them with others.

The first try seemed simple, do everything on the user’s computer, so we don’t have to do anything with the server. As i recall there were a couple of JS solutions i had tried, but all of them were really CPU intensive, Network intensive, or both. And mid-way the client decided that the website should be less of a computer game style, and more of a mobile game. This meant that UI needed to be very much simplified, and all the customization options were scrapped. So I immediately dropped JS as a possible solution and grabbed PHP since the website itself was to be served via PHP anyway.
I bet the money would have been better spent Bitcoin mining, especially way back in 2015.
The only way i saw fit was to use PHP-GD in order to add text to a pre-existing image, as seen on PHP4Kids. Which did not in fact work, because in that case you drop the animation aspect since GD is unable to process animated Gifs in this way. I pushed the idea further and spent some time trying to re-create the animation by parsing each frame individually and merging them later, i was really happy with myself once i got it working, but the process itself was long and painful for the machine. We were told to expect 100+ users at any given moment. If one user (me) on a powerful local machine caused the fans to go insane imagine what 50 users would do to a DigitalOcean droplet, or more importantly to our wallets once we let the server farms rage. I bet the money would have been better spent Bitcoin mining, especially way back in 2015.
FFmpeg
In the process it occurred™ to me that since PHP is server side language, and we control the server environment, i can freely use FFmpeg in my scripts. Unfortunately FFmpeg does not have the ability to stitch DOM elements to animation, like JS canvas does, but we are allowed to heavily stylise subtitles!

Remember, back in the olden days, the age of CD autorun.ini based windows, before BSPlayer and MV2 Player, it was pretty hard to get subtitles working properly all the time. So what people would often do is to encode the subtitles into the image information. Also, was it not fun, when some jerk would encode a subtitle in pink Comic Sans, with black background and with wrong encoding. Or better yet — in Korean. Remember? Well who would have thought that one day the days and days of watching pirated movies on VHS and .avi would become useful.
FFmpeg ended up being a really awesome tool and i was very sad that there was no proper PHP wrapper for it, so i had to shell_exec everything which, of course works, but is a really ugly way to solve problems, and there is always lots of string concatenation which by itself means lots of error and edge case handling. For me it meant that the script must be very simple and short.
$videoWithCaption = addCaption(
 $video,
 getCaption($video,$captionID)
);

$gifSrc = videoToGif(
 $videoWithCaption,
 $gif
);return ‘build/’. $gifSrc;
As close to that as possible. The more code, the more edge handling will be needed. You can take a look at the whole script via the GitHub link.

I would create a new video file with encoded titles, and then resize it while converting it into gif. In essence, it had worked wonderfully, but it did output fairly large files. So i needed a way to compress them on the fly. I started looking at Gif compression methods, and boy was i in for a treat… There was so much information and methods, and much of it depends on exact particular use cases. Luckily for me, at that point the copywriters from the client had decided to scrap the idea and make a fixed number of captions and images, so there was a limited number of 64 permutations. I could simply generate all the Gifs at home, compress them via ImageOptim locally and upload them.
Fun… I just went through all that trouble for nothing. Well, it’s rarely lost time, i learnt a lot on the way, and was ready to tackle another Gif-related problem a couple of months later.
Gif Optimisation App
Do youknow that feeling, when someone says something so far off, with such confidence, as if it is clearly a historical fact written in stone, and the whole room becomes silent and no one questions it?
Well a couple of months after our little PHP website from the previous example, i was working at another company, doing primarily Symfony 3 development, and the interim PO told me that we need to somehow fix the frontpage, which will soon start having really low FPS, because christmas is coming, and the content team is about to upload a bunch of animated Gifs as affiliate logos which for some weird reason makes everything not work properly — “It’s tough, those gifs…”
“It’s tough, those gifs…”
So i presumed that all the options have already been looked into, and i started thinking — maybe we remove jQuery by rewriting all of JS into vanilla, or caching DOM element selectors, or find all will-change elements and mark them as such. Offloading fonts and images? Local caching via PWA? Half a hour in, i decided to put words into actions, and analyze the DOM to see what is in fact stealing so much CPU. Must be the repaints Gifs are causing. I needed to recreate the page to be as similar as possible to what the Christmas page will look like and asked the UX team to send me all 13 logos via Slack. Needless to say, i received a ~50MB zip archive via WeTransfer.
The page grew up from 1.3MB to 30+, all because front page now had had 7 animated Gifs. Most of them repeated three times, so total of ~20 and some of them had CSS transformations on hover, so CPU started revving, and the performance chart in Chrome went off like crazy. Interesting thing to note at this point is that Safari worked flawlessly with the exactly the same page. In any case, the problem was clearly not to be solved by improving the code quality (albeit there is never enough of that) and micro optimizations, but by properly optimizing our Gifs. I expected the animators to know what to do in terms of optimizing gifs, but when i talked to them, they had no clue about Gif optimization itself, and their primary concern was — as expected — why can’t they have more than 25 fps on a Gif, and how awesome would it be to make all of their 25fps Gifs 2x for Retina screens. It was amusing to me at that point that nobody looked into this last year.

Common Sense Optimization
I already had read lots about Gif optimization and made a PHP app that uses FFmpeg so i figured i can create an easy to use server-side tool that will perform the transformation automatically. Unfortunately unlike last time, it was not smart to install FFmpeg on a server handling milions of visits a year. Ok, scrap PHP and make a simple Desktop shell based application that will use the exact same commands and have a similar workflow to ImageOptim, and thus not be too hard to implement into their daily lives.
First i got them into a room and tried to figure out what can we agree on as a standard. We needed to start off from something, and i figured that finding out what they considered as standard was important so that i can learn more about the usage goal of these images, so it should be my first task. We started at 500x500 @ 25 fps and tested plain non-compressed output file by file.
I learned from this that most of the optimisation does not come from the micromanagement of output settings, but from applying common sense. Why have a 3MB Gif if you can achieve the same effect with 2 hours of testing and a 500kb file.
I decided that we need test each setting separately instead of all at once, for example we created the exact same Gif at 6, 10, 12, 15, 17, 22, 25 fps and put them into the browser one by one. That way you can clearly differentiate if a particular setting acctually brings the expected benefit. We ended up deciding that 200x200 @ 12 fps ~ 255 colours was sufficient and covered all the use cases. Yes even Retina — it turns out that when something is moving fast, even when it is a SVG graphics, you don’t actually notice the 1x impact on Retina screens, once you insert the Gif into the actual page. The browser zooms the image and performs the built-in antialiasing, so the image looks almost exactly to the file double that size. As for the FPS, i know from watching lots of anime that 12 fps is enough for most simple animations, and while i got lots of the resistance from the designers that worked for hours in After Effects in order to make the animation, when faced with the effect as seen on the page, they decided that for these small animations there is almost no difference between 15 and 25 fps.
The page worked normally after this. But, for me, an engineer, that wasn’t enough, we still had 21 animated Gifs on the page, and the page was 14.8MB in size. So i turned to my previous knowledge of Gif optimization, so let’s get right to it.
The Nitty Gritty
While tools like EzGif do make images smaller, they often leave weird artefacts on the output. A bit of research led me to this heroic article. Which had explained to me what these artefacts are, and how we can use them if we find the correct use cases for each of them. (which i will mention later in the text)
The article goes in depth to properly explain the differences between optimisation models, and in my opinion the most important part of the article was to show me that i will undoubtedly need to test every single decision. That is simply how it’s like with Gif optimisation.

Transparency
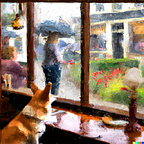
First i discovered that we can get lots of bytes back by encoding a transparency layer into the parts of the gif that are not changing from frame to frame. Since we are dealing with drawing animation, which is essentially a still image, most of the Gif surface wont ever change, only the actor changes. To quote Cassidy K who made the image you see attached:
“If you want to peak at the internals of a gif, you can use
gifsicle -e input.gifto explode the frames. Here’s the first three frames of the gif above. Notice that only the pixels that change from one frame to the next are present.”
By supplying the FFmpeg with an array of optional arguments we can control the compressor algorithm, for example by specifying diff_mode=rectangle we are restricting the area only to the regions where motion exists, and leave other segments transparent, which in turn shaves off bytes while getting the same effect. As far as i know we can often whiteness this same optimisation technique while streaming watching H.264 video over a bad connection, as sometimes when the connection drops, it will seem like a single frame has stuck, while only the moving parts bring change to the image. From my tests, this saved at least 25% (and up to 50%) on the total size of the Gif in output, depending heavily on the type of content displayed. In cases where you have a moving camera or lots of distributed changes on a picture, like glitter for example, this optimisation technique does almost nothing.

Creating a Palette
As you probably know, Gif format has a 256 color limitation, which means that in any given frame, we are only allowed to use 256 colors. What you most probably are not aware of is:
- You are allowed to provide a custom colour palette, that best suits your needs.
- You are allowed to change it for each individual frame if you want (not implemented)
We can create a palette out of an existing Gif by simply asking FFmpeg via palettegen, and you can follow the whole process thoroughly on this SuperUser question:
We will later provide this palette to FFmpeg via paletteuse filter argument to be handled in the optimization process and thus make a higher quality Gif, with the same file size. The parser’s job here is to determine which color from the palette most closely matches the input color, for every pixel, which is why we provide a dither method at this point (more in the next chapter). It is important to note here that since our Gifs were mostly flat-style drawings, we seldom used more than 20 colors on a palette. But i did not notice any mentionable difference in file size if i strictly enforced the limited number of colors while outputing the file.
An additional advice i got from Cassidy’s blogpost is that we can combine palette generation with transparency using stats_mode=diff when generating the palette will generate a smaller palette because FFMPEG will only look at the pixels that do not change from one frame to the next. While i have not observed this detail, as i said, we had very little range of gamut, Cassidy claims that on photographic Gifs, some pixels change color slightly between frames, which in turn makes the transparency option useless, so providing a stats_mode will solve this issue and make both optimizations more efficient. I will explain more about this filter in the next chapter.

Dithering Filters
Dithering is the process of adding noise to a digital recording, in order to reduce overall perceived distortion. In Gifs, which support only 256 colors, dithering is used to simulate gradients, and being that we use Gifs mostly for memes, cats and animations, there are a lot of gradients.
It’s no wonder that this is the most complicated part to grasp and use, as it completely depends on the particular use case. For example, in the subtitle example (gif with the dog on the beginning of the article) ordered bayer dithering is applied. As PKH puts it:
“It is easily recognizable by its
8x8crosshatch pattern. While it's not the prettiest, is has many benefits such as being predictible, fast, and actually preventing banding effects and similar visual glitches.”
Since most of the other dithering methods are error based, the results might be far better in quality, but in turn they can also distort the whole recording in some cases.
#!/bin/sh

palette="/tmp/palette.png"

filters="fps=15,scale=320:-1:flags=lanczos"

ffmpeg -v warning -i $1 -vf "$filters,palettegen" -y $palette
ffmpeg -v warning -i $1 -i $palette -lavfi "$filters [x]; [x][1:v] paletteuse" -y $2
The exact syntax is a bit hard to figure out at first, but Cassidy shines again and explains it briefly in the same article. The values we are passing are actually nested key-value pairs, which is unusual for most command line tools. It might be easier to get a hang of it when presented like a Yaml.
fps: 15
scale:
  [320, -1]
  flags: "lanczos"
paletteuse:
  dither:
    bayer_scale: 5
    diff_mode: rectangle
There are lots of dithering options in the wild, but FFmpeg has implemented only the 5 most used ones. There are three levels of bayer, floyd_steinberg, two versions of sierra and of course none. The below photo is a compilation of dither tests hat PKH provided for us in his article. It might be easier to generally compare them in a side-by-side comparison like this while reading, but if you are making a decision, i strongly recommend going to see the originals, as they are presented in original size and more detailed.
Now that we understand dithering, we can dive into a practical example. As i mentioned above, in the palette segment, Cassidy mentioned that we should learn to use stats_mode dithering parameter, but what does it do in practice? It turns out PHK covered that also.
“This option will basically allow you to specify if you are more interested in the whole/overall video, or only what’s moving.“
It changes the way that dithering parser (¿ditherer?) looks at the image. As we previously said — ditherer’s job at this point is to compare pixel-per-pixel values, and pick the best color from the allowed colors palette. But as we have observed, that explanation is oversimplified, because in practice it creates a non dithered image. It must look at the broader picture, and decide if the current pixel is a part of a gradient, and if it is, what dithering strategy should be applied, sierra2 for example.
How does stats_mode figure into this? Well as we know it decides if ditherer should understand transparency or not. For example the default (full) mode does not perceive transparency, and it distributes it’s attention to the whole picture, even the background that is not changing. This would be the option we pick for movie scene gifs. On the other hand, the diff mode that Cassidy mentioned understands transparency, so it pretty much leaves the background as it was, and concentrates on making the moving parts smoother which is more useful for rendered graphics, drawings etc.
Gifsicle & ImageOptim
Since i created a desktop Mac app using Platypus which is actually run from a single shell script, there is some additional boilerplate:
# If no arguments are supplied
if [ $# -eq 0 ]; then
    echo "No arguments supplied!"
    exit
fi# If supplied file does not exist
if [ ! -f "$1" ]; then
    echo "File not found!"
    exit
fiffmpeg=./ffmpeg
gifsicle=./gifsicle
imageoptim=./ImageOptim.app/Contents/MacOS/ImageOptim$ffmpeg -y -i "$1" -vf fps=20,scale=200:-1:flags=lanczos,palettegen palette.png$ffmpeg -i "$1" -i palette.png -filter_complex "fps=20,scale=200:-1:flags=lanczos[x];[x][1:v] paletteuse=" temp.gif$gifsicle -O3 temp.gif -o ~/Desktop/output.gif
$imageoptim ~/Desktop/output.gifrm temp.gif
rm palette.png
Apart from the boilerplate you will notice that i added use of ImageOptim and Gifsicle. Let me try to explain why they haven’t been mentioned so far.
ImageOptim is a well known Mac utility that is so easy to use that it became a part of usual workflow for thousands of people. You simply drop an image into a window, and it optimizes it losslessly and overwrites the file. Saves a lot of time and shaves a lot of kb. Works with animated gifs.
Gifsicle is something new for me, it is a less known CLi utility for merging files into Gifs, and according to David Walsh, it seems that it is also able to optimize the Gif file.
In comparing sizes of 13 files, i have figured out that there is actually a difference in size up to 15% depending on the order of optimization actions.
- I saw no difference between resizing a file with FFmpeg and providing an already resized file to it.
- If i take the optimized file through ImageOptim, it becomes even smaller.
- If i were to take the file apart, and perform ImageOptim for each individual frame and stitch it back together, it would have absolutely the same size as №2.
- If i first optimize the file in ImageOptim, and later shave it via FFmpeg, it is larger than the other way around.
- If is use gifsicle before ImageOptim, file gets even smaller, although only for a couple of kilobytes.
As usually, i am leaving you with a question. I still haven’t figured out what do Gifsicle and ImageOptim do to the file, that i did not do (apart from ImageOptim apparently removing metadata)?
Cheers 🌊