Deploying Actions Runner Controller for Cost-Efficient GitHub Actions

Introduction
GitHub Actions is a powerful tool for automating workflows within your software development lifecycle. While GitHub offers hosted runners to execute these workflows, they can incur significant costs, especially for frequent or resource-intensive jobs. Actions Runner Controller (ARC) emerges as a solution to manage self-hosted runners on your Kubernetes cluster, offering cost savings, autoscaling capabilities, and seamless integration with GitOps practices.
Why Use ARC?
- Cost-Effectiveness: Self-hosted runners often cost less than hosted runners, especially for long-running or high-resource jobs. ARC allows you to leverage your existing infrastructure, potentially saving you money.
- Autoscaling: ARC automatically scales runners up and down based on demand, ensuring efficient resource utilization and avoiding unnecessary costs.
- Increased Security: GitHub self-hosted runners can be configured to run on your servers, which provides an extra layer of security compared to using shared runners. This helps to protect sensitive information and data in your workflows.
- Greater Control: Self-hosted runners give you complete control over the resources and environment used for your workflows, which can help you optimize performance and ensure that your builds and deployments run smoothly.
In this tutorial, we will show you how to set up GitHub’s ARC on Kubernetes using Helm, then create and run a workflow that uses runner scale sets. For more information about runner scale sets, see “Deploying runner scale sets with Actions Runner Controller.”
If you are looking to secure your Actions Runner Controller (ARC) environment, get in touch with Hostspace.
Step-by-Step Guide
Prerequisites
- Basic understanding of Kubernetes, Git, and GitHub Actions
- A Kubernetes cluster with ArgoCD installed
- Helm installed on your local machine
- Prepare the ARC Charts Repository:
- Create a New Repository
- You need to create a dedicated repository to store the Helm charts for this specific deployment. You can create this repository on GitHub within your organization or on any other Git hosting platform you prefer.
- For clarity, let’s assume you call this new repositorygh-arc-scale-set-charts. - Clone the Base Repository
- Next, clone theactions/actions-runner-controllerrepository to your local machine. This repository contains the base files needed for deploying ARC. We only need the below folders.
#Link to the gha-runner-scale-set-controller folder
https://github.com/actions/actions-runner-controller/tree/master/charts/gha-runner-scale-set-controller

#Link to gha-runner-scale-set-controller folder
https://github.com/actions/actions-runner-controller/tree/master/charts/gha-runner-scale-set
- Now, you need to copy the contents of the cloned actions-runner-controller directory into the local directory of your newly created gh-arc-scale-set-charts repository.
- Finally, push the local gh-arc-scale-set-charts repository.

2. Create ArgoCD Applications:
Once you’ve prepared your custom gh-arc-scale-set-charts repository, it’s time to tell ArgoCD how to deploy and manage your ARC components. This involves creating two ArgoCD applications, one for the gha-runner-scale-set-controller and one for the gha-runner-scale-set.
Recommended Approach: Using a Connected Git Repository
Use the provided manifest files (gha-runner-scale-set-controller.yaml and gha-runner-scale-set.yaml), adjusting values as needed.


name: This defines the name of your ArgoCD application, in this case,gha-runner-scale-set-controller.namespace: This specifies the namespace where the application resources will be deployed. In this example, it'sargocd.destination: This defines the Kubernetes cluster and namespace where the resources will be deployed. Here, it points to thearc-systemsnamespace in the default Kubernetes cluster.project: This defines the ArgoCD project the application belongs to. Usually, you'll use the default project.source: This section specifies the location of the manifest files.repoURL: Replace this with the URL of yourgh-arc-scale-set-chartsrepository.targetRevision: This specifies the Git revision to use. Typically, you'll usemain.path: This points to the specific directory within the repository containing the manifest files. In this case, it's./gha-runner-scale-set-controller.syncPolicy: This defines how ArgoCD will manage the application's state.automated: Enables automatic syncing with the Git repository.prune: Removes resources that are no longer present in the repository.selfHeal: Attempts to fix any discrepancies between the desired and actual state.syncOptions: Additional options for syncing. In this case,CreateNamespace=trueensures thearc-systemsnamespace is created if it doesn't exist.githubConfigUrl: Specifies the URL of your GitHub repository, organization, or enterprise where the runners will operate.
- Example:https://github.com/your-organizationgithubConfigSecret: References a Kubernetes secret containing credentials for authenticating with GitHub.
- To enable ARC to authenticate to GitHub, generate a personal access token (classic) or GitHub App. For more information, see Authenticating to the GitHub API.maxRunners: Sets the maximum number of runners that can be scaled up in the cluster. Example:5minRunners: Specifies the minimum number of runners that should always be available. Example:1controllerServiceAccount: Configures the service account used by the ARC controller to manage runners.
-namespace: Identifies the namespace where the service account resides (usuallyarc-systems).
-name: Specifies the name of the service account (usuallyactions-runner-controller-gha-rs-controller).
Key Point:
- Carefully adjust these values to match your specific environment and requirements.
- Ensure the
githubConfigSecretexists in your Kubernetes cluster with the appropriate credentials.
3. Authentication Configuration:
In the gha-runner-scale-set Helm values file, choose your authentication method:
- PAT: Use a personal access token (PAT) with appropriate permissions.
- GitHubConfigSecret: Create a Kubernetes secret containing GitHub app credentials
To enable ARC to authenticate to GitHub, generate a personal access token (classic) or GitHub App. For more information, see Authenticating to the GitHub API.
- Reference the secret in the
githubConfigSecretfield of the Helm values.
5. Deploy the Applications:
If you’ve wisely connected your gh-arc-scale-set-charts & your manifests repository to ArgoCD, the deployment process is remarkably streamlined! ArgoCD will automatically detect changes in your repository and initiate syncs without requiring manual commands.
Here’s a brief overview for those who haven’t connected their repository yet:
- Manual Sync (If Not Using GitOps):
- Use the following commands to manually trigger the initial sync:
argocd app sync gha-runner-scale-set-controller
argocd app sync gha-runner-scale-set
6. Verify Deployment:
- Check if the ARC controller and runner pods are running in your cluster.


7. Actions Workflows to Test Custom Runners:
Once you’ve successfully deployed your Actions Runner Controller (ARC) with custom runners using ArgoCD, it’s essential to verify that everything works as expected. This section guides you through creating a sample workflow to test your setup.
Before that, let’s Check the status of our deployed self-hosted runner.
A self-hosted runner can be located in either your repository, organization, or enterprise account settings on GitHub. To manage a self-hosted runner, you must have the following permissions, depending on where the self-hosted runner was added:
- User repository: You must be the repository owner.
- Organization: You must be an organization owner.
- Organization repository: You must be an organization owner, or have admin access to the repository.
- In your organization or repository, navigate to the main page and click Settings.
- In the left sidebar, click Actions, then click Runners.
- Under “Runners”, you can view a list of registered runners, including the runner’s name, labels, and status.
The status can be one of the following:
- Idle: The runner is connected to GitHub and is ready to execute jobs.
- Active: The runner is currently executing a job.
- Offline: The runner is not connected to GitHub. This could be because the machine is offline, the self-hosted runner application is not running on the machine, or the self-hosted runner application cannot communicate with GitHub.

Since our runner is online, let’s test it by creating a workflow to test our setup.
Here’s the process:
- Access Your Workflow File:
- Navigate to the GitHub repository where you want to create the test workflow.
- Create a new file named .github/workflows/test-custom-runners.yml (or any preferred name). - Define the Workflow:
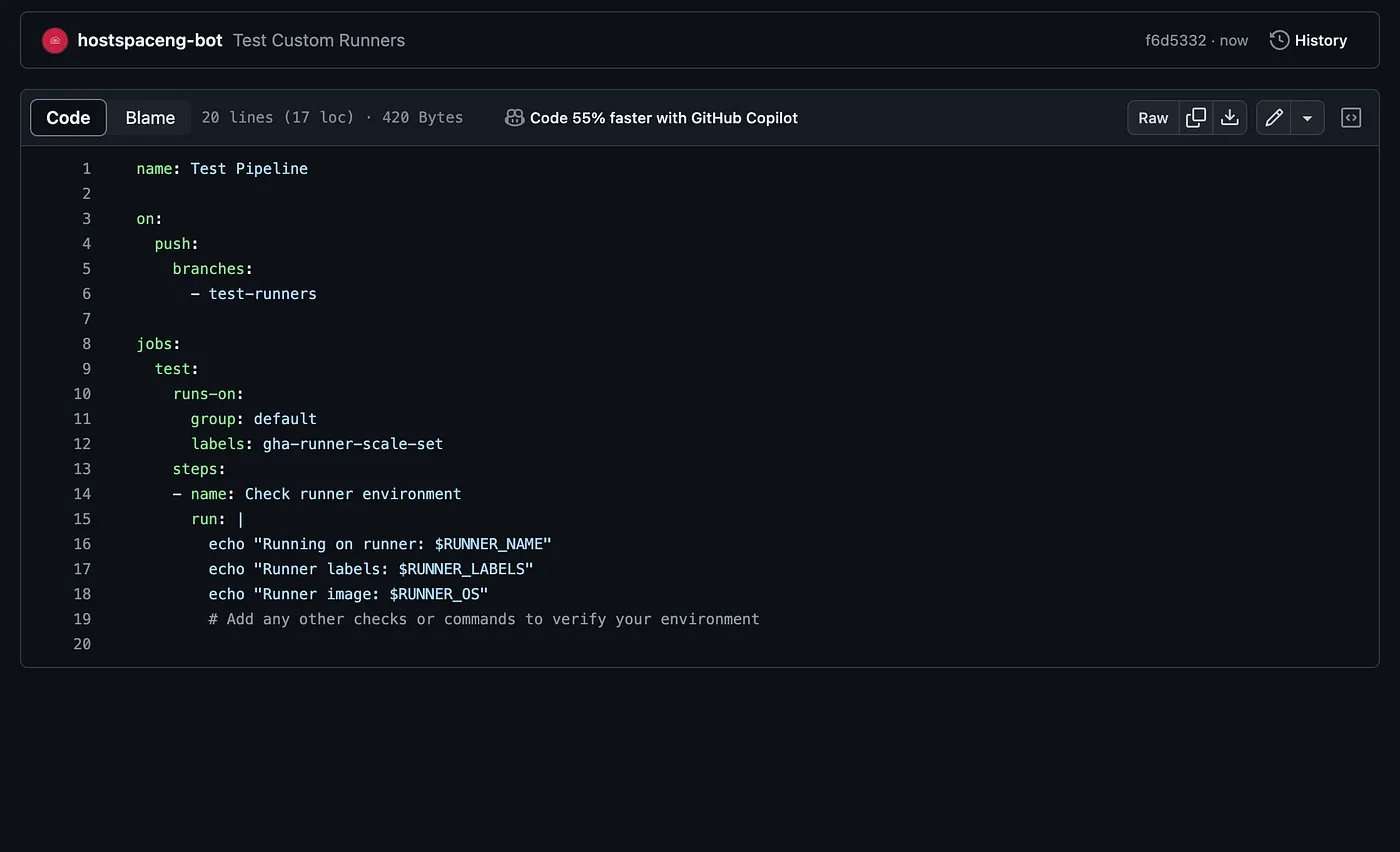
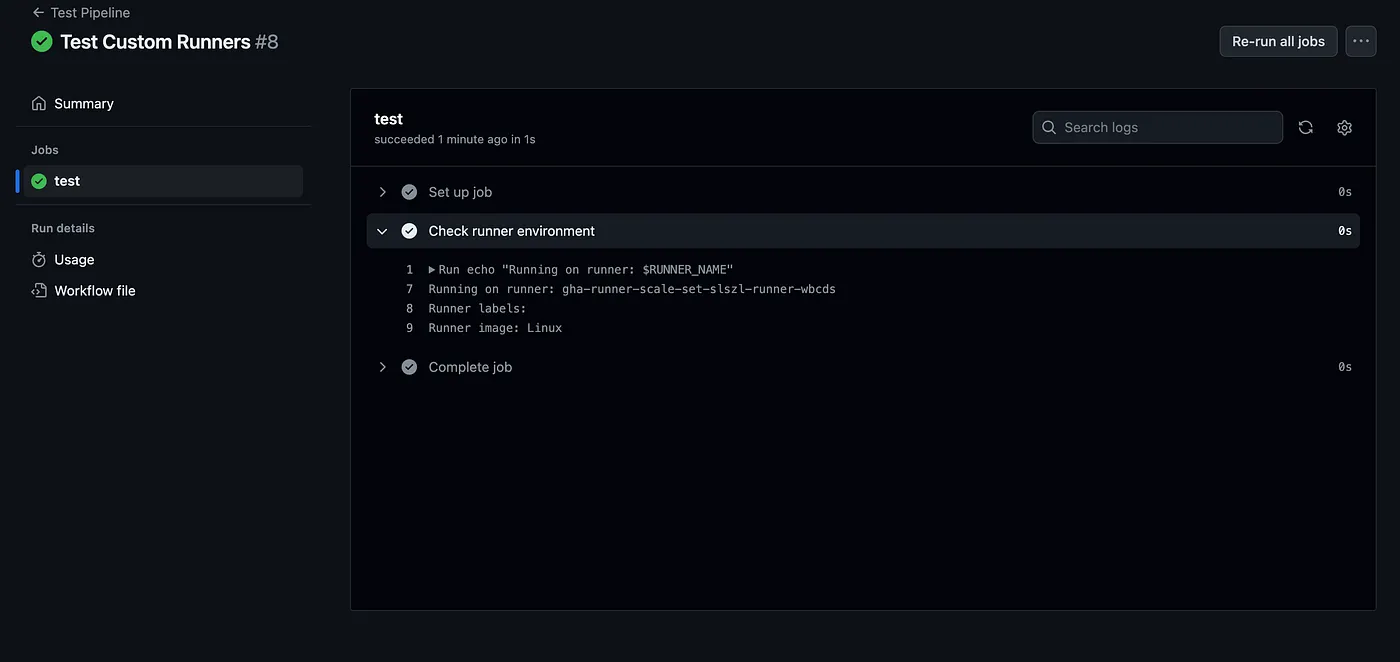
- Monitor the Workflow:
The workflow will automatically execute on the specified runner.
You can track its progress and output in the “Actions” tab of your repository.

Tips and Troubleshooting for Deploying Actions Runner Controller with ArgoCD
Tips:
- Use Secrets for Credentials: Store GitHub access tokens or App credentials in Kubernetes Secrets for enhanced security and easier management.
- Test and Validate your Manifests: Ensure your manifests are correct before syncing them to your cluster. Consider using tools like Helm lint or Kustomize for validation.
- Monitor ArgoCD and Kubernetes Logs: Keep an eye on ArgoCD UI and Kubernetes logs for deployment progress and potential issues.
- Start Small and Scale Gradually: Begin with a minimal runner scale set and gradually increase based on your workload demands.
- Utilize GitOps Best Practices: Leverage the power of Git for version control, collaboration, and automated deployments.
Troubleshooting:
- Connection Errors:
- Verify that ArgoCD can access your Kubernetes API server.
- Double-check the URL and namespace settings in your manifests. - Resource Creation Failures:
- Ensure the required Kubernetes resources (namespaces, service accounts, etc.) exist.
- Check for permission errors related to the service account used by the controller. - ArgoCD Sync Failures:
- Review the ArgoCD UI for detailed error messages.
- Consult the ArgoCD documentation for specific troubleshooting steps.
Conclusion:
ARC empowers you to take control of GitHub Actions runner costs and management while benefiting from autoscaling, declarative configuration, and GitOps integration. By following these steps and understanding the key concepts, you can successfully deploy ARC in your Kubernetes environment and optimize your GitHub Actions workflows.
This doesn’t end here, there will be next steps after the successful deployment
- Creating custom images for actions-runner-controller: Now that we have actions-runner-controller up and running, we need to think through the runner image some. You would want to install dependencies on the image eg Docker, Yarn, etc. — Article coming soon
Resources:
- Actions Runner Controller (ARC) Repository: https://github.com/actions/actions-runner-controller/releases
- Actions Runner Controller (ARC) Documentation: https://docs.github.com/en/actions/hosting-your-own-runners/managing-self-hosted-runners-with-actions-runner-controller/quickstart-for-actions-runner-controller
- ArgoCD Documentation: https://argocd-operator.readthedocs.io/en/latest/reference/api.html/
- Helm Documentation: https://helm.sh/docs/helm/
- GitHub App Authentication: https://docs.github.com/en/apps/creating-github-apps/registering-a-github-app/registering-a-github-app
