PyTorch Auto grad — quick reference
Hello there! Welcome back to Torch Thursdays series.
This blog assumes familiarity with PyTorch framework and basics of neural networks. In today’s blog, I will be sharing some tidbits for a quick look-up on PyTorch auto-grad functionality.

Neural networks (NNs) are a collection of nested functions that are executed on some input data. These functions are defined by parameters (consisting of weights and biases), which in PyTorch are stored in tensors.
Training a neural network has two steps:
Forward Propagation: In forward propagation, the neural network makes its best guess about the correct output. It runs the input data through each of its functions to make this guess.
Backward Propagation: In back-prop, the neural network adjusts or learns its parameters proportionate to the error in its guess. It does this by traversing backwards from the output, collecting the derivatives of the error with respect to the parameters of the functions (gradients), and optimizing the parameters using gradient descent.

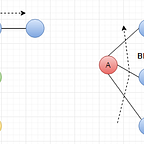
Fig 1. Forward and backward pass (Ref Book : Deep Learning with PyTorch)
When we perform backward pass to find the partial derivatives of loss function w.r.t models learning params (weights/ bias). These derivatives tell us what direction we have to adjust in order to minimize the loss. This involves iterative application of differential calculus (partial derivative computations — automatic differentiation) over every computational path of the graph as shown in Fig 1.
Auto-grad eases the computation of partial derivatives needed for backward propagation performed during training step in neural networks. It works by tracing computations at run time — this helps get accurate derivatives even with dynamic structures such as loops and conditions. Every output tensor carries a history of computations that led to it. This history allows rapid computation of derivatives over graph all the way up-to model weights.

Tracking grad functions
# create
a = torch.linespace(0., 2.* math.pi, steps=25, requis_grad= True)
b = torch.sin(a)
# when you print b, PyTorch shows a grad_fn argument = SinBackward indicating it came from a op that required grad.
c = 2 * bd = c + 1out = d.sum()# d.grad_fn.next_functions() can be used to check ops it came from.# in this example, a will be the leaf node/ input to graph, that does not have a grad function. represents the target vars for which we want to compute gradients. Intermediate tensors will not have gradients.
compute gradients
# all we need to do is call backward() on model output
out.backward()print(a.grad)  # only leaf nodes will have gradients (not intermediate tensors)
Autograd
Loss function :
- square of the euclidean distance between prediction and ideal output.
Optimizer :
- stochastic gradient descent — responsible for adjusting weights.
prediction = model(inputs)
loss = (ideal_out - prediction).pow(2).sum()
loss.backward()
# gradients are computed, not applied to weightsoptimizer = torch.optim.SGD(model, parameters, lr = 0.001)
# gradients guide optimizer to adjust weights to minimize loss.optimizer.step()
# updates weights in model.optimizer.zero_grad() # -- call after each train step --
# else gradients will accumulate over each batch, make sure to clear.
Turn off auto-grad
- use learning context manager options with torch.no_grad() / torch.enable_grad().
- You have an original tensor tracking the history but might need a copy of the tensor, that doesn’t need to maintain history — in this case original tensor needs to be detached from computation history using the detach() option during copy as shown below.
a = torch.rand(2, 3, requires_grad=True)
b = a.detach().clone() # detach first and then clone
# creates copy detached from computation history.
in-place operations on tensors that require grad, results in run-time error. because in-place operations could destroy info needed to perform grad computation/backward pass later.
Profiling
- you can use auto-grad profiler to profile backward pass.
with torch.autograd.profiler.profile(use_cuda=True) as prf:
    // do some computationsprint(prf.key_averages().table())
That’s it for this blog. As always, if you found this blog useful, don’t forget to drop some claps below— so it can reach more folks. Thank you! Also, don’t forget to follow @howsofcoding and come along~