Create a Beautiful Site Tracker App with Huawei Mobile Services (HMS)

HMS DEVELOPMENT
Let the friendly war begins.
Hello to you all. As you know, there is an ongoing legal battle between Google i.e USA and Huawei. And things are getting serious in the tech field as well. As you may have heard, Huawei stopped using Google Mobile Services (GMS) from a while on their mobile devices and developed its own Mobile Services which known as Huawei Mobile Services (HMS). It has all the abilities that GMS has except some minor features but those would be implemented in the near future thanks to its robust roadmap of Huawei Core team. And plus, you would get the unique features that only supported by the Huawei ecosystem and its devices. If you have GMS experience somehow, the implementation of HMS would be a piece of cake for you due to its API design is identical to GMS.
Actually, you might want to use HMS Core Toolkit Plugin for those who have GMS implementations on their apps and implement HMS with less effort and pretty UI 🦋. It has a Convertor feature that automatically changes all GMS package name occurrences with correct HMS mappings. This little Android Studio plugin would save you time rather than some manual labor. And also, it offers a couple of features that would make your HMS development more convenient. But this is up to you.
The number of Huawei Mobile Services aka HMS samples and articles are getting bigger and bigger each day goes by. You could find numerous samples easily and implement them into your app without effort. Different HMS articles release almost in a day such as JavaScript libraries so you will have a lot of options to choose from 😄. So enough chit chat, let’s get into the business.

In this article, I’m gonna show you how to build a site tracker app using Huawei Mobile Services (HMS). Much precisely tracker app for health institutions who do Coronavirus testing in Turkey. For that, we‘re going to use the list of institutions provided by the Minister of Health of Turkey’s website. I named the app COVID19HIT. I know, it does not sound nice 😑 but it stands for COVID-19 Health Institutions Tracker. That was the best and simple naming I could get for an app like this one. Apparently, I’m not good at naming apps 😄. Anyways, Before getting into the development, I would like to clarify things beforehand such as the app‘s aim, capabilities, and limitations. I would leave you with concise text that I used in my README file to answer those questions.
It’s an Android sample application that uses Huawei Mobile Services (HMS) to display and search health institutions around you that supports Coronavirus testing in Turkey. The default search radius is 10 km.
The project aims to how to use HMS in real-life applications. Our use-case is displaying all the near health institutions around you that have a certificate to test for Coronavirus. The list itself declared on the website of the Ministry of Health of Turkey. You can check the list out at the link below.
The official list of health institutions
We’re going to use
Analytics+Map+Location+SiteKits andDirectionsAPI to demonstrate their usage in this use-case. The application’s architecture pattern isMVVMwith modular project architecture. Currently, the project has 3 modules which areApp,BaseandNetworkmodules. Their usage and role differ as modules. And lastly, it developed with everyone’s favorite Kotlin Coroutine which is the language level supported feature.
After that huge boring explanation, I’ll give you short brief information about which Kits solve which use-cases for this app. And, you could click the kit name and see what is more they offer.
- Analytics Kit sends user events or properties via Analytics Kit
- Map Kit provides a visual map to discover what is around you and drawing 2D shapes
- Location Kit locates the user’s current location
- Site Kit shows nearby health institutions around 10 KM
- Directions API gets you directions based on the options that you select which are by walk, by a drive, and by bike options
Development
FYI, for the sake of the article’s goal, I would only focus on the HMS Development parts in the project. And also, you could ask me any other questions that you have in mind in the comments below.
⚠️ Each HMS Integration requires the same initial steps, to begin with. You could use this link to prepare your app before implementing features into it. Please, don’t skip this part. This is a mandatory phase. HMS Kits will not work as they should be without it.
After you finish your project’s initial steps, we’re ready to rock and roll.
My DI choice for this project would be Koin which I really recommend who codes in Kotlin. It really takes away all of the boilerplate jobs that Dagger brings on the table. Therefore, we start with Koin initialization in our custom application class’s onCreate() method.
Our module dependencies are in the app module’s com.yektasarioglu.covid19hit.di package.
This app has only two screens Home and Splash. Our entire logic underlies in Home screen. So, we would focus there mostly. Firstly, Map Kit has two ways to display a map i.e container in our app. The first one is using MapView in our XML which I did. Secondly, you could develop with MapFragment way too. This way of using prevents to call onStart(), onStop(), onResume(), onPause(), onDestroy(), onLowMemory(), and onSaveInstanceState(Bundle outState) methods in its Activity due to Fragment is tied to its parent Activity’s lifecycle. But I chose to use MapView rather than MapFragment. So I did call those Map Kit’s lifecycle methods in HomeActivity. You could choose whatever you want based on your needs. Then, we initialize our managers and request to get location updates at HomeActivity’s onCreate() via calling initialize() method of our ViewModel which takes Activity as a parameter.
As you would notice, we use ViewModel’s OnMapReadyCallback implementation rather than directly implementing it to Activity. In this case, our ViewModel provides the implementation somewhere else. You would see why we do that just below for a couple of reasons.
We are going to use Manager classes to encapsulate HMS kit implementations and call it in ViewModel. For our previous example above, ViewModel would only call the MapKitManager’s implementation of OnMapReadyCallback. This helps us to hide all the HMS implementation details in its class, enables us to make changes easily and prevents to propagate more code in HomeViewModel. This approach also suits SOLID principles, especially the Single-responsibility principle. I strongly recommend you to learn it if you don’t know what those are.
If you run the APK. You would see that the app has two different themes which are Light(Default) and Dark. I wanted to display different map styling for Dark Theme. This custom styling feature is supported by Map Kit. You could use this reference to make your own map style. Even, there is handy Huawei style tool that generates JSON style file based on your customization choices.
requestLocationUpdatesWithCallback() method’s callback result initiates our flow. Whenever the callback first time returns, we fetch our nearby health institutions with filtered fashion.
getNearbyHealthInstitutions() does all the work. In a basic sense;
- Get health institutions
- Filter only the exact matching ones with user location’s city
- Search nearby hospitals with the help of Site Kit
- Compare the filtered list with the result of Site Kit
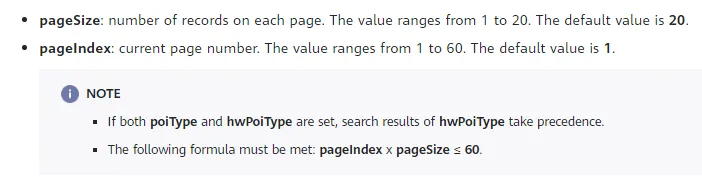
addNearbyHospitals() returns its result to onEnd(List<Site>) lambda parameter does the post-process after its call. This enable us to get the max result which is 60. We loop until the nearbyHealthInstitutions’ element count is 60. Checking of pageIndex x pageSize ≤ 60 formula under the isInTheRangeOfMaxResult(Int, Int) method.
Then, we compare the nearby hospital list with official health institutions. This comparison’s result is our final list that we would mark it on the map. A comparison algorithm is just a basic token comparison. It uses the Levenshtein distance method to compare two strings. Nowadays, you don’t have to be a math genius to use these methods thanks to StackOverflow. But as an enthusiast, you might go and learn how the Levenshtein distance algorithm works in the first place. Before getting into the next phase, I would like to mention about data fetching layer. Under the hood, the data fetching mechanism designed to get data from a Repository. A repository method returns a result if the data wasn’t cached. Repository Pattern is another good old design pattern that you should learn if you didn’t know. It simplifies the data fetching layer of your app. You should check this link out if you’re interested in. Data collection of the app is not so robust due to the Ministry of Health of Turkey changes its HTML so often 😅. As you would guess, all we do is some basic web scraping. As you were reading, the Ministry of Health of Turkey might change its website’s HTML some of two. And that would lead to corrupt scraped data and cause you to see fewer health institutions or nothing at all. Unfortunately, there is no REST API for getting certified health institutions in Turkey. That is all we have for now I am afraid. If you find a stable REST API for getting certified health institutions in X country. The country does not matter as long as the data is stable, just let me know. Or you could implement it on your own and contribute it to the sample project. I would gladly accept your contribution to the project.
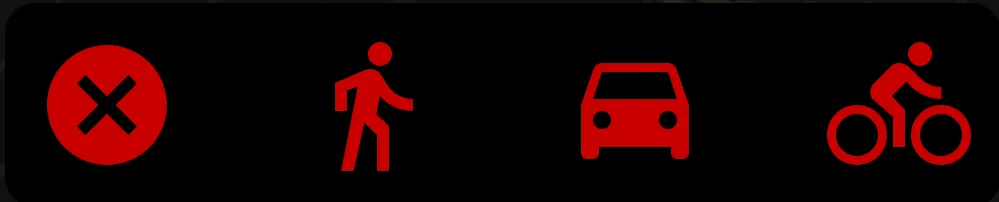
Our last demonstration would be how to navigate to your destination point from your current location. For that, the app only offers a simple display of directions at this moment. No fancy or complex features are supported for the sake of the simplicity of our app’s context. As you would see above, there is a compound component and each component’s action would provide 3 different routes(walking/driving/bicycling). At that point, Directions API would come to rescue from our train of thoughts about how to get directions. Then, these directions would be displayed on the map with drawing polylines till the destination point via MapKit. And that would pretty much do the job in a nutshell.
🎈 Bonus Resource
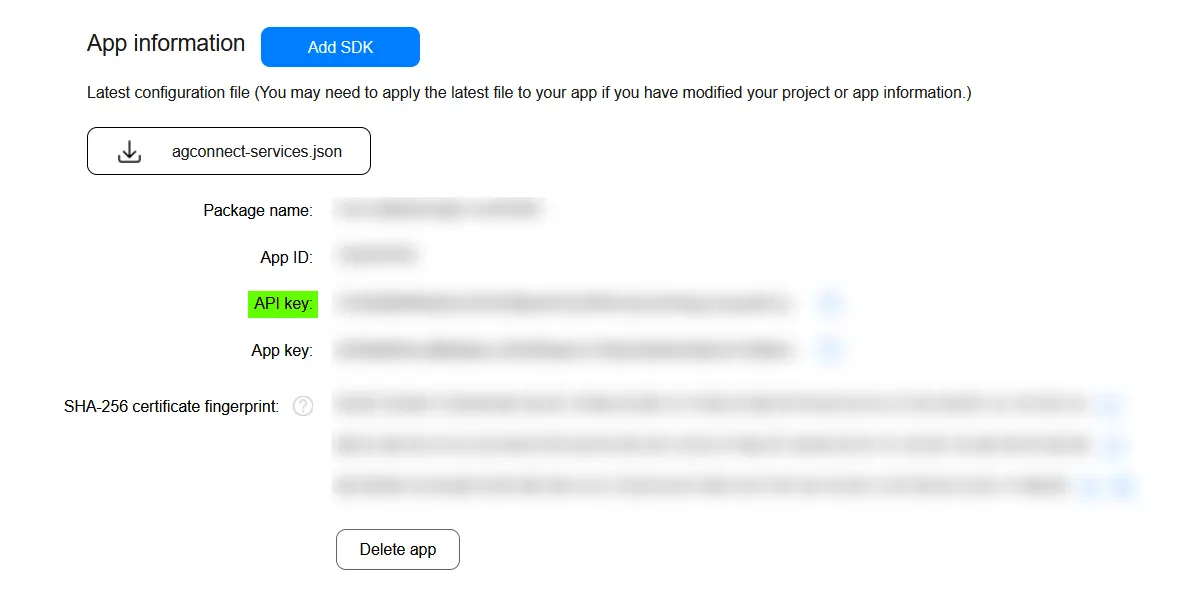
I created also Postman collections for both Directions and Matrix APIs to observe all the endpoints. All you have to do is create an empty project under my projects section in AppGallery Connect. Then use this field as your API Key like the above image to test it.
After we fill stepList variable with the response. Our code block in the onLocationResult callback method which is the below would be triggered. This code block below exists in the article as the sixth gist but in the terms of laziness, I made this as another gist. Who likes to scroll up in a long article, right 😅? As we know, requestLocationUpdatesWithCallback() method’s callback invokes after each x interval. That would cause a rotate camera to the current direction.
Github Repository
That is it for this article. You could search any question that comes to your mind via Huawei Developer Forum. And lastly, you could find lengthy detailed videos at Huawei Developers YouTube channel. These resources diversify learning channels and make things easy to pick and learn from a huge knowledge pool. In short, there is something for everybody in here 😄. Stay tuned for more HMS Development resources. Thanks for reading. Be safe folks.